background image

U S E R   M A N U A L   /
M A N U A L   D ’ U T I L I S AT I O N  

RAIS Rondo

RAIS Mino II

RAIS Mino II Soapstone / Stéatite

Summary of Contents for MINO II

Page 1: ...U S E R M A N U A L M A N U A L D U T I L I S AT I O N RAIS Rondo RAIS Mino II RAIS Mino II Soapstone Stéatite ...

Page 2: ...G 7 ALTERING THE CHIMNEY CONNECTION 8 9 INSTALLATION OF SOAPSTONE RAIS MINO SOAPSTONE 10 11 CLEARANCES TO COMBUSTIBLE WALLS 12 CLEARANCES TO NON COMBUSTIBLE WALLS 12 FLOOR PROTECTION 13 FIREWOOD 13 DRYING AND STORING 13 CONTROL 13 USING THE STOVE 14 ADJUSTING THE AIR CONTROL 14 ADJUSTING THE COMBUSTION AIR 15 FIRST FIRE 15 LIGHTING AND STOKING 16 FUEL CAUTION 17 CARE AND MAINTENANCE 17 CLEANING TH...

Page 3: ...MENT DE LA CHEMINEE 27 28 INSTALLATION DE STÉATITE RAIS MINO STÉATITE 29 30 DISTANCES A DES PAROIS COMBUSTIBLES 31 DISTANCES A DES PAROIS NON COMBUSTIBLES 31 PROTECTION DE SOL 32 BOIS A BRULER 32 SECHAGE ET STOCKAGE 32 CONTROLE 32 UTILISATION DU POELE 33 REGLAGE DE L ARRIVEE D AIR 33 REGLAGE DE LA COMBUSTION D AIR 34 PREMIER FEU 34 ALLUMAGE ET ENTRETIEN DU FEU 35 PRECAUTIONS A PRENDRE 36 ENTRETIEN...

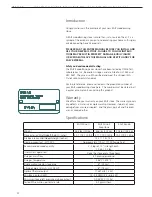
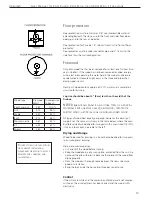
Page 4: ...he number must be stated in all inquiries or complaints concerning this product Warranty We offer a five year warranty on your RAIS stove The warranty covers any defects in materials or workmanship However it does not cover damage from misuse or neglect and the glass gaskets and firebricks are not covered either Specifications RAIS Mino II RAIS Mino II Soapstone RAIS Rondo Weight 265 lbs 120 kg 456 l...

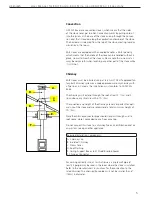
Page 5: ...em or a code approved masonry chimney with a flue liner In Canada the installation must conform to CAN CSA B365 The chimney must extend through the roof at least 3 1m and 2 6m above any structure within 10 3m The condition and height of the chimney are very important for opti mal use of the stove and we recommend a total minimum height of 10 3m Note the chimney connector pipe should not pass throug...

Page 6: ...e of any mechanical fans e g kitchen or bathroom exhaust systems that may affect the proper draw Make sure that the floor and the sub floor of the room in which the stove is installed is designed to carry the extra weight of the stove The floor protector plate must be made of a non combus tible material The floor protection plate must lie under the stove and extend 16 41cm 18 45cm in Canada in front o...

Page 7: ...7 US English User Manual for RAIS Rondo RAIS Mino II and RAIS Mino II Soapstone Tested Beaverton Listed by Oregon US OMNI Test Laboratories Inc ...

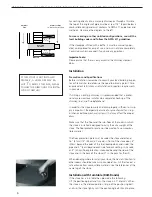
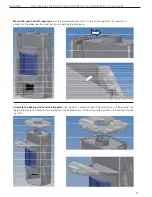
Page 8: ...ey connec tion but it can easily be altered for backmounting by doing the following Remove the three smoke chicane plates Please see the section on Cleaning and Maintenance To remove the top retainer unscrew the two M6 nuts with a wrench Now you have free access to the smoke chamber of the stove Please note that the top retainer is to be remounted to the rear smoke exit with the flue collar ...

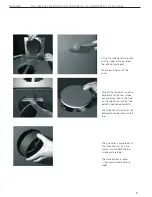
Page 9: ...cover Take off the the gasket and the blind plate for the rear smoke exit and place them in the hole on the top Make sure that the gasket is positioned correctly Use three M6 nuts to fasten the blind plate and gasket onto the top The flue collar is mounted with the three M6 nuts The two lower nuts also hold the top smoke plate retainer The smoke chicane system is then remounted in reverse order ...

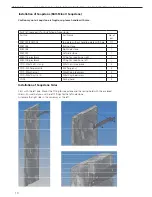
Page 10: ...apstone Cautionary note Soapstone is fragile so please handle with care Parts list loose parts for installation of soapstone Part No Part Name No of pcs 9057001 9057002 Top plate without hole top plate with hole 1 1 9057004 Baking stone 1 5057006 Right side stone 1 9057007 Left side stone 1 9050118 grey black Fitting for soapstone right 1 9050109 grey black Fitting for soapstone left 1 0110 M5x12a...

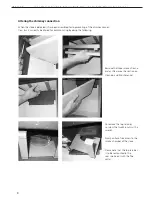
Page 11: ...to the spring hold the soapstone is turned into the proper position and the spring is held by the back panel Assemble the baking stone and the top plate The top plate is placed on top of the side stones In the bottom of the top plate there are two holes that are placed over the pointed screws The baking stone is placed in the centre of the bak ing shelf ...

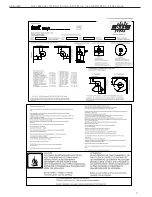
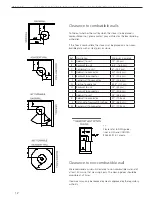
Page 12: ... cm D Sidewall to connector 20 50 8 cm E Backwall to connector 12 30 5 cm F Cornerwall to connector 14 35 6 cm G Ceiling to appliance 43 5 111 cm H Backwall to unit 13 33 cm I Backwall to connector 20 50 8 cm J Sidewall to unit 34 86 4 cm K Sidewall to connector 41 104 cm L Distance to frontwall furnishing 34 86 4 cm M Cornerwall to connector 41 104 cm Clearance to non combustible wall We recommen...

Page 13: ...INTED WOOD ARTIFICIAL LOGS OR NON SEASONED WOOD All types of wood heat equally per pound however the density of wood is not the same as is shown in the table below where the com bustible value of wood dried for two years with a moisture of 15 20 is taken into account See table to the left Drying and storage Wood to be used for burning in a stove should be dried for two years to ensure optimal burn...

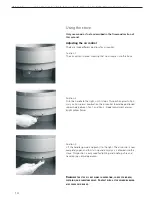
Page 14: ...tops This position gives full pri mary air For normal combustion the air control should be positioned somewhere between Pos 1 and Pos 2 Proper adjustment ensures bright yellow flames Position 3 Lift the handle upward and push it to the right The air control is now completely open and full start up and primary air is allowed into the stove This position is only used for lighting and kindling a fire a...

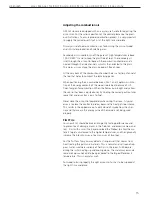
Page 15: ... suf ficient oxygen for combustion When the flames burn bright and yellow the control has been adjusted correctly Finding the correct position takes some trial and error but is easy to find Never close the air control completely when using the stove A typical error is to close the control too soon because the heat gets too intense This results in the appearance of a dark cloud of smoke from the chim ...

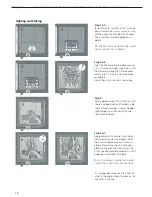
Page 16: ...door completely Adjust the air control later if necessary Step 5 After approximately 10 20 minutes until there is a good quantity of embers add two or three more logs Leave the door slightly open until they catch fire and then close the door Step 6 7 Approximately five minutes later when the flames burn clear and bright close the air control gradually but not com pletely Never close the air intake co...

Page 17: ...r surfaces can be wiped with a soft dry rag and if needed a small amount of mild detergent NEVER scrub the surfaces Cleaning the soapstone Day to day cleaning can be made with a damp rag If necessary the soapstone can be carefully cleaned with some paint thinner from the hardware store For difficult stains that cannot be dissolved by the paint thinner lightly sand them Cleaning the combustion chamb...

Page 18: ...s The wood is too damp Make sure that the stove is sufficiently heated up before closing the door The air control has been set too low The stove burns too quickly Gasket may not be tight please check and replace if necessary Chimney draft maybe too high 22 Pa if this is the case please install a damper The stove is burning too slowly Not sufficient amount of firewood Not enough air is getting into th...

Page 19: ...sed the warranty is void RAIS Rondo Soapstone top plate without hole Part no 505700170 RAIS Rondo Soapstone top plate with hole Part no 505700270 RAIS Rondo Soapstone baking plate Part no 505700470 RAIS Mino Soapstone top plate without hole Part no 905700170 RAIS Mino Soapstone top plate with hole Part no 905700270 RAIS Mino Soapstone baking plate Part no 905700470 ...

Page 20: ...090 505179595 RAIS Rondo Turntable and turntable pipe connection Part no 814753690 814753695 RAIS Rondo Mino Gasket set Part no 5055500 All replaceable parts can be obtained as spare parts from your local RAIS dealer We also recommend you see the enclosed spare parts drawings for the individual products ...

Page 21: ...t soapstone side 5 1 905700470 Soapstone baking plate 6 1 9041090 95 Door 7 5052200USA Set of Skamol stones 8 5055500 Gasket set RAIS Mino II Pos Number Part No Description 1 1 905700170 Soapstone top plate without hole 2 1 905700270 Soapstone top plate with hole 3 1 9040601SORT GRÅ Top plate without hole 4 1 9040602SORT GRÅ Top plate with hole 5 1 905700470 Soapstone baking plate 6 1 9041090 95 D...

Page 22: ...70 Soapstone top plate without hole 2 1 505700270 Soapstone top plate with hole 3 1 505060190 95 Top plate without hole 4 1 505060290 95 Top plate with hole 5 1 8142390 95 Turn table pipe connection 6 1 505700470 Soapstone baking plate 7 1 5051090 95 Door 8 5052200USA Set of Skamol stones 9 5055500 Gasket set 10 5051590 95 Turn Table ...

Page 23: ...it être indiqué lors de toute question ou réclamation concernant ce produit Garantie Nous proposons une garantie de cinq ans sur votre poêle RAIS Cette ga rantie couvre tous les défauts de matériau ou de main d œuvre Cepen dant elle ne couvre pas les dommages dus à une mauvaise utilisation ou à une négligence ni la vitre les joints et les briques réfractaires RAIS Mino II RAIS Mino II Stéatite RAI...

Page 24: ... rapport à toute structure située à moins de 10 3 m Les caractéristiques et la hauteur de la cheminée jouent un rôle très important dans l utilisation optimale du poêle et nous recommandons une hauteur totale de 10 3 m Remarque Le tuyau de connexion de la cheminée ne doit pas traverser de grenier d espace sous toit d armoire d espace confiné de plancher ou de plafond Evitez de connecter ce poêle à ...

Page 25: ...ent susceptibles d affecter la qualité du tirage Vérifiez que le sol et le sous sol de la pièce dans laquelle le poêle est installé sont conçus pour supporter la surcharge pondérale due au poêle Le protecteur de sol ou la plaque doivent être fabriqués à l aide d un matériau non combustible La plaque de sol doit couvrir la partie située sous le poêle et dépasser de 16 41 cm 18 45 cm au Canada devant...

Page 26: ...Français canadien Manuel d utilisation des modèles RAIS Rondo RAIS Mino II et RAIS Mino II Stéatite 26 Tested Beaverton Listed by Oregon USA OMNI Test Laboratories Inc ...

Page 27: ...e cheminée mais il peut facilement l être pour un montage arrière de la façon suivante Retirez les trois petites plaques de chicane reportez vous à la section Nettoyage et Main tenance Pour retirer l arrêtoir du haut dévissez les deux écrous à l aide d une clé Vous avez désormais accès à la chambre à fumée du poêle Remarque L arrêtoir du haut doit être remonté sur l évacuation de fumée arrière à l...

Page 28: ...vez le joint et la plaque aveugle de l évacuation de fumée arrière et placez les dans l orifice du haut Vérifiez que le joint est bien en place Fixez la plaque aveugle et le joint à la par tie supérieure à l aide de trois écrous M6 Le collier de conduit est monté avec les trois écrous M6 Les deux écrous du bas retiennent également l arrêtoir de plaque de fumée du haut Remettez ensuite en place le sy...

Page 29: ...9 grey black Raccord pour stéatite gauche 1 0110 M5x12afst stang Entretoise M5x12 2 0110 M5 flangemøtrik Ecrou de manchon M5 2 0110 M5x40 pinol Vis pointue M5x40 2 0110 M5x10 cyl rå lh Vis cylindrique M5x10 4 70 03 Support à ressort 2 Installation de stéatite RAIS Mino II stéatite Attention La stéatite est fragile et doit donc être maniée avec précaution Installation de parois en stéatite Commencez...

Page 30: ...fournies La stéatite se met en place grâce au support à ressort et le ressort est maintenu par le panneau arrière Montez la pierre à four et la plaque supérieure La plaque supérieure est placée au dessus des briques latérales Au fond de la plaque supérieure il y a deux trous situés au dessus des vis pointues La pierre à four est placée au centre de l armoire de cuisson ...

Page 31: ...cteur 20 50 8 cm E Paroi arrière à connecteur 12 30 5 cm F Paroi de coin à connecteur 14 35 6 cm G Plafond à l appareil 43 5 111 cm H Paroi arrière à unité 13 33 cm I Paroi arrière à connecteur 20 50 8 cm J Paroi latérale à unité 34 86 4 cm K Paroi latérale à connecteur 41 104 cm L Distance à paroi avant mobilier 34 86 4 cm M Paroi de coin à connecteur 41 104 cm Veuillez consulter les directives d...

Page 32: ...U CHES ARTIFICIELLES OU DU BOIS NON ENTREPOSE Tous les types de bois ont le même pouvoir calorifique par livre cependant la densité du bois n est pas la même comme indiqué dans le tableau ci dessous qui reflète la valeur de combustion d un bois séché pendant deux ans avec un taux d humidité de 15 20 Voir tableau de gauche Séchage et entreposage Le bois utilisé dans un poêle doit être séché pendant d...

Page 33: ...débit d air maximum Pour une combustion normale l arrivée d air doit être placée entre la position 1 et la position 2 Si le réglage est correct le feu dégage des flammes jaunes brillantes Position 3 Soulevez la poignée et poussez la vers la droite L arrivée d air est désormais complètement ouverte et le poêle reçoit l intégralité de l air de démarrage et d air primaire Cette position n est utilisée...

Page 34: ...ions 1 et 2 Des flammes brillantes et jaunes indiquent un bon réglage de l arrivée d air La recherche de la bonne position s effectue par essais et erreurs mais est relativement facile à effectuer Ne fermez jamais complètement l arrivée d air lorsque vous utilisez le poêle Une erreur type consiste à fermer l arrivée d air trop tôt parce que la température devi ent trop élevée Conséquence la cheminé...

Page 35: ...d air si besoin est Etape 5 Au bout d environ 10 20 minutes une fois la quantité de braises suffisante ajoutez deux ou trois bûches sup plémentaires Laissez la porte entrouverte jusqu à ce qu elles prennent puis refermez la Etapes 6 7 Environ cinq minutes plus tard une fois les flammes claires et vigoureuses fermez petit à petit l arrivée d air mais pas complètement Ne fermez jamais complète ment l ...

Page 36: ...doux et sec et le cas échéant un petit peu de détergent dilué Ne grattez JAMAIS les surfaces Nettoyage de la stéatite Le nettoyage au jour le jour peut être effectué à l aide d un chiffon humide Au besoin la stéatite peut être soigneusement nettoyée à l aide d un diluant à peinture quelconque du commerce Les tâches résistantes impossibles à dissoudre à l aide du diluant peuvent être nettoyées au p...

Page 37: ...humide Vérifiez que le poêle est suffisamment réchauffé avant de refermer la porte L arrivée d air est mal réglée trop faible Le poêle brûle trop fort Le joint n est peut être pas étanche Vérifiez le et remplacez le si besoin est Le tirage de la cheminée est trop élevé 22 Pa Si c est le cas installez un coupe tirage Le poêle brûle trop lentement Quantité de bois à brûler insuffisante Le poêle ne reçoi...

Page 38: ...arantie n est plus valable RAIS Rondo Plaque supérieure en stéatite sans trou Réf pièce 505700170 RAIS Rondo Plaque supérieure en stéatite avec trou Réf pièce 505700270 RAIS Rondo Plaque à four en stéatite Réf pièce 505700470 RAIS Mino Plaque supérieure en stéatite sans trou Réf pièce 905700170 RAIS Mino Plaque supérieure en stéatite avec trou Réf pièce 905700270 RAIS Mino Plaque à four en stéatit...

Page 39: ... tournante et connexion de tuyau de table tournante Réf pièce 814753690 814753695 RAIS Rondo Mino Jeu de joints Réf pièce 5055500 Toutes les pièces remplaçables peuvent être obtenues sous forme de pièces détachées auprès de votre distributeur RAIS local Nous vous recommandons également d examiner les diagrammes de pièces détachés joints aux différents produits ...

Page 40: ...supérieure avec trou 5 1 905700470 Plaqué à four en stéatite 6 1 9041090 95 Porte 7 5052200USA Jeu de briques en Skamol 8 5055500 Jeu de joints Diagrammes de pièces détachées RAIS Mino II Stéatite Pos Numéro Réf pièce Description 1 1 905700270 Plaque supérieure en stéatite avec trou 2 1 90570070 Plaque supérieure en stéatite sans trou 3 1 905700670 Côté en stéatite droit 4 1 905700770 Côté en stéa...

Page 41: ...ieure en stéatite sans trou 2 1 505700270 Plaque supérieure en stéatite avec trou 3 1 505060190 95 Plaque supérieure sans trou 4 1 505060290 95 Plaque supérieure avec trou 5 1 8142390 95 Connexion de tuyau de table tournante 6 1 505700470 Plaqué à four en stéatite 7 1 5051090 95 Porte 8 5052200USA Jeu de briques en Skamol 9 5055500 Jeu de joints 10 1 5051590 95 Table tournante ...

Page 42: ...Français canadien Manuel d utilisation des modèles RAIS Rondo RAIS Mino II et RAIS Mino II Stéatite 42 ...

Page 43: ...Français canadien Manuel d utilisation des modèles RAIS Rondo RAIS Mino II et RAIS Mino II Stéatite 43 ...

Page 44: ...RAIS A S Industrivej 20 DK 9900 Frederikshavn www rais com ...

Reviews: