Envirogard Products Limited
446 Major Mackenzie Dr. E., Unit 6, Richmond Hill, ON L4C 1J2 Canada
P.O. Box 64, Richmond Hill, ON L4C4X9 Canada
© Copyright 2008 * Envirogard Products Limited * All rights reserved
R519/R830/R830F E Lamp Inst. Jan /08
Thank you for purchasing one of our UV Replacement Lamps. We are committed to ensuring your total satisfaction with the product.
If you have any problems, don't go back to the store - Please give us a call!
HELP LINE: 1-800-667-8072 TORONTO & AREA: 905-884-9388 Web Site: www.rainfresh.ca
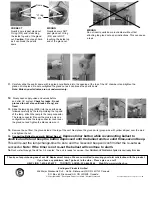
Dome
“O” ring
515
CORRECT
Quartz dome is past gland nut
O-ring (515) and is touching
the inside top end of the gland
nut.
Caution
: Do not push hard
as it can break the quartz
dome.
WRONG
Quartz dome is NOT
past gland nut O-ring
(515) and is NOT
touching the inside top
end of the gland nut.
WRONG
Do not insert quartz dome in chamber without first
attaching top gland nut as per instructions. This can cause
a leak.
12.
Slowly open supply-valve and valves before
and after UV system.
Check for leaks. Do not
proceed to next step until leaks (if any) are
fixed.
13.
Slide the lamp spring (4036) into the quartz dome
followed carefully by the lamp. Holding the top end
of the lamp, attach the lamp to the lamp connector.
The lamp connector fits over the pins in only one
configuration. Slide the lamp connector cover over
the gland nut and tighten the black screw on it.
14.
Remove the nut from the ground stud at the top of the unit. Next place the ground wire (green wire with yellow stripes) over the stud
and tighten the nut.
15. Connecting Ballast to power &
Ballast Re-set
:
Depress timer button while reconnecting ballast to
electrical outlet and keep the button depressed until the ballast emits a solid three-second beep.
This will re-set the lamp-change-timer to zero and the 3-second beep will confirm that the re-set was
successful.
Note: If the timer is not re-set the ballast will conitnue to alarm.
16.
Flush water through the UV for 2-3 minutes. The unit is ready for service.
Your Rainfresh UV Disinfection System is now ready for service.
11.
Carefully slide the quartz dome with top gland nut attached into the opening at the top of the UV chamber. Hand-tighten the
gland nut into place. Do not overtighten the gland nut as it can break the quartz dome.
Note: Broken quartz domes are not under warranty.


