


CONNECT
120 VAC
RESET
ACCESSORY
1 2 3 4 5 6 7 8
24VAC
SENS
C M
AUTO
OFF
MANUAL
NEXT
STATUS
ACTIVE
TERMINAL
JUMPER WIRES
3
3.
Select “Add Controller” to begin the set-up wizard.
Set Date and Time
• When the controller is connected to WiFi, it will automatically set the date and time
according to the local WiFi network settings. In the event of a power outage, the date
and time will default to the local WiFi network settings.
• If a local WiFi network is not available at setup and the controller is connected to the Rain
Bird App in AP Hotspot mode, the controller will default to the date and time in the mobile
device settings. In the event of a power outage, the date and time will need to be manually
reset by reconnecting the controller to your mobile device through AP Hotspot mode.
Create a Watering Schedule
1. ADD PROGRAM(S): This controller is scheduled using up to three programs (A, B and C).
Basic programs include instructions on watering days, start times and durations.
In the Rain Bird App, add a new program by sel PGM and an available program.
NOTICE
• The first time you connect to the controller, the Rain Bird App will reflect the default
program assigned to the controller. You can choose to retain, change, or set up a new
program.
• Programming is stored in non-volatile memory and will remain in the controller in the
event of a power outage.
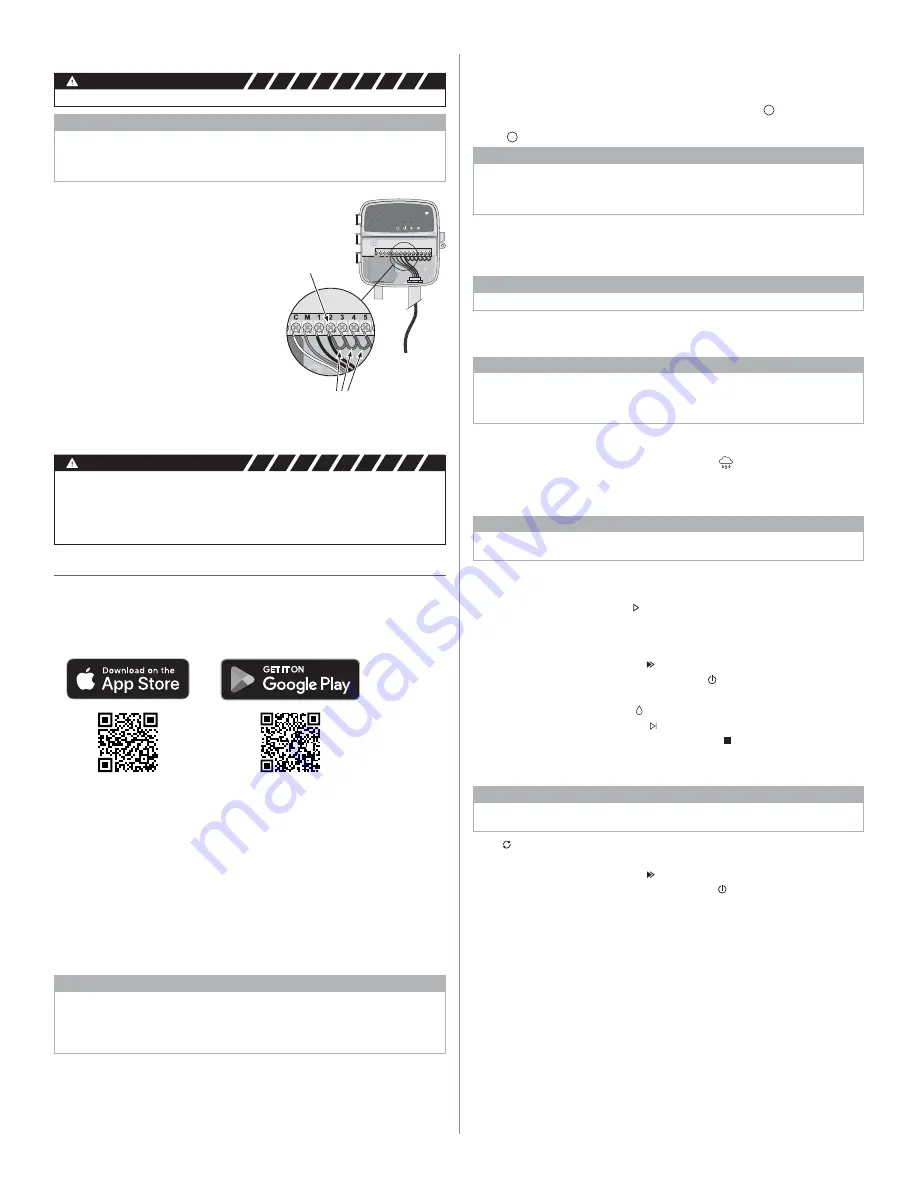
Connect Pump Start Relay (optional)
WARNING
DO NOT route the pump start relay wires through the same opening as the power wires.
NOTICE
• A pump start relay connects to the controller in the same way as a master valve, but
connects differently at the water source.
• This controller DOES NOT provide power for a pump. A relay must be wired according to
pump manufacturer’s installation instructions.
1.
Using a direct burial cable, connect one of the
wires from the pump start relay to the master
valve terminal (M).
2.
Connect the remaining wire from the pump
start relay to the common terminal (C).
3.
To avoid possible pump damage in the event
run times are assigned to unused zones,
connect a short jumper wire from all unused
zone terminals to the nearest zone terminal
in use.
4.
For detailed installation and operation of
pump start relay, refer to pump manufacturer’s
installation instructions.
Connect Power
• The controller can be installed indoors or
outdoors (if plugged into a weatherproof
external outlet).
• The controller has an internal transformer that reduces supply voltage from 230 V
∿
to
24 V
∿
. You will need to connect power supply wires to the transformer’s three wires (live,
neutral, ground). Refer to “Connect Fixed Wiring” section for installation details.
WARNING
• Electric shock can cause severe injury or death. Ensure power supply is turned OFF before
connecting power wires.
• DO NOT plug in or apply power to the controller until you have completed and checked
all wiring connections.
• Disconnect or turn off the external power source before connecting or disconnecting
wires to the controller.
Programming
Add a New Controller to the Rain Bird App
1.
Before mounting new controller, check the WiFi signal at controller.
• Verify minimum signal strength of two bars at controller.
• Mount controller closer to router or add signal booster if needed.
2.
Download and launch the Rain Bird App.
2.
SET PR
OGRAM START TIME(S): This controller is scheduled using up to four
independent start times per program. The start time(s) is the time of day at which
the program will begin. Each start time will run every zone for its scheduled duration
within that program.
• In the Rain Bird App, add a program start time by selecting the + icon.
• Set the zone(s) and watering duration(s) associated with the start time by selecting
the + icon.
NOTICE
Start times apply to the entire program, not individual zones. Depending on landscaping
needs, multiple start times may be assigned for that program. Once the start time is set,
the controller begins the watering cycle with the first zone; the other zones in the program
follow in sequence.
3.
SET PROGRAM RUN DAYS: Run days are the specific days of the week in which
watering occurs.
In the Rain Bird App, set the watering frequency by selecting Odd (days of the week),
Even (days of the week), Custom or Cyclic (specific intervals).
NOTICE
Watering days apply to the entire program, not the individual zones.
4.
SEASONAL ADJUST changes the watering duration (as a percent) for all zones
associated with run times in an individual program. This may be manually adjusted in
the Rain Bird App using the slider in the program settings.
NOTICE
• The controller must be connected to WiFi to make automatic adjustments.
• An adjustment value of 100% is representative of irrigation during the average hottest
time of year, so even if you’re experiencing warm weather on a summer day, you may not
see an adjustment above 100%.
5.
RAIN DELAY: In the Rain Bird App, manually turn off automatic watering for a fixed
number of days when it rains even without a rain sensor.
• Suspend watering for up to 14 days by selecting the icon in the controller
settings.
• Slide the bar to the desired number of days to delay automatic watering.
• Select “Save” to store the setting.
NOTICE
The maximum numbers of days to delay watering is 14. After the days expire, automatic
irrigation will begin again according to the programmed schedule.
Manual Watering
ON THE CONTROLLER
• To start manual watering, press the button.
• As a default, each zone will run for 10 minutes; you can choose to retain or change the
watering duration in the Rain Bird App.
• The blinking LED will give indication for which zone is active.
• To advance to the next zone, press the button.
• To stop manual watering on the controller, press the button.
IN RAIN BIRD APP
• To start manual watering, select the icon and select manual watering preferences.
• To advance to the next zone, select the icon.
• To stop manual watering in the Rain Bird App, select the icon.
Automatic Watering
ON THE CONTROLLER
NOTICE
When operating in automatic mode, each program will run according to the start times, run
days, and run times for each zone in sequence until all scheduled watering has been run.
• Press to start automatic watering according to scheduled program(s).
• The blinking LED will give indication for which zone is active.
• To advance to the next zone, press the button.
• To stop automatic watering on the controller, press the button.
IN RAIN BIRD APP
The Rain Bird App offers a toggle to switch between automatic watering and off status.
Apple and the Apple logo are trademarks of Apple Inc., registered
in the U.S. and other countries. App Store is a service mark of
Apple Inc. Google Play is a trademark of Google Inc.
rain-bird.com.ua