background image

7

RailKing RS-3 Diesel Engine

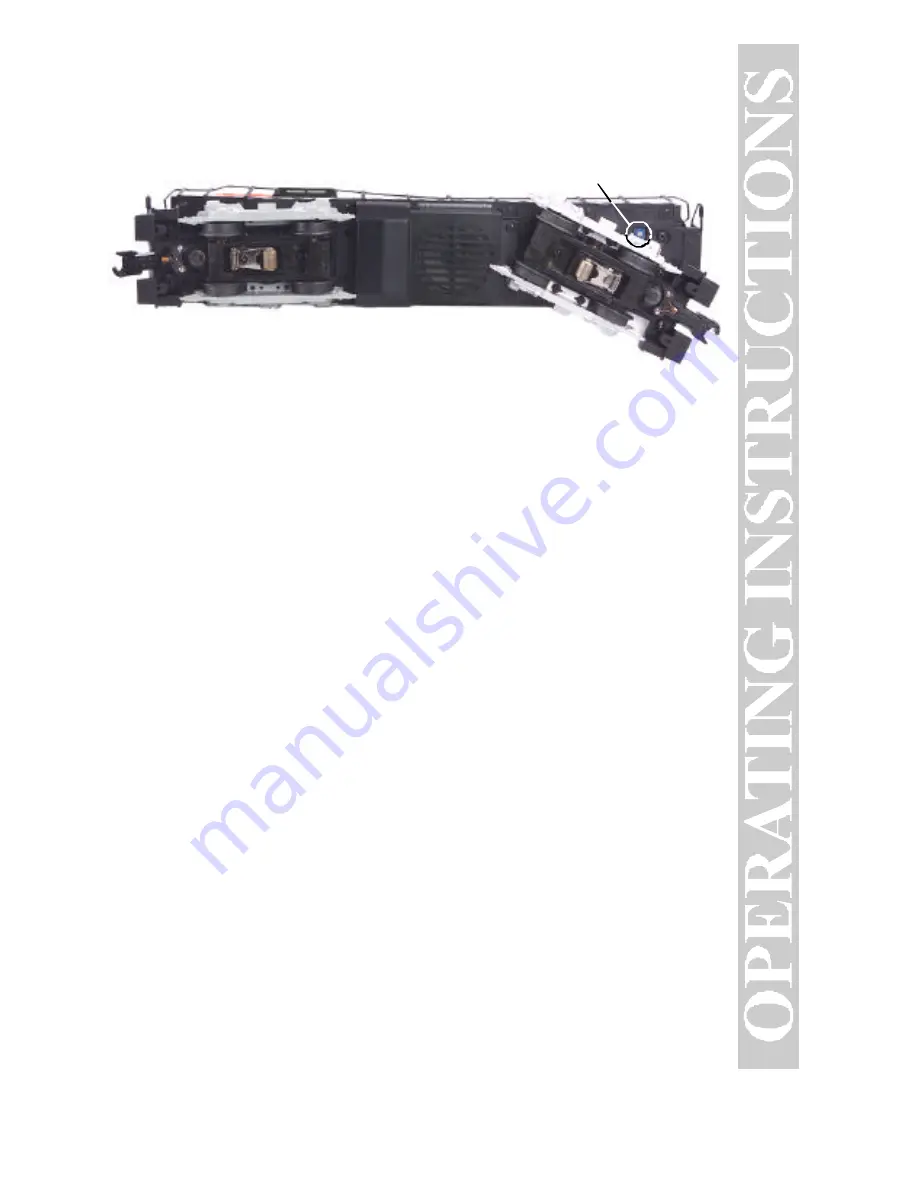
Volume Control 

 To adjust the volume of all sounds made by this

engine, turn the master volume control knob located under the engine
clockwise to increase the volume and counter-clockwise to decrease the
volume (see Fig. 1).

Loco-Sound

Volume Adjustment Knob

Figure 1. Location of the Loco-Sound  Volume Adjustment Knob

Summary of Contents for RS-3 DIESEL ENGINE

Page 1: ...This RailKing Diesel Engine contains M T H s Loco Sound sound and train control system The locomotive is easy to operate with any compatible standard AC transformer see the compatibility chart on pag...

Page 2: ...5 Proto Cast and Proto Dispatch 6 Volume Control 7 Maintenance 8 Lubrication and Greasing Instructions 8 Cleaning the Wheels Tires and Track 9 Locomotive Traction Tire Replacement 10 Locomotive Light...

Page 3: ...before operation Lightly grease the outside idler and drive gears marked G in Fig 3 on pg 9 to prevent them from squeaking Use light household oil and follow the lubrication points marked L in Fig 2 o...

Page 4: ...e bell off press and release the Bell button again The bell will continue to ring from the time you turn it on until you press and release the button again to turn it off Direction Your train is progr...

Page 5: ...rn it to the other condition You will want to do this during the initial neutral upon start up if you ever couple this engine to another engine that is not equipped with speed control to avoid damagin...

Page 6: ...e CD tape player to connect your microphone to the remote lock on To use Proto Dispatch simply plug the mini cable into the microphone and into the Mic port on the left side of the remote lock on and...

Page 7: ...l sounds made by this engine turn the master volume control knob located under the engine clockwise to increase the volume and counter clockwise to decrease the volume see Fig 1 Loco Sound Volume Adju...

Page 8: ...nstructions below Note that in some tightly packed engines you may need to move internal components temporarily in order to access the gears 1 Remove the Phillips screws from the chassis as seen in Fi...

Page 9: ...wires are not caught between the body and chassis as this can lead to a short that may damage the electronics beyond repair It is also a good idea to lubricate the outside truck block idler and drive...

Page 10: ...re Replacement Instructions Your locomotive is equipped with two neoprene rubber traction tires on each powered truck block While these tires are extremely durable you may need to replace them at some...

Page 11: ...r One set of replacement tires is packaged with the model Additional tires are available directly from the M T H Parts Department phone 410 381 2580 fax 410 423 0009 e mail parts mth railking com mail...

Page 12: ...ress the bell button You may be pressing the button too quickly Try pressing the whistle button more slowly taking approximately one full second to fully depress the button You may be pressing the but...

Page 13: ...knob on the bottom of the chassis counter clockwise to reduce the volume Compatibility This engine will operate on any traditional O 31 or larger O Gauge track system including M T H s RealTrax or Sc...

Page 14: ...Standard Lionel 1063 U A 8 17v 60 Watt Standard All Trol Left Terminal Right Terminal 0 24v 300 Watt Electronic Dallee Hostler Left Terminal Right Terminal Electronic Lionel LW A U 8 18v 75 Watt Stan...

Page 15: ...using electrical products basic safety precautions should be followed including the following Read this manual thoroughly before using this device M T H recommends that all users and persons supervis...

Page 16: ...ntacting M T H for your Return Authorization number 3 Please make sure you have followed the instructions carefully before returning any merchandise for service Limited One Year Warranty All M T H pro...

Reviews: