background image

Traction Tire Replacement Instructions

Your locomotive is equipped with two neoprene rubber traction tires on each 
powered truck block.  While these tires are extremely durable, they may 
occasionally need replacement.

First, remove the truck sides from the truck block.  To do this, turn your engine 
upside down and remove the chassis as detailed on page 12.

Remove the trucks from the chassis and the truck sides from the trucks in order to 
slip the new tire  over the grooved drive wheel.  Once the truck sides have been 
removed:

1. Make sure the old tire has been completely removed from the groove in the drive 
wheel, using a razor blade or small flathead screwdriver to pry away any remains.

2. Slip the new tire onto the wheel.  You may find it useful to use two small 
flathead screwdrivers to stretch the tire over the wheel.  

3. If  you twist the tire while stretching it over the wheel, you will need to remove 
and reinstall the tire.  Otherwise your engine will wobble while operating.  

4. Make sure the tire is fully seated inside the groove.  Use a razor blade to trim 
away any excess tire that will not seat inside the groove properly.

5. Reassemble in the reverse order.

Replacement parts are available directly from the M.T.H. Parts Department (order 
online:  www.mth-railking.com, e-mail: [email protected]; mail: 7020 
Columbia Gateway Drive, Columbia MD 21046-1532, FAX:  410-381-6122). 

RKS SD-45 Diesel Engine with 

11

Loco-Sound

Summary of Contents for RKS SD-45

Page 1: ...ate on any traditional O 31 Gauge track system including M T H s RealTrax or ScaleTrax or traditional tubular track It is also compatible with most standard AC transformers See page 22 for a complete...

Page 2: ...attended Obstructed accessories or stalled trains may overheat resulting in damage to your layout l This train set is intended for indoor use Do not use if water is present Serious injury or fatality...

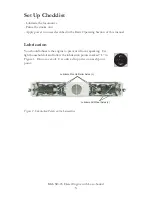
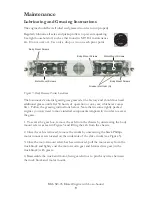
Page 3: ...the engine to prevent it from squeaking Use light household oil and follow the lubrication points marked L in Figure 1 Do not over oil Use only a drop or two on each pivot point RKS SD 45 Diesel Engin...

Page 4: ...to add smoke fluid or have already added fluid but choose to run smoke free turn off the smoke unit by turning the smoke unit switch to the OFF position Failure either to add fluid to the smoke unit...

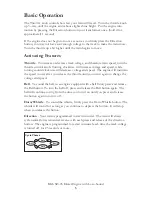
Page 5: ...ill maintain the speed you set after you release the throttle until you turn it again to change the voltage and speed Bell To sound the bell in an engine equipped with a bell firmly press and release...

Page 6: ...by this engine turn the master volume control knob located next to the fuel tank clockwise to increase the volume and counter clockwise to decrease the volume RKS SD 45 Diesel Engine with 6 Loco Sound...

Page 7: ...ard It is also affected by the addition or releasing of cars while on the run To maintain a constant speed when speed control is turned off you need to adjust track voltage yourself To turn speed cont...

Page 8: ...lowing approximately second to lapse between each quick button press The engine will not change direction including going into neutral until you repeat the 1 whistle 3 bells code to return the engine...

Page 9: ...he gears 1 To access the gear box remove the cab from the chassis by unscrewing the body mount screws as seen in Figure 5 and lifting the cab from the chassis 2 Once the cab is removed remove the truc...

Page 10: ...h can cause poor electrical contact and traction and prematurely wear out the neoprene traction tires Wheels and tires can be cleaned using denatured not rubbing alcohol applied with a cotton swab To...

Page 11: ...heel using a razor blade or small flathead screwdriver to pry away any remains 2 Slip the new tire onto the wheel You may find it useful to use two small flathead screwdrivers to stretch the tire over...

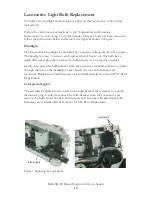
Page 12: ...ect plug that attaches the bulb harness to a connector terminal Gently disconnect the bulb harness from the connector terminal and remove bulbs through the rear of the headlight socket Insert the new...

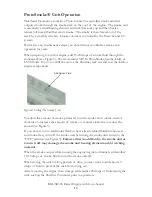
Page 13: ...adjust the amount of smoke produced turn the smoke unit volume control clockwise to increase the amount of smoke or counter clockwise to reduce the amount se Figure 3 If you choose not to add smoke f...

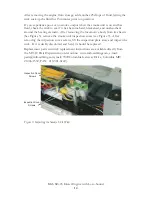
Page 14: ...remove the smoke unit inspection cover see Figure 9 After removing the inspection cover screws lift the inspection plate away and inspect the wick If it is darkly discolored and hard it should be rep...

Page 15: ...king approximately one full secondtofullydepressthebutton This is normal behavior To prevent accidental high speed start ups Loco Sound is programmed to start up in neutral anytime track power has bee...

Page 16: ...c Lionel RS 1 Red Terminal Black Terminal 0 18v 50V A Electronic Electronic Lionel RW U A 9 19v 110 Watt Standard Lionel SW U A Unknown 130 Watt Standard Lionel TW U A 8 18v 175 Watt Standard Lionel Z...

Page 17: ...less of whether you discussed the problem with a service technician when contacting the Service Center for your Return Authorization Please make sure you have followed the instructions carefully befor...

Reviews: