background image

SA

T

A

SA
T

A

SA

T

A

SA
T

A

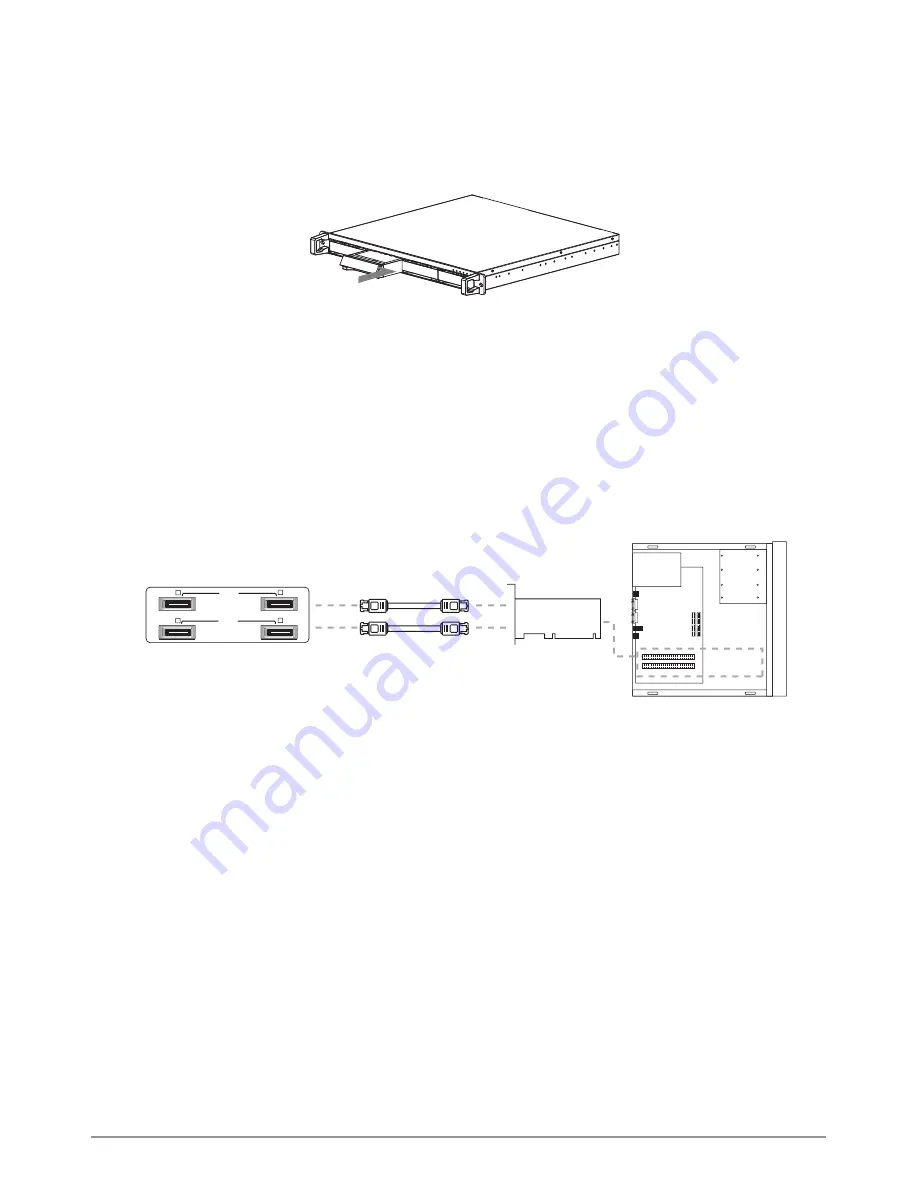
ST7610 eSATA Ports

eSATA cable

eSATA

1

2

3

4

eSATA

5

Hardware Installation Procedure


.Carefully push the removable tray into the slot and push the handle back into place.

3.Connection Wiring Installation.


A.Four Individual Hard Disk Drives Mode


a.  Connect the ends of the four eSATA-to-eSATA cables to the SATA II card (Note) and 


connect the other ends of the eSATA-to-eSATA cables to the eSATA ports on the 


ST7610. Make sure the screws on the bracket are fastened and the eSATA 

    connectors 

are 

secured.


b.  After ensuring the device is installed successfully, power on the ST7610 first and then 


turn on the PC when the ST7610 runs normally.

SATA Card

PCI Slot

Computer Case

Summary of Contents for ST7610-4S-S2

Page 1: ...User Manual ST7610 4S S2 Version 2 0 April 2009...

Page 2: ...e Introduction 2 Precautions prior to Installation 3 Hardware Installation Procedure 4 Hard Disk Drive Format Procedure 7 How to Use the Operating System to Set Up the RAID Type 12 Product Description...

Page 3: ...an 60 C or the fan fails 2 Check Package Contents and Accessories Hardware Introduction ST7610 system includes the following Item Quantity ST7610 1 Removable Carrier 4 eSATA cable 4 Quick Installation...

Page 4: ...d disassembly or modification if such unauthorized disassembly or modification results in any storage device failure data damage or loss or causes the operating system unable to start 3 Please careful...

Page 5: ...e 2 Hardware Installation A Insert the supplied plastic key into the lock hole on the removable tray and carefully remove the tray B Remove the holder from the removable tray with a screwdriver be car...

Page 6: ...ard Disk Drives Mode a Connect the ends of the four eSATA to eSATA cables to the SATA II card Note and connect the other ends of the eSATA to eSATA cables to the eSATA ports on the ST7610 Make sure th...

Page 7: ...purchasing an external SATA II 3 0 GHz card to enhance compatibility and transmission efficiency Please be advised that the external card should work properly before the ST7610 incorporates with the...

Page 8: ...ard Disk Drives modes the installed devices can be detected by the Device Manager of the operating system A Window OS 2 Customers can format the hard disk drive by using the Disk Management tool of th...

Page 9: ...8 Hard Disk Drive Format Procedure...

Page 10: ...all b Select the Erase tab If the disk device is ready the disk information will be displayed on the left window c To erase all data and volumes on a disk please select the icon for the disk drive and...

Page 11: ...10 Hard Disk Drive Format Procedure...

Page 12: ...nd enter a name and size A dialog will pop up with the following message Partitioning a disk will destroy all information on the volume of the disk Are you sure you wish to partition the disk XXXXXXX...

Page 13: ...n us http support microsoft com kb 303237 zh tw 2 Operating Instructions for Macintosh You can use the disk utility provided by Mac OS 10 4 6 to create RAID systems The following is a brief descriptio...

Page 14: ...ect the RAID tab If the disk device is ready the disk information will be displayed on the left window Please select the Volume Format and the RAID Type you wish to create Please decide the RAID Type...

Page 15: ...Set Up the RAID Type C Drag disks or volumes to the list box to create the hard disk drives according to the definition of RAID D Select Create to create RAID systems according to the information in t...

Page 16: ...ating System to Set Up the RAID Type E When the format is completed you will have a highly efficient RAID system featured with ST7610 4S S2 You can then access the data through the RAID system as show...

Page 17: ...ent tasks at the same time for enhanced operation performance 7 Fail LED will light up in red when the machine is excessively hot or the fan fails 8 For Power Mac G5 or any other 64bit computers all y...

Page 18: ...em BIOS still fails to detect the hard disk drive make sure the installation and connection procedures are compliant with regulations described in the manual 2 Install SATA II 3 0 GHz PCI interface to...

Page 19: ...uld any of the situations occur please shut down the system and clean the fan up or remove the wires that trap the fan Then restart the system again If the problem still occurs or for any reason that...

Page 20: ...Memo 19 Memo...

Reviews: