background image

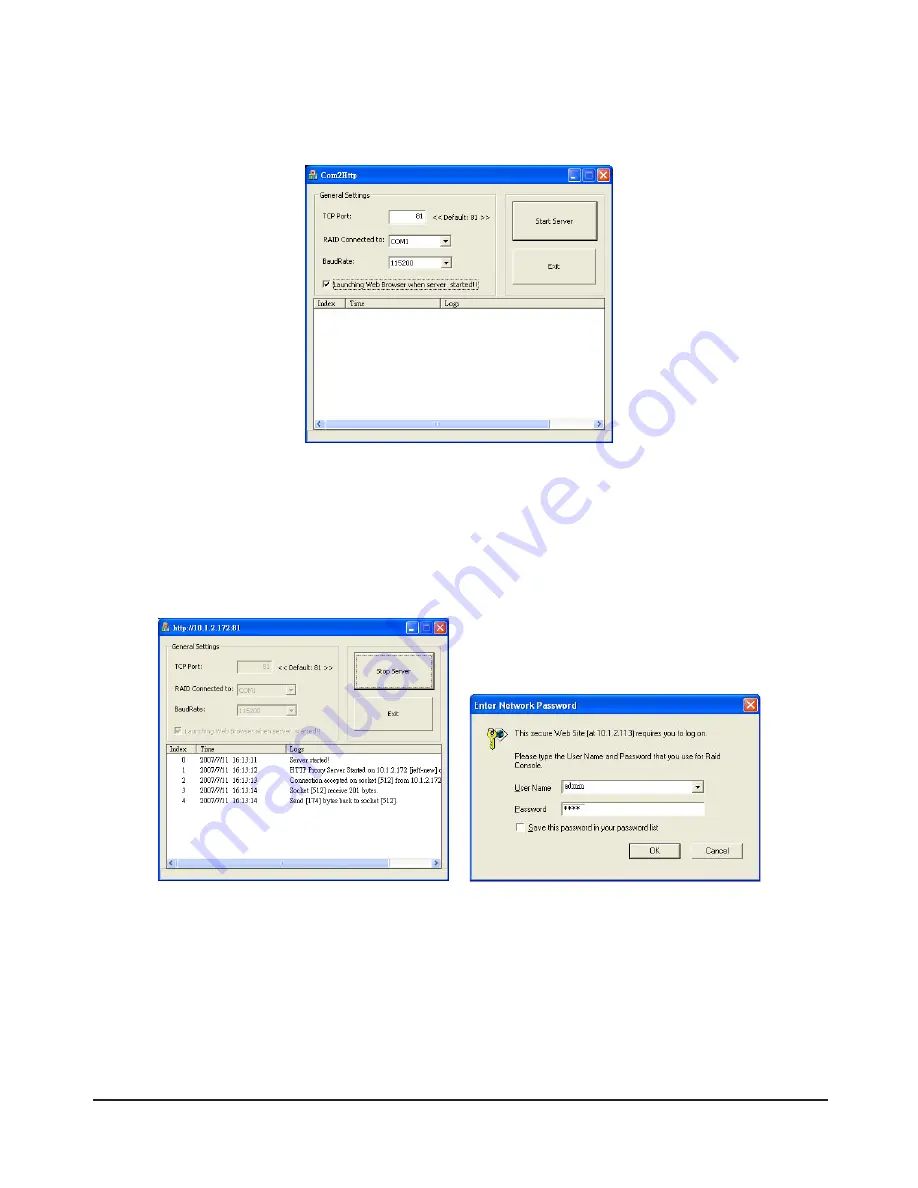
Once the installation is complete log in by referring to the following instructions: 

1) Run the “GUI-Com2Http” program, define the necessary settings then check the “Launching Web  
    Browser when server started!” box.

                                              Explanation of Settings
                                              1. TCP Port: A value between 1~65535.  The default is 81.
                                              2. RAID Connected to: COM1, COM2, COM3… etc.
                                              3. BaudRate: 1200 ~ 115200.  The default is 115200.

2) Click “Start Server” and the program will automatically search for the SR6600 and display the 
    relevant information.  Once the SR6600 has been found a separate login window will appear.


Default Account: admin  Default Password: 0000

System Login

  11

Summary of Contents for SR6600 Series

Page 1: ...SR6600 Series User Manual v5 0 September 2010 ...

Page 2: ...3 2 3 8 Rescue RAID Set 23 2 4 Volume Setup 23 2 4 1 Create RAID Volume Set 24 2 4 1 1 Volume Name 25 2 4 1 2 RAID Level 25 2 4 1 3 Strip Size 25 2 4 1 4 Cache Mode 25 2 4 1 5 Tagged Queuing 26 2 4 1 6 IDE Channel 26 2 4 1 7 IDE Xfer Mode 26 2 4 2 Delete Volume Set 26 2 4 3 Modify Volume Set 26 2 4 4 Check Volume Set 26 2 4 5 Stop Volume Set Check 26 2 5 Physical Drive 26 2 5 1 Create Pass Through...

Page 3: ...t Controller 28 2 7 Information 28 2 7 1 RAID Set Hierarchy 28 2 7 2 System Information 29 2 7 3 Hardware Monitor 29 Appendix A Frequently Asked Questions 30 Appendix B 2 2TB Setting Instruction for SR6600 5S WBS2 30 Appendix C SR6600 Series Firmware Update Process 34 ...

Page 4: ... made If you have any query regarding the products of Raidon Technology or you would like the latest product information please contact us at supporting raidon com tw and we shall give you a reply as soon as possible Note Raidon Technology will only provide technical support and services on products purchased directly from the company General consumers and third party buyers who did not purchase f...

Page 5: ...b Cable 1 SR6600 5S WBS2 Only SCSI Cable 1 SR6600 5S U3 Only Terminator 1 SR6600 5S U3 Only Power Cable 1 RS232 Cable 1 CD ROM 1 Parts Bag 1 Please check that there are no missing accessories or damage to the product itself Contact your distributor or sales representative if you have any questions Front View LCD Select Button Power LED Temperature LED Fan Detector LED ESC EXIT Button ENTER ENT But...

Page 6: ...e the installation of the SR6600 hardware 1 Remove the external packaging remove the product unit and place it on a stable surface Check that the cooling fans are not blocked and have sufficient room for ventilation Please avoid placing the device near a source of water or where the product may be prone to damage 5 6 1 2 3 4 5 6 7 8 WBS1 B 1 2 3 4 5 6 8 SB2 4 WBS1 A 1 2 3 6 U3 5 9 4 6 Quick Instal...

Page 7: ...e computer If daisy chaining not required for the SR6600 5S U3 connect the Terminator 5 Turn on power to the SR6600 Log into the system via the LCD RS232 or LAN connection then select Quick Volume and RAID Set Setup to set the RAID Mode and Volume Default Password 0000 6 Turn on power to the computer Your operating system will automatically identify the new hardware and once recognized follow the ...

Page 8: ...nted on the SR6600 is the primary user interface You can manage and setup the entire system using the LCD display and the four control buttons below it without using any other hardware or software The LCD panel can display all system information status and settings With the exception of Firmware Update all other functions can be controlled through the LCD control panel Function Button Description ...

Page 9: ...ute the VT 100 HyperTerminal program on the computer in order to access the system settings Connect the appropriate cable then turn on the SR6600 and computer To log in using the VT 100 refer to the following instructions 1 Select Start Program Files Accessories Communications HyperTerminal Configure the terminal data settings First define a name for this terminal 2 Select port System Login 9 ...

Page 10: ...1 2 2 Login to Web GUI via RS232 Cable Windows systems only If you choose to log in via the Web GUI over a RS232 Connection you must first install the GUI Com2Http software Insert the included CD ROM in the CD ROM Drive then under Management Software select GUI COM2Http to install the software automatically Alternatively you can go directly into the CD ROM s contents open the GUI COM2Http folder un...

Page 11: ...x Explanation of Settings 1 TCP Port A value between 1 65535 The default is 81 2 RAID Connected to COM1 COM2 COM3 etc 3 BaudRate 1200 115200 The default is 115200 2 Click Start Server and the program will automatically search for the SR6600 and display the relevant information Once the SR6600 has been found a separate login window will appear Default Account admin Default Password 0000 System Logi...

Page 12: ...IP address from your DHCP server If an IP address can t be acquired the SR6600 will automatically set an IP address The default IP is 192 168 1 100 The IP address used will be automatically shown on the unit s LCD display You can access the login interface by launching a web browser and typing in the shown IP address After entering the account and password you will be logged in to the system Defau...

Page 13: ... waste of disk space C Initialization Mode includes the three options a Background Initialization It allows use of hard disk during Initialization but delivers lower efficiency b Foreground Initialization Use of the hard disk will follow Initialization c No Int To Rescue Volume Use of hard disk without Initialization You are advised to choose option 2 system default setting D You may choose from 4...

Page 14: ...3 Check the Confirm The Operation box and then click Submit 4 The following screen will appear Initialization is finished 5 Please select Restart Controller under System Controls 14 System Login ...

Page 15: ...d then click Submit 7 After this screen appears check the option in the red box again and then click Submit SR6600 will restart and the setup of SR6600 is completed 8 Connect SR6600 with Computer 9 To format the hard disk please right click the My Computer icon and then select Manage System Login 15 ...

Page 16: ... As shown below please select Disk Management The unformatted hard disk will appear as shown in the red box 11 Right click the Disk 1 to pop up three options Please execute Initialize Disk 16 System Login ...

Page 17: ...12 Please select OK 13 Please select Next System Login 17 ...

Page 18: ...14 Select Next 15 Select Next 18 System Login ...

Page 19: ...16 Select Perform a quick format Select Next 17 Click Finish to complete the process System Login 19 ...

Page 20: ...18 Disk will then be formatted Once it is completed the following screen will appear 19 Once the disk is formatted you can start using it 20 System Login ...

Page 21: ... Config Alert By Mail Config SNMP Configuration NTP Configuration View Events Mute Beeper Generate Test Event Clear Event Buffer Modify Password Upgrade Firmware Restart Controller Information RaidSet Hierarchy System Information Hardware Monitor 2 2 Quick Setup The Quick Volume and RAID Set Setup function is the fastest way to complete the system setup process and involves just five steps The LCD ...

Page 22: ...f the smallest hard drive 2 This function will create only one volume If you need to add additional volumes please select the Volume Set Functions to make your changes 2 3 RAID Setup The RAID Set Functions allow you setup your RAID The setup functions include Create RAID Set Delete RAID Set Expand RAID Set Offline RAID Set Activate RAID Set Create Hot Spare Delete Hot Spare Rescue RAID Set 2 3 1 C...

Page 23: ... disk arrays 2 3 5 Activate RAID Set If a HDD was removed when the system was turned off the RAID set status will be set to Incomplete State If the user wishes to continue using the system after the system boots up they must fi rst activate the incomplete RAID set 2 3 6 Create Hot Spare This function can be used to set an idle HDD as the Hot Spare disk When another hard disk in the RAID set is dama...

Page 24: ...ther models so information available under this function will vary as well For the SR6600 5S WBS2 you will see RAID Level Strip Size Cache Mode IDE Host Channel IDE Drive Select Tagged Queuing IDE Xfer Mode and Volume Name For the SR6600 5S U3 you will see RAID Level Strip Size Cache Mode SCSI Host SCSI ID SCSI LUN Tagged Queuing SCSI Max Rate and Volume Name Please refer to the chart below for mo...

Page 25: ... you regularly read or write large files e g mpeg video files then you can use 128K for better performance If you mainly work with smaller document fi les 4K will offer better performance 2 4 1 4 Cache Mode This can be set to Write Through or Write Back mode In Write Through mode the Cache will process commands in the order that they arrive in Under Write Back mode the commands will be sorted by prio...

Page 26: ...volume set 2 4 3 Modify Volume Set This function can be used to re define or modify a volume set s attributes 2 4 4 Check Volume Set Use this function to check the consistency of the volume set 2 4 5 Stop Volume Set Check Stop the volume set consistency check currently in progress 2 5 Physical Drive This function shows all of the physical drive related information including Create Pass Through Disk...

Page 27: ... Controls The RAID System functions offer the following setup options System Config EtherNet Config Alert By Mail Config SNMP Configuration NTP Configuration View Events Mute Beeper Generate Test Event Clear Event Buffer Modify Password Upgrade Firmware Restart Controller 2 6 1 System Config Click this feature will enter to advanced access device related settings 2 6 2 EtherNet Config This functio...

Page 28: ...dify Password You can use this function to modify password 2 6 10 Upgrade Firmware We suggest you that do not update firmware if your system runs normally however if it is necessary please refer to the appendix A Upgrading Flash Firmware programming 2 6 11 Restart the Controller Restart the RAID controller Notes The controller should only be restarted when the system is not being accessed 2 7 Info...

Page 29: ...rsion Serial Number Unit Serial Controller Name Current IP Address 2 7 3 Hardware Monitor Information Shows the current information on the system hardware including Controller Temperature Power 12V status Power 5V status Power 3 3V status Power 2 5V status Power 1 3V status Power 1 2V status System Fan 1 RPM System Fan 2 RPM HDD 1 5 Temperatures System Management 29 ...

Page 30: ...up press the ENTER button the LCD panel then enter the universal password xxxxxxxxx to log in Once you are logged in select Change Password under RAID System Functions to set up a new password 2 Reset Password by Logging in over RS232 Once you have connected to the system over a RS232 cable press X and select RAID System Functions At Verify Password enter the universal password xxxxxxxxx to log in...

Page 31: ... setting the hard drive will be divided into two parts and showed two disks in the disk management column Please right click on disk 1 and select GPT Disk to combine these two disks Appendix B 2 2TB Setting Instruction Only SR6600 5S WBS2 31 ...

Page 32: ...e the process 3 LCM Operating Instruction 1 After entering the password and Quick Volume And Raid Set Setup appears please press ENTER 2 Select RAID MODE and press ENTER 32 Appendix B 2 2TB Setting Instruction Only SR6600 5S WBS2 ...

Page 33: ...ess ENTER is to set the volume supporting over 2 2TB capacity 4 Press ENTER to confirm the available volume 5 Press ENTER to confirm available Stripe Size 6 Press ESC to cancel and press ENTER to confirm Appendix B 2 2TB Setting Instruction Only SR6600 5S WBS2 33 ...

Page 34: ...From RS232 Cable Please connect SR6X00 and PC by serial RS232 cable then install the software Com2Http included in the CD 3 Run the Com2Http as below figure 4 Then run the web browser manager to choose the items as below figure The System will request ID and Password to enter below Name admin Password 0000 Click System Controls Upgrade Firmware 34 Appendix C SR6600 Series Firmware Update Process ...

Page 35: ...s below figure 6 Restart SR6600 Second step please select the firmware ARC FIRM BIN to run just like above Third step please select the firmware ARC MBRO BIN to run just like above 7 Choose the item System Information and check the firmware versions you upgraded is newest or not 8 From LAN port upgrade If you want to upgrade firmware versions by LAN please make sure the SR6600 and other computers ...

Page 36: ...dress after entering the web browser manager The System will request ID and Password and then you can enter GUI to upgrade Please find step4 7 for your reference 36 Appendix C SR6600 Series Firmware Update Process ...

Reviews: