

Product Diagrams and Contents of Product Package
Precautions Before Application
Open the package and you should find the following:
SAS Cable is not attached to the accessories, if you need it, please purchase it
separately.
Please check the product and accessories for any defect or missing parts. If you have
any questions, please contact your product supplier.
Please visit the official website (www.raidon.com.tw) to download user manuals, drivers
and other related resources.
˙
˙
˙
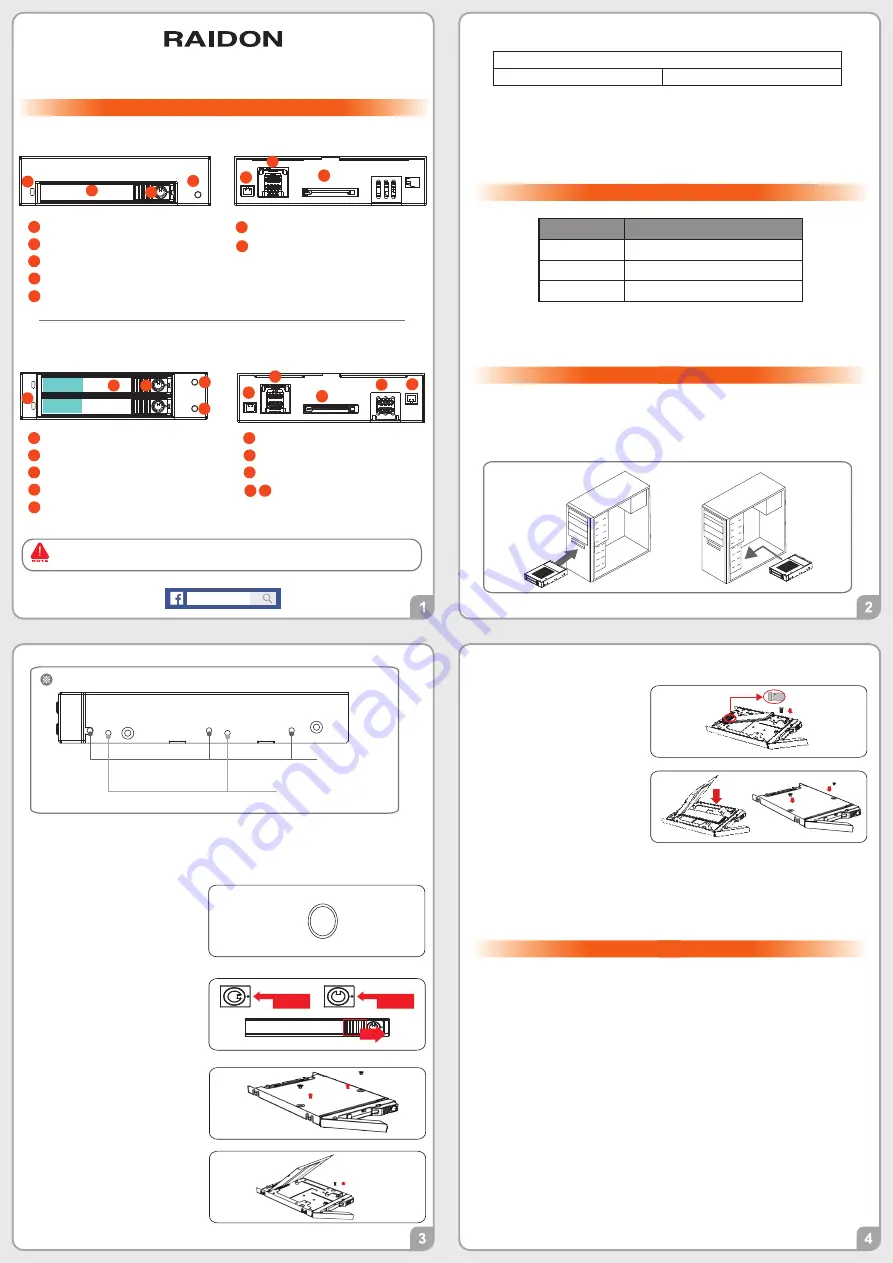
LED Indicator
iU1776 Front View
iU1776 Rear View
Please install iU1776 & iU2776 as the following instruction.
Hardware Installation
Install the product unit into the comput er chassis and make the necessary
connections and mount the product unit properly and securely to the bay position
desired.
1.
We strongly recommend you to keep an extra copy at your important personal data
other than stored in your iU1776 & iU1776 product. RAIDON will not be responsible
of your data loss problem.
1.
Raidon
iU����-U�P� / iU����-U�P�
Quick Installation Guide
LED Instruction
RAIDON
is one brand under
RAIDON TECHNOLOGY, INC.
Thank you for choosing
RAIDON’s
product.
The information provided in this manual was checked before publication, but the actual product
specifications may have changed before shipping; Latest product specifications and updates can be
found at
www.RAIDON.com
.tw or through your sales representative. No separate notifications will be
provided by our company.
If you have any questions about RAIDON products or would like to receive the latest product information,
instruction manuals, or firmware, please contact S
for assistance.
All product-related content in this manual are copyrighted by
RAIDON TECHNOLOGY, INC.
V0.1 (Nov. 2022)
Note1: While using a different SSD Hard Drives, the LED Indication might be
with a different light set.
Note2: If the SSD is supported, the LED has a flashing function during data
access; if there is no support, there is no flashing function.
Status
HDD Status Light
HDD idle
Blue light always On / Off (Note 1 )
Data access
Blue light flashing(Note 2 )
No SSD
Blue light always On
Screw positions to
mount like a
3.5" hard drive
Screw positions to mount
like a floppy drive
LED Instruction
Mounting Positions
4.Remove the screws of the upper
cover of the M.2 Tray.
5.Open the upper cover and remove
the screw .
Lock
Unlock
3.Unlock the M.2 SATA Bridge Tray Key
Lock and push the HDD tray ejection to
the right .
6.Insert M.2 NVMe SSD and fix
the screw.
10. Power on your system after hardware installation is completed, and your
operating system will automatically detect the hard drives from booting.
Then follow the steps from your operating system to partition and format the
drives when necessary, device will be ready to use once the format is completed.
2.Please press the “RELEASE
button” before unlocking.
**“RELEASE botton” only support
RAIDON’s product PC04-EZ ( M.2
NVMe PCIe Card )
If you use another card, you must
turn
iU1776 & iU2776 off before
unlocking.
RELEASE
7. Put the upper cover back.
8. Fix the screws.
9. Install the M.2 tray back into
the
iU1776 & iU2776 .
Quick Installation Guide x1
Screws & Ejector pins
Product x 1
PC05-U6P3 Hot plug Switch Connector
I J
PC05-U6P3 Hot plug Switch
Connector
“RELEASE botton” only support
RAIDON’s
product
PC��-U�P� ( PCIe Card to SAS )
A
Removable drive tray
B
HDD Tray Key Lock & HDD Tray Ejection
C
D
15 Pin Power Connector
E
F
PCIE(SAS Connector)
G
RELEASE Button
LED Indicator
iU2776 Front View
iU2776 Rear View
A
Removable drive tray
B
HDD Tray Key Lock & HDD Tray Ejection
C
D
15 Pin Power Connector
E
PCIE(SAS 1 Connector)(
HDD1)
F
PCIE(SAS 2 Connector)(
HDD2)
G
H
RELEASE Button1(
HDD1)
RELEASE Button2(
HDD2)
HDD1
HDD2
B
RELEASE
RELEASE
HDD 2
HDD 1
A
C
D
E
G
H
I
J
F
G
A
B
D
HDD
RELEASE
C
E
F


