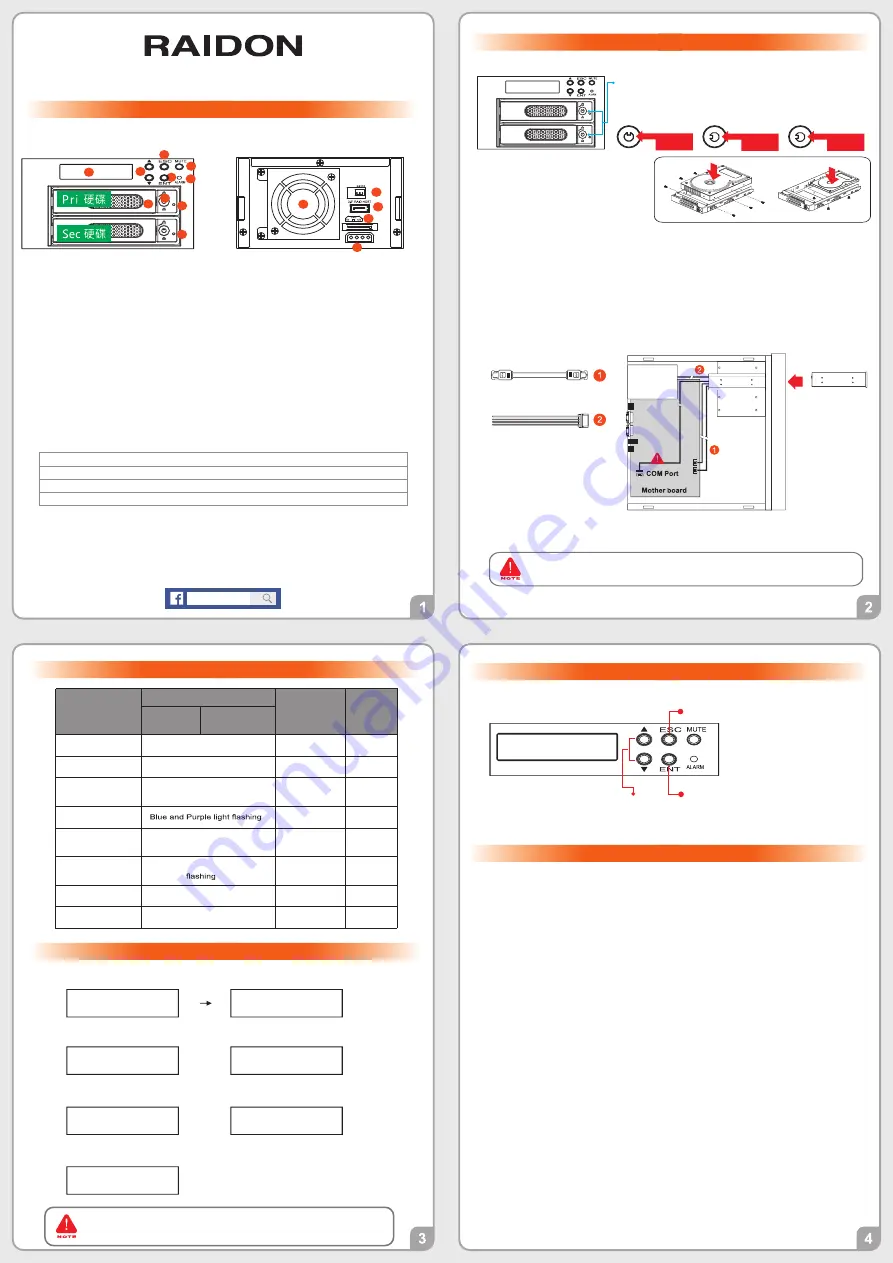
Install device into one of the CD-ROM bays with screws from the accessory kit. Then properly
connect SATA cable and SATA power cable from your system to the device.
SATA Cable
iR2822
SATA Ports
SATA Power Cable
iR2822
Power Supply
Internal host shell schematic
iR���� Quick Installation Guide
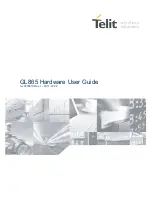
Package Contents and Product Views
iR����
X1(with removable drive tray enclosed x 2)
SATA Cable
x
1
Quick Setup Guide x 1
Screws and keys
Open the package and you should find the following:
1. Computers or servers with SATA I & SATA II & SATA III.
2. Hard drive with SATA I & SATA II & SATA III.
3. You are strongly advised to set the storage mode (the default is the Independent mode) before using the
iR2822
.
4. The product needs to be restarted after adding or changing the RAID mode, and the update is
guaranteed to be the new RAID mode. (Default setting is RAID 1)
5. The product allows the user to simultaneously utilize two hard drives manu factured by different
companies. However, if the user expects better efficiency, we strongly recommend the users to use hard
drives manufactured by the same manufacturer.
6. Please make sure that the two hard drives are free from bad blocks or defects prior to installation in
order to avoid system crashes or data loss.
7. The actual storage capacity of iR2822 recognized by the system may differ from the
total capacity stated on the hard drives combined once the drives have been formatted.
8. It is highly recommended for users to back up important data contained within the iR2822 on a
regular basis or whenever the user feels necessary to a remote or a separate storage device. Stardom will
not be responsible for any lost of data caused during the use of the unit or the recovery of the data lost.
Hardware Requirements and Precautions
Hardware Installation
Please check the product and accessories for any defect or missing parts. If you have
any questions, please contact your product supplier.
Please visit the official website (www.raidon.com.tw) to download user manuals, drivers
and other related resources.
˙
˙
Raidon
RS232 Port: For industrial control system or IPC to monitor the hardware status.
More information, please contact your sales window or [email protected]
RAIDON
is one brand under
RAIDON TECHNOLOGY, INC.
Thank you for choosing
RAIDON’s
product.
The information provided in this manual was checked before publication, but the actual product
specifications may have changed before shipping; Latest product specifications and updates can be
found at
www.RAIDON.com
.tw or through your sales representative. No separate notifications will be
provided by our company.
If you have any questions about RAIDON products or would like to receive the latest product information,
instruction manuals, or firmware, please contact S
for assistance.
All product-related content in this manual are copyrighted by
RAIDON TECHNOLOGY, INC.
Please follow the instructions below to complete the hardware installation.
1.
Lock
Unlock
Press
For the 3.5" HDD tray, please use the key included in the
accessory kit to unlock the HDD tray key lock, and then
press the HDD tray key lock. The removable drive tray will
pop open and extract the removable drive tray.
2.
�.
�.
For 3.5" HDD/SSD, please secure it by
use six the larger screws included in
the accessory kit. For 2.5" HDD/SSD,
please secure it by use four the
smaller screws included in the
accessory kit.
Power on your system after hardware installation is completed, and your operating system will
automatically detect the hard drives from booting. Then follow the steps from your operating
system to partition and format the drives when necessary, device will be ready to use once the
format is completed.
V1.0(DEC,2021)
Front view
Rear view
LED Instruction
Hard Disk Status on LCD Screen
RAIDON RAIDbox2
RAID-1 vxxxxxx.x
Pri HDD : OK
Sec HDD : READY
�. Booting and Normal status
�.Fan Failure
Pri HDD : OK
Sec HDD : READY T
�. HDD Failure
Pe i HDD:OK
Sec HDD:FAILED
Pei HDD:FAILED
Sec HDD:OK
�. Over Temperature (≥��°C)
Pri HDD : OK F
Sec HDD : READY
�. Rebuilding
Rebuilding
Sec→Pri 32%
When “T” is shown, it's an alert of system over heating, but it would still work fine.
And as long as the ambient temperature is improved, system shuts off the alert.
Description of Front Panel Operation
Select Items
Back to next level or Cancel
Enter to next level or Confirm
Status
3.5" HDD tray access light
Buzzer
Fail LED
Pri HDD tray
access light
Sec HDD tray
access light
Power On
— —
Stabdby
Blue light
always on
— —
HDD
Failure
Red light
always on
Red light
always on
On
Access
— —
Rebuilding
(Source)
Blue light
always on
— —
Rebuilding
(Target)
Red light
— —
Fan Failure
Red light
always on
Blue light
always on
On
Over Heat ( ≥50
℃ )
Red light
always on
Blue light
always on
On
— —
— —
— —
— —
— —
Blue light always on
1. LCD Display
2. UP/DOWN Button
3. ESC Button
4. Enter Button
5. Mute Button
6. Power Failure Indicator
7. 3.5" HDD tray key lock
8. 3.5" HDD tray handle
9. Pri HDD tray access light
10. Sec HDD tray access light
11. Cooling fan
12. RS232 Port
13. 3.5" SATA Port
14. 15 PIN SATA Port
15. 4Pin Power socket
2
4
3
5
6
8
9
11
1
10
7
12
14
15
13