12
www.raider.bg
than if you hold it by hand.
1.5.13. Keep your workplace clean.
Mixtures of different materials are particularly hazardous. Fine shavings from light metals can
be self ignite or explode.
1.5.14. Do not use the hammer drill, where the power cord is damaged. If during operation the
cable is damaged, do not touch. Immediately disconnect the plug from the outlet.
Damaged power cables increase the risk of electric shock.
1.5.15. If the hammer is to be operated at low temperature or after long storage, allow the
hammer to operate for few minutes without load, for its internal elements get properly lubricated.
Do not use three jaw drill chuck when the hammer drill is set to hammer drilling or chiselling
mode. This chuck is designed only for regular drilling in wood or steel.
Failure of the considered instructions may lead to electric shock, fire and / or severe injuries.
2. Functional description and purpose of the hammer drill.
Hammer drill is a hand-operated power tool with insulation class II. The tool is driven by single-
phase commutator motor. Hammer drill can be used for drilling holes in working mode with
hammer, digging channels, or surface processing of materials such as concrete, stone, brick
etc. Range of use covers repair and building works, and any work from the range of individual,
amateur-enthusiast DIY activities. Not permitted the use of power tools for activities other than
its intended purpose.
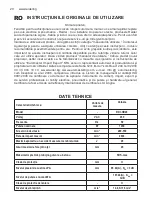
3. Information on noise and vibration emitted.
The values are measured according to EN 60745. A level of noise generated is generally: the
sound pressure level LpA = 95,1 dB (A); sound power LwA = 108 dB (A). Uncertainty K = 3 dB.
Work with a silencer! The resultant value of vibration (the vector sum of the three directions) is
determined according to EN 60745: Drilling in metal: the value of the emitted vibrations ah = 4,7
m/s2, uncertainty K = 1,5 m/s2, hammer drilling in concrete: value the emitted vibrations ah =
19.402 m/s2, uncertainty K = 2,0 m/s2.
That in this operating manual for the vibration value is measured by the method specified in EN
60745 and can be used to compare different power. The level of vibration varies depending on
the specific activity carried out and in some cases may exceed that amount in that direction. If
power is used for a long time in this mode, the load caused by vibration, could be underestimated.
Directions: For an exact estimate of the burden of vibrations in a working cycle should be
recorded and the intervals in which the power is off or idling. This can significantly reduce the
reporting burden of vibrations throughout the business cycle.
4. Preparing for the job. Installation of accessories and auxiliary tools.
4.1. Auxiliary handle.
Use only the hammer drill fitted with an auxiliary handle (5). You can insert auxiliary handle (5)
in practically any position, to ensure your comfortable and safe position for the job. Turn the
handle itself (5) axis and counterclockwise, thus reducing the firmness of the loop around the
head of the drill and you can rotate the auxiliary handle in the desired position. Then tighten the
grip again (5), such as turning it clockwise.
4.2. Placing the drill in the chuck. Turn off the power of hammer drill. For hammer drilling and
chiselling, SDS-max tools are required that are inserted in the SDS-max drill chuck.
The SDS-max drill chuck allows for simple and convenient changing of drilling tools without the
use of additional tools.
Insert the SDS-max quick. Clean and lightly grease the shank end of the tool. Insert the tool
in a twisting manner into the tool holder until it latches itself. Check the latching by pulling the
tool. As a requirement of the system, the SDS-max drilling tool can move freely. This causes a
certain radial run-out at no-load, which has no effect on the accuracy of the drill hole, as the drill
bit centres itself upon drilling.
4.3. Removing SDS-max drilling tools. Push back the locking sleeve and remove the tool.
5. Turn on and off.
Pay attention to mains voltage! The supply voltage must correspond to the data on the rating
Summary of Contents for RDI-HD48
Page 79: ...79 ...
Page 80: ...80 www raider bg EXPLODED VIEW ...
Page 83: ...83 ...
Page 99: ...99 ...
Page 104: ...104 www raider bg ...


