background image

20

www.raider.bg

When the motor run the revolutions of the motor will drop and you will hear a change in the motor sound. 

When this occurs stop mowing, release the switch lever and raise the height of cut.

Failure to do so could damage the machine.

NOTE: The battery packs are protected by a safety cut–out function which is activated when the blade 

becomes jammed or if the motor is overloaded. When cut-out occurs, stop mowing and disconnect the lawn 

mower from the power supply. Clear any obstruction and wait for a few minutes for the safety cut out switch 

to reset before continuing to use the mower. If the mower cuts out again increase the height of cut to reduce 

the load on the motor.

NOTE: The temperature of the motor will rise quickly,

if the lawn mower frequently jams. If the motor overheats, the safety cut out switch will operate and will cut 

off the power. If this occurs, you will need to disconnect the lawn mower from the power supply and wait 

for it to cool down completely. You will need to wait for approximately 1 hour before you can start using the 

mower again. 

Blade Replacement

Switch off the lawnmower and disconnect from the mains supply. Before replacing the blade it is advisable 

to thoroughly clean the underside of the machine.

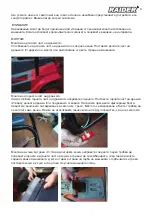
Always wear work gloves when replacing the blade. Note  which way the blade is fitted. Hold the blade 

firmly with one hand and using the spanner to remove the blade securing bolt anticlockwise. Remove the 

blade and thoroughly clean the area around the shaft. To attach the new blade (400mm), align the blade 

onto the drive shaft ensuring that the mark on the blade is on the outside and the two studs on the back of 

the fan are located into the corresponding two holes in the blade. Tighten blade securing bolt clockwise, do 

not over tighten.

Check to ensure the blade is located correctly before using the lawnmower

Grass box/bag:

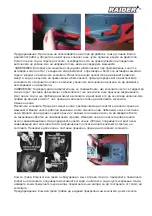
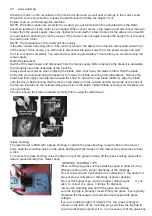
The lawnmower is fitted with a grass box/bag. To attach the grass box/bag, raise the flap on the mower 

body, align the mounting holes on the grass box/bag with the bulges on the mower body and press to hear 

a click.

To remove the grass box/bag, raise the flap on top of the grass box/bag, lift the grass box/bag upwards to 

detach grass box/bag from mower body.

  GENERAL  MOWING TIPS 

When cutting long grass, reduce walking speed to allow for more 

effective cutting and a proper discharge of the clippings.

Do not cut wet grass; it will stick to the underside of   the deck and 

prevent proper collection or discharge of grass clippings.

 New or thick grass may require a higher cutting height.       If  you  

wish  to  collect  the  grass  cuttings  for disposal,

remove the mulching plug and fit the grass box making

sure the top flap is properly closed. Empty the grass   box regularly, 

otherwise the discharge chute will become blocked with grass 

cuttings.

If you are making a light cut and wish for  the  grass cuttings to 

remain on the lawn, fit the mulching plug and close the top flap to 

cover the discharge opening. It is   not necessary to fit the grass box 

Summary of Contents for RD-LM23

Page 1: ...ww euromasterbg com Contents 2 BG схема 4 BG оригинална инструкция за експлоатация 15 EN instructions manual 24 RO instructiuni 32 МК упатство за употреба 40 SR upatstvo za upotrebu 48 EL οδηγίες 56 HR originalne upute za rad 64 RU инструкция по применению 72 SL navodila za uporabo 80 FR manuel d instructions 88 IT istruzioni 96 ES instrukcio manlibro 104 PT manual de instruções RAIDER GARDEN TOOL...

Page 2: ...не изключване 2 Горна част на дръжката 3 Долна част на дръжката 4 Кабел за управление на двигателя 5 Държач на кабела 6 Лост за регулиране на височината 7 Капак на отделението за батерия 8 Индикатор за напълване 9 Кош за трева 10 Болтове за закрепване на горната част на дръжката към долната 11 Задно колело 12 Предно колело 13 Предпазен ключ 14 Капак на отвора за окосена трева 15 Отделение за батер...

Page 3: ...за зареждане на акумулаторната батерия h 2 Клас на защита II Акумулаторна косачка НоНоминално напрежениеНННН V DC 36 18x2 Обороти на празен ход min 1 3500 Вид и капацитет на батерията mAh Li ion 4000 Широчина на косене mm 400 Височина на косене mm 25 65 Обем на коша за трева L 40 Ниво на звуково налягане LpA K 3 0 dB dB 84 30 Ниво на звуково мощност LwA K 3 0 dB dB 96 Стойност на вибрационните уск...

Page 4: ...ката на движение по склонове бъдете особено внимателни Не използвайте машината в близост до канавки прекомерно стръмни склонове или насипи Нестабилната основа може да предизвика падане и инцидент ОБЩА БЕЗОПАСНОСТ НА РАБОТНОТО МЯСТО Никога не използвайте машината докато хората особено децата или домашните любимци са на не повече от 15 метра поради опасност от изхвърляне на предмети Обектите засегна...

Page 5: ...а трябва да се зарежда само със зарядното устройство посочено от производителя Използването на зарядно устройство с несъвместима батерия може да създаде опасност от пожар Използвайте комплект батерии само с включено зарядно устройство Използвайте само комплект батерии предназначени специално за продукта Използването на други батерии може да доведе до риск от пожар токов удар или нараняване на хора...

Page 6: ...е проектирана Спрете ножа когато пресичате чакълните повърхности Не дърпайте машината назад освен ако не е наложително Ако трябва да върнете назад машината при наличие на препятствие или стена огледайте се на всички страни за да избегнете инциденти Спрете мотора и оставете ножа да спре в случай че машината трябва да се накланя за транспортиране при пресичане на повърхности различни от трева и при ...

Page 7: ...а стабилно стъпили на земята Не трябва да се използва за рязане на нещо друго освен на тревни площи ОСТАТЪЧЕН РИСК Дори когато продуктът се използва по предписаното все още е невъзможно напълно да се елиминират някои остатъчни рискови фактори Следните опасности могат да възникнат при употреба и операторът трябва да обърне специално внимание за да избегне следното Наранявания причинени от вибрации ...

Page 8: ...всяка употреба почиствайте продукта с мека суха кърпа Всяка повредена част трябва да бъде правилно ремонтирана или заменена от оторизиран сервизен център Проверявайте навсякъде гайките болтовете и винтовете на подходящи интервали за да сте сигурни че продуктът е в безопасно работно състояние Внимавайте при подготвянето на косачката за работа за да предотвратите захващане на пръстите между движещит...

Page 9: ...ж на горната част на дръжката За да сглобите горната част на дръжката направете следното Поставете горната част на дръжка 2 върху долната дръжка 3 и подравнете отворите Натиснете през двата фиксиращи болта Завинтете винтовете за закрепване и затегнете с ръка Мястото за закрепване и болтът трябва да се затягат само ръчно Никога не използвайте гаечен ключ или друго средство за да ги затегнете Монтаж...

Page 10: ...като косачката е била изключена Уверете се че режещите елементи са спрели да работят и че сте извадили акумулаторните батерии от косачката за трева преди да извършите каквото и да е техническо обслужване Регулиране на височината За регулиране на височината се извършва следното Предупреждение Спрете освободете лоста на превключвателя и изчакайте докато двигателят спре Ножовете продължават да се вър...

Page 11: ... захранването Ако това се случи ще трябва да изключите косачката и да изчакате тя да се охлади напълно Ще трябва да изчакате около 1 час преди да започнете отново да използвате косачката Смяна на ножа Изключете косачката Преди да смените ножа препоръчваме да почистите долната страна на машината Винаги носете работни ръкавици когато сменяте ножа Забележете как е поставен ножа Дръжте ножа здраво с е...

Page 12: ...иране и затворете горния капак за да покриете отвора за освобождаване В този случай не е необходимо да поставяте коша за трева Косачката е проектирана да работи и реже най ефективно когато се движи напред Времето на работа на напълно заредената батерия зависи от различните работни условия Височина дебелина влажност на тревата скорост на движение профил на терена острота и правилно сглобяване на но...

Page 13: ...ructions EUROMASTER Import Export Ltd is an authorized representative of the manufacturer and owner of the trademark RAIDER Adress Sofia City 1231 Bulgaria Lomsko shausse Blvd 246 tel 02 934 33 33 934 10 10 www raider bg www euromasterbg com e mail info euromasterbg com Since 2006 the company introduced the system of quality management ISO 9001 2008 with scope of certification Trade import export ...

Page 14: ... wire bones toys or other foreign objects Remember string or wire may entangle with the cutting means Always use the product in the daylight or in good artificial light Do not operate the product in explosive atmospheres such as in the presence of flammable liquids gases or dust The product creates sparks which may ignite the dust or fumes Do not operate the product in wet grass or in the rain Do ...

Page 15: ...nts The vapour can irritate the respiratory system Do not leave the battery pack in a vehicle or outdoor storage during hot or cold conditions Do not incinerate the battery When the battery is beyond its useful life dispose of it correctly according to the local regulations in your area Under abusive conditions liquid may be ejected from the battery avoid contact If contact accidentally occurs flu...

Page 16: ...The product is only intended for use outdoors The product is designed for domestic lawn mowing The Lawn mower has been designed for use only in private gardens and is not suitable for use in public grounds parks sports fields or for agricultural or forestry purposes Only mow the lawn when the grass is relatively dry Any other use of the lawn mower is considered inappropriate use The manufacturer s...

Page 17: ...make adjustments and repairs described here For other repairs contact the authorised service agent Check the grass box frequently for wear or deterioration ŶAfter each use clean the product with a soft dry cloth Any part that is damaged should be properly repaired or replaced by an authorised service centre Check all nuts bolts and screws at frequent intervals for proper tightness to ensure the pr...

Page 18: ...y Never use a spanner or any other tool to tighten them Assembly of the Grass box bag 9 To assemble the grass box bag 9 proceed as follows first you need align the upper and lower grass box bag and combine them then you turn on the machine rear cover align the hook on the 2 sides of back machine with the grass bag put the grass box bag in the 2 hooks and then loose the machine rear USING YOUR LAWN...

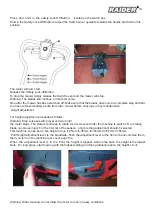
Page 19: ...ment proceeds as follows Warning Stop release switch lever and wait until the motor stops The blades continues to rotate for a few second after the machine is switch off a rotating blade can cause injury For the first cut of the season a high cutting adjustment should b selected This machine can be set to five height of cut I 25mm II 35mm III 45mm IV 55mm V 65mm Pull Height adjustment lever to the...

Page 20: ...e the blade securing bolt anticlockwise Remove the blade and thoroughly clean the area around the shaft To attach the new blade 400mm align the blade onto the drive shaft ensuring that the mark on the blade is on the outside and the two studs on the back of the fan are located into the corresponding two holes in the blade Tighten blade securing bolt clockwise do not over tighten Check to ensure th...

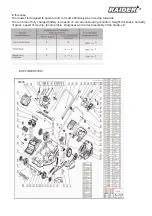
Page 21: ...cut most effectively when moving forwards The run time of fully charged battery is depend on on various working condition Height thickness humidity of grass speed of moving terrain profile sharpness and correct assembly of the blade etc EXPLODED VIEW LM23 ...

Page 22: ...zodpovednost prohlašujeme že je tento výrobek v souladu s následujícími standardy a normami SK Vyhlasujeme na našu výhradnú zodpovednost že tento výrobok je v zhode a súlade s nasledujúcimi normami a predpismi SLO S polno odgovornostjo izjavljamo da je ta izdelek v skladu in da odgovarja naslednjim standardom ter predpisom PL Deklarujemy na własna odpowiedzialnosc ze ten produkt spełnia wymogi zaw...

Page 23: ... на държавите членки за предоставяне на пазара на електрически съоръжения предназначени за използване в определени граници на напрежението 2000 14 EС на Европейския парламент и на Съвета от 8 май 2000г за сближаване на законодателствата на държавите членки във връзка с шумовите емисии на съоръжения предназначени за употреба извън сградите Шумови емисии съгласно EN ISO 3744 2010 Измерено ниво но зв...

Page 24: ...14 on the harmonization of the laws of the Member States relating to the making available on the market of electrical equipment designed for use within certain volt age limits 2000 14 EU of the European Parliament and of the Council of 08 May 2000 relating to the noise emission in the environment by equipment for use outdoors Noise emission according to standart EN ISO 3744 2010 Measured sound pow...

Page 25: ...и ролки тампони гумени маншони задвижващи ремъци спирачки гъвкав вал с жило лагери семеринги бутало с ударник на такери и др допълнителни аксесоари и консумативи като ръкохватки струйник кутии свредла дискове за рязане секачи ножове вериги шкурки ограничители полир шайби патронници захвати и държачи на режещият инструмент макарата за корда и самата корда за косачки и др ръчен стартерен механизъм и...

Page 26: ...сени от собствениците им един месец след законния срок за ремонт Търговската гаранция за батерии и зарядни устройства която Евромастер Импорт Експорт ООД дава за територията на Република България е както следва 18 месеца за батерията и зарядното устройство от сериите Raider Industrial Raider Pro 12 месеца за батерията и зарядното устройство от сериите Raider Power Tools Raider Garden Tools Гаранци...

Page 27: ...в съответствие с договора за продажба трябва да се извърши в рамките на един месец считано от предявяването на рекламацията от потребителя 3 След изтичането на срока по ал 2 потребителят има право да развали договора и да му бъде възстановена заплатената сума или да иска намаляване на цената на потребителската стока съгласно чл 114 4 Привеждането на потребителската стока в съответствие с договора ...

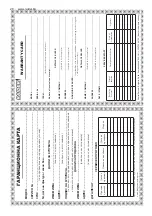
Page 28: ...0700 44 155 безплатен за цялата страна e mail info euromasterbg com за подробности виж гаранционните условия MODEL SERIAL TERM date of invoice cash receipt DETAILS OF BUYER NAME COMPANY ADDRESS SIGNATURE OF BUYER WARRANTY CARD DETAILS OF SELLER NAME COMPANY ADDRESS DATE STAMP be filled in by the employee be filled in by the employee I am familiar with warranty conditions and the operating device i...

Page 29: ...and bulbs Mechanical damage to the hull and all external components of the machine including decorative Overall damage to machinery caused by natural disasters such as fires floods earthquakes etc Void the warranty And Euromaster I E Ltd has the right to refuse warranty service if Inconsistent or blank serial number of this article with a completed warranty card Product identification tag is remov...

Page 30: ...30 www raider bg www raider bg EUROMASTER IMPORT EXPORT LTD 1231 Sofia Bulgaria 246 Lomsko shose Blvd tel 359 700 44 155 fax 359 2 934 00 90 www euromasterbg com e mail info euromasterbg com ...

Reviews: