2
Flying the Spinner Missile X
Replacing Damaged Propellers
1.
Turn the On/Off switch to On and the red status LED will light up, the rocket is now ready
for flight.
2.
Place the Spinner Missile X on the launch pad. Press the launch button and the rocket will
power up after approximately 3 seconds. With one press, the flight will last about
4 seconds before the parachute opens. For the rocket to reach its highest altitude
(8 second flight time), press the launch button twice in quick succession.
NOTE:
There is a 3 second delay from the time that the launch button is pressed and the Spinner
Missile X begins its launch. This allows time to walk a safe distance away from the missile.
Loading the Parachute
1.
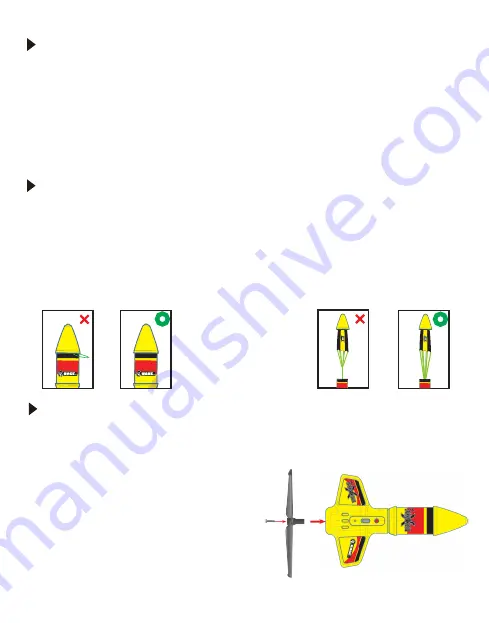
Check for any entanglement of the parachute chords, untangle if necessary.
2.
Fold the bottom of the parachute over so it touches the base of the nose cone.
3.
Push the release piston down, then carefully insert the parachute chords and folded
parachute into the compartment.
4.
Push the nose cone down onto the compartment. Check that none of the parachute fabric
is stuck between the nose cone and the parachute compartment.
The Spinner Missile X features a parachute to reduce the impact during landings. Loading the
parachute correctly will reduce the possibility of a malfunctioning parachute.
To replace a damaged propeller, remove the screw holding it in place and slide the propeller
away from the rocket and off the shaft. Slide the new propeller into position and reinstall the
screw. If you are not able to remove the old propeller by hand, use pliers to assist.
Warning:
To avoid injury and damage, check the propeller
regularly for nicks and breaks and make sure it is
securely attached before and after each flight.
Use only the propeller intended for this product
Part# RGR4138.
Do not alter, repair, modify or customize the propellers
Make sure that the lines or
chute are not pinched by
the nose cone.
Make sure that the lines are
not twisted or tangled.
Summary of Contents for Spinner Missile X
Page 4: ...X 4...


