

thank you for choosing a product from radius
design. you can find further products at:
www.radius-design.com
danke, dass sie sich für ein produkt von radius
design entschieden haben. weitere produkte
finden sie unter:
www.radius-design.com
CD-BAUM 1 & 2 STAND
DEUTSCH
ENGLISH
herzlichen glückwunsch zum kauf ihres
CD-BAUMs.
benötigte personen für den aufbau:
2
stecken sie die schrauben durch die
verbindungsplatte. die verbindungsplat-
te ist nicht immer gleichfarbig.
der standfuss wird von unten mit
pfosten und verbindungsplatte ver-
schraubt.
hinweis:
je nach ausführung wird der pfosten
senkrecht (CD-BAUM 1) oder waage-
recht (CD-BAUM 2) auf den standfuss
montiert.
1.
entfernen sie die klebeschutzfolie.
2.
kleben sie die vier kunststoffteile von
unten in die ecken des standfuss
3.
pressen sie das graue kunststoffteil
in das schwarze wie gezeigt, bis es hör-
bar einrastet.
hängen sie die regalböden ein:
1.
führen sie die oberen haken bis zum
anschlag komplett ein.
2.
lassen sie den boden nach unten
klappen.
hinweis:
1 haken unten, 2 oben.
wenn sie einen regalboden als dvd oder
cd-ständer benutzen möchten, können
sie die stütze um 90° abwinkeln (s.
abbildung). biegen sie den regalboden
bündig an einer stabilen kante. bitte
beachten sie vor dem biegevorgang
schritt 6!
congratulations on your purchase of the
CD-BAUM.
number of persons for the installation:
2
put the screws through the connecting
plate. connecting plate is not always of
the same color.
the foot is screwed to the pole and con-
necting plate from below.
note:
depending on the version, the pole is
mounted vertically (CD-BAUM 1) or
horizontally (CD-BAUM 2)on the foot.
1.
remove the adhesive pro tection film.
2.
tack the plastic part under the stan-
ding foot; one in each corner.
3.
pushing the gray plastic part in the
black as shown, until it clicks into place.
hang the shelves in place:
1.
insert the upper hooks up to the
stop.
2.
let shelf flap downwards.
note:
1 hook at the bottom, 2 at the top.
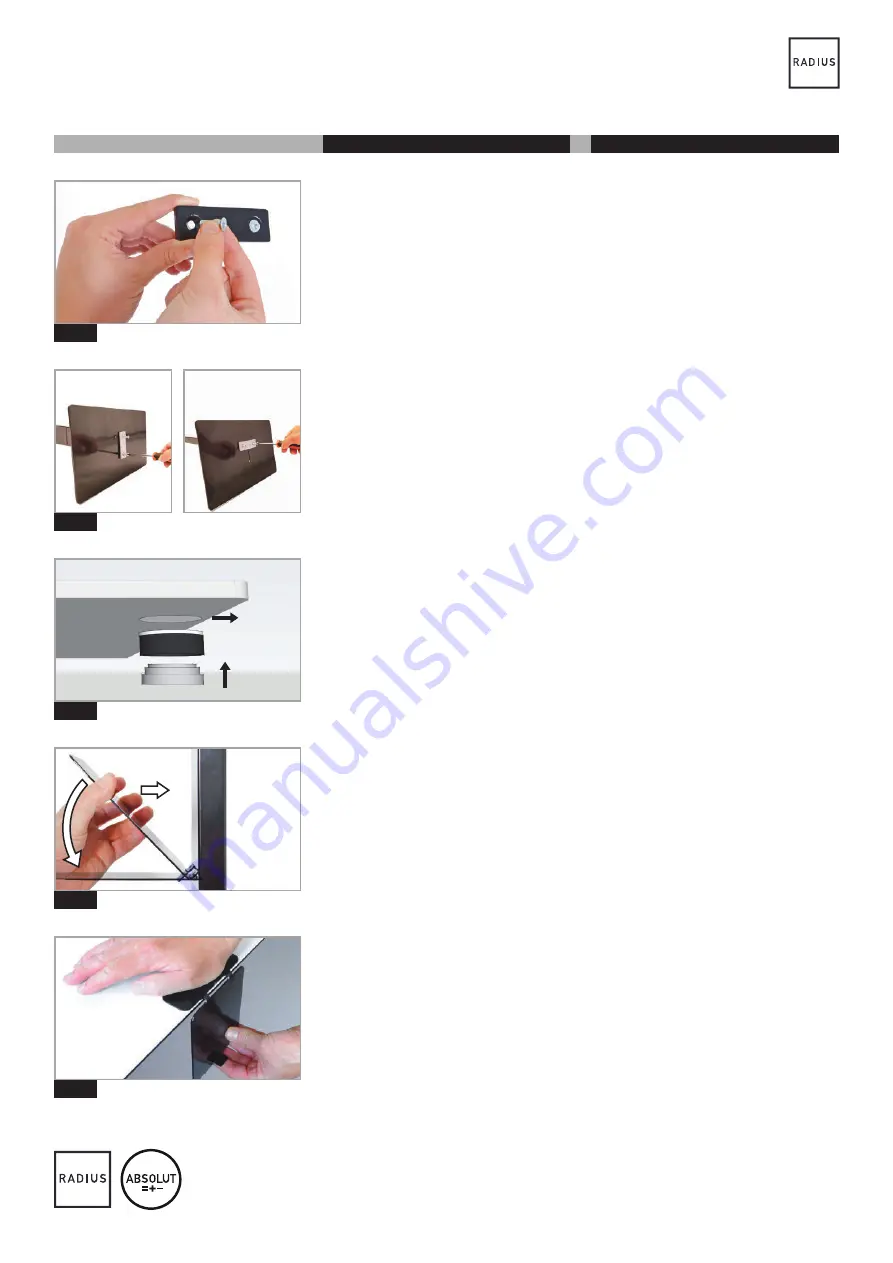
if you want to use one shelf as dvd or cd
rack, you can bend the support by 90°
(see picture). bend the shelf shortly on
one stable edge. before bending, please
note step 6!
MONTAGEANLEITUNG / ASSEMBLY INSTRUCTIONS
ART. NR.: 718, 719, 736, 737
1/2
1
3
4
2
1.
2.
3.
1.
2.
5
CD-BAUM 1
CD-BAUM 2


