D2112/D2112E Installation Manual
Page 12
74-07111-000-D 196
© 1995 Radionics
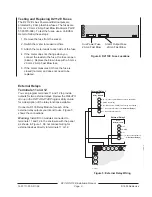
Figure 10: Programmer Jack
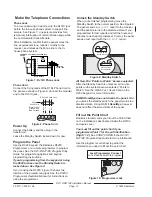
Unlock the Standby Switch
When you're finished programming move the
Standby Switch to the normal position. See Figure 9.
The panel sends a
RE-BOOT
report to the receiver
and the panel returns to the disarmed state. If you
programmed for test reports and left the hours and
minutes to next report prompts at 0 (zero), the panel
sends a test report with the
RE-BOOT
report.
11
12
9
10
1
Local Programmer Connect
Lock standby switch to program.
15
11
12
16
17
20
21
22
23
24
25
26
27
28
29
19
18
1
6
7
8
9
10
3
5
4
2
14
13
Standby Switch
Normal (Open)
Standby Switch
Locked (Closed)
Figure 9: Standby Switch
All Non-Fire “Points to Watch” become selected:
After the Standby Switch is unlocked, all non-fire
points on the system become selected “Points to
Watch.” See the
Watch-Test User’s Card on the
D202 Keypad for more information.
RAM II ResetBye does not disarm the panel: After
you unlock the standby switch, the panel returns to a
disarmed state. Using RAM II
ResetBye, however,
does not affect the armed state of the panel.
Fill out the Point Chart
Radionics recommends you fill out the
Point Chart
on the Installation Label located inside the D2103
enclosure cover.
You must fill out the point chart if you
programmed Point 1 for Fire with Verification
(Digit 1 = 2). See POINT CODES in the D2112/
D2112E Program Entry Guide for more information.
Use the program record sheet to gather the
information you need to fill out the point chart.
D164
Phone Cord
25
26
27
28
29
T1
R
R1
T
Brown
Green
Red
Gray
To RJ31X Phone Jack
Black, Yellow,
Orange, and
Blue not used.
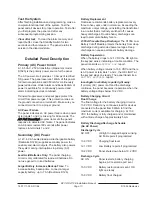
Figure 8: Phone Cord
Figure 7: RJ31X Phone Jack
☎
R1
T1
1
2
3
4
5
6
7
8
R
T
PREMISES
PHONE
INCOMING
TELCO LINE
FULL MODULAR PHONE JACK
RJ31X MODULE
Make the Telephone Connections
Phone Jack
To prevent jamming of reports, wire the RJ31X jack
before the in-house phone system to support line
seizure. See Figure 7. Line seizure provides for a
temporary interruption of normal phone usage while
the communicator transmits data.
After installation, confirm that the panel seizes the
line, acquires dial tone, reports correctly to the
receiver, and releases the phone line to the in-
house phone system.
Phone Cord
Connect the flying leads of the D164 Phone Cord to
the panel as shown in Figure 8. Connect the modular
end to the RJ31X jack.
Power Up
Connect the battery and then plug in the
transformer.
Leave the Standby Switch locked down for now.
Program the Panel
Use the D202 Keypad, the Radionics D5200
Programmer, or a remote programmer to program
the panel. See the
D2112/D2112E Program Entry
Guide for programming options and keypad
programming instructions.
If you're programming from the keypad or using
the D5200, make sure the Standby Switch is
locked down. See Figure 9.
If you're using the D5200, Figure 10 shows the
location of the programming jack. See the
D5200
Programmer Operation Manual for instructions on
using the programmer.


