background image

10. Analyzer shutdown  

ABL800 FLEX Operator's Manual


General information 


Shutdown 
programs 

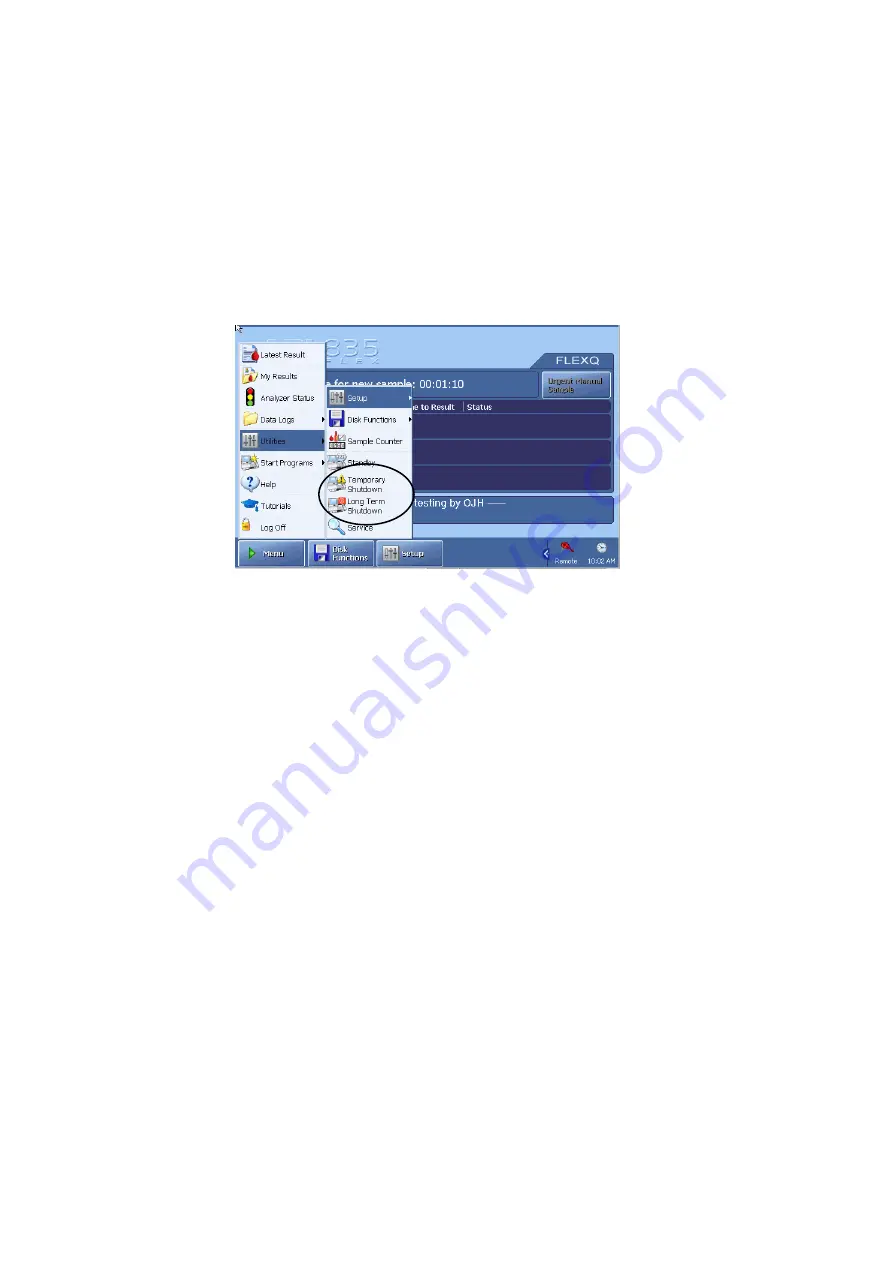
The following programs are available:  

• 

Standby 

• 

Temporary Shutdown 

• 

Long Term Shutdown. 

To access the programs, press 

Menu

 - 

Utilities


Then press the desired button to enter the program. 

When the waste container becomes critically full, the analyzer automatically enters 
Forced Standby mode. 


10-2


Summary of Contents for ABL800 FLEX

Page 1: ...ABL800 FLEX operator s manual ...

Page 2: ......

Page 3: ...ABL800 FLEX operator s manual ...

Page 4: ......

Page 5: ...ead Changes Description Limitations of use and known interfering substances CAUTION Known interfering substances Substance Interference ClO4 drugs For ClO4 interference on cCa2 1 25 mmol L level cCl 110 mmol L level and cK 4 mmol L level has been detected cCa2 1 25 mmol L level 0 27 cCl 110 mmol L level 4 30 cK 4 mmol L level 0 3 Interference new interference results for ClO4 Depending on the pH l...

Page 6: ...roducts ABL7xx Series XPE analyzers ABL800 FLEX analyzers ABL800 BASIC analyzer The new feature enables the analyzer to detect clots caught in the measurement chamber under the pH electrode This document describes it When to activate the clot detection feature It is especially beneficial to activate the clot detection feature in analyzers frequently used to analyze samples known to be prone to clo...

Page 7: ...form the first action in the list and the actions indicated in the Removal condition s list If the message persists perform the next listed action and the actions indicated in the Removal condition s list and so on No Message Interpretation Operator action s Clot suspected beneath pH electrode The difference between the pH of the rinse solution measured during the sample measurement and that store...

Page 8: ...esence of a clot in the measuring chamber beneath the pH electrode Remove the pH electrode and check the measuring chamber for clots clean the measuring chamber with a cotton stick moistened with distilled water Make sure no cotton fibers are left in the measuring chamber Clean pH electrode Remembrane Ref electrode Replace pH electrode Perform a 1 or 2 point calibration Removal condition s Acknowl...

Page 9: ...p 4 Sample measurements 5 Quality control 6 Calibration 7 Replacements 8 Disk functions 9 Data management 10 Analyzer shutdown 11 Troubleshooting 12 Sampling 13 Specifications 14 Ordering information 15 Radiometer settings Index Date of issue ABL800 FLEX Operator s manual ...

Page 10: ...where is a registered trademark of Sybase Incorporated Warranties and disclaimer Radiometer makes no warranties express or implied other than expressly stated Any warranties expressly stated in this document are conditional upon the system being installed used and maintained in accordance with Radiometer procedures including that only accessories meeting the specifications provided by Radiometer a...

Page 11: ...or programs written in Java Java technology is not fault tolerant and is not designed manufactured or intended for use or resale as online control equipment in hazardous environments requiring fail safe performance such as in the operation of nuclear facilities aircraft navigation or communication systems air traffic control direct life support machines or weapons systems in which the failure of J...

Page 12: ......

Page 13: ...rear 2 4 Measuring section 2 5 Inlet module 2 7 FLEXQ module 2 8 Thermal printer 2 10 Communication ports 2 11 Barcode reader 2 13 AutoCheck module 2 14 Screen elements 2 15 Menu structure 2 24 Analyzer status 2 28 Online aid facilities 2 36 Sample counter 2 39 3 Installation and setup 3 1 Overview 3 1 Installation 3 2 Setup menu structure 3 3 Analyzer security 3 6 Analysis setup 3 13 Patient repo...

Page 14: ... expired air sample 4 16 Patient identification 4 17 Patient result 4 21 Calculation of FShunt and ctO2 a _ V 4 25 Patient result messages 4 26 5 Quality control 5 1 Overview 5 1 General information 5 2 Preparing a control solution 5 4 Manual quality control measurement 5 6 AutoCheck measurement 5 7 Quality control identification 5 8 Quality control result 5 10 Quality control result messages 5 15...

Page 15: ...grams 7 21 Cleaning the analyzer 7 23 List of references 7 25 8 Disk Functions 8 1 Overview 8 1 General information 8 2 Creating a WDC report 8 4 Backing up all data 8 6 Restoring all data 8 8 Exporting data logs 8 9 Importing exporting archives 8 11 Saving setup 8 13 Loading restoring setup 8 14 9 Data management 9 1 Overview 9 1 General information 9 2 Patient Results Log 9 4 Patient Profiles Lo...

Page 16: ...procedures 11 78 Pump troubleshooting procedure 11 80 Fluid transport system description 11 81 12 Sampling 12 1 Overview 12 1 Causes of errors in preanalytical phase 12 2 Preparation prior to arterial venous sampling 12 5 Preparation prior to capillary sampling 12 7 Sampling devices 12 8 Storage and preparation prior to analysis 12 9 Sampling procedures 12 12 References 12 15 13 Specifications 13 ...

Page 17: ...Overview 14 1 Analyzer accessories 14 2 Quality control 14 5 Sampling devices 14 7 15 Radiometer settings 15 1 Overview 15 1 Radiometer default settings 15 2 Contents of setup settings 15 15 Calibration verification 15 18 Interfacing facilities 15 20 Index Date of issue ...

Page 18: ...Contents ABL800 FLEX Operator s Manual ...

Page 19: ...anual Throughout this manual ABL800 FLEX analyzer is used for all ABL8xx FLEX analyzers i e ABL837 835 830 827 825 820 817 815 810 805 and ABL810 BG only The abbreviation ABL8x7 FLEX analyzer is used for the ABL837 27 17 FLEX analyzers throughout this manual Contents This chapter contains the following topics Names and intended use 1 2 Limitations of use and known interfering substances 1 4 Warnin...

Page 20: ...Parameter group Parameters pH acidity pCO2 carbon dioxide tension pH blood gas pO2 oxygen tension ctHb total hemoglobin concentration sO2 oxygen saturation FO2Hb fraction of oxyhemoglobin in total hemoglobin FCOHb fraction of carboxyhemoglobin in total hemoglobin FHHb fraction of deoxyhemoglobin in total hemoglobin FMetHb fraction of methemoglobin in total hemoglobin Oximetry FHbF fraction of feta...

Page 21: ... FLEXMODE provides the highest number of parameters from all available to as many as reliably possible This mode is not available in the ABL8x7 FLEX analyzers Measurements on pleural fluids Pleura pH can be measured on pleural fluids Corrections are present in the device Other fluids mode All parameters available on your ABL800 FLEX analyzers can be measured on fluids other than heparinized human ...

Page 22: ...the sampling procedures described in chapter 12 Sampling Failure to follow these procedures may introduce clots or air bubbles in the sample and yield erroneous results NOTICE Bilirubin measurements on plasma and creatinine measurements on plasma and serum need to be measured in Other fluids mode as the other modes are intended for measurement on human whole blood only Corrections for Creatinine c...

Page 23: ...ts on the Ca electrode and it will reduce the lifetime of this electrode Thiocyanic acid degradation product from treatment with nitroprussid Also produced in thiosulphate treatment of cyanide poisoning Erroneously high cGlu and cLac measurements Glycolic acid ethyleneglycol degradation product Erroneously high cLac measurements Insufficiently stabilized blood Caustic fluids e g strong acids or ba...

Page 24: ...ve into the sample and give erroneously low cCa2 results Therefore we recommend Radiometer accessories together with our analyzers e g the safePICO arterial blood sampler which is specifically designed to minimize sample contamination with CMC Galactose glucosamine maltose mannose xylose Erroneously high cGlu measurements CAUTION Known interfering substances continued For detailed information see ...

Page 25: ...y hazards The designation of a hazard alert as a warning is reserved for the most significant problems The term WARNING is generally used as signal word for this type of hazard alert CAUTION The term precaution is used for the statement of a hazard alert that warns the reader of a potentially hazardous situation which if not avoided may result in minor or moderate injury to the user or the patient...

Page 26: ... of Electrical and Electronic Equipment WEEE The symbol indicates that Radiometer Medical ApS and its distributors within the European Union EU and associated states have taken the necessary steps to comply with the directive 2002 96 EC on waste electrical and electronic equipment WEEE The instrument when reaching its end of life must be collected and recycled separately from other waste according...

Page 27: ...ding to their related function This chapter describes the basic parts of the ABL800 FLEX analyzer and its software Contents This chapter contains the following topics Analyzer front 2 2 Analyzer rear 2 4 Measuring section 2 5 Inlet module 2 7 FLEXQ module 2 8 Thermal printer 10 2 2 2 2 2 2 2 2 2 Communication ports 11 Barcode reader 13 AutoCheck module 14 Screen elements 15 Menu structure 24 Analy...

Page 28: ...ection A sensor detects when container is full and a message is displayed on the screen Rinse Solution For rinsing the liquid transport system after various analyzer activities FLEXQ module See FLEXQ module in this chapter Barcode reader See Barcode reader in this chapter AutoCheck module See AutoCheck module in this chapter Cal 1 Solution For performing 1 and 2 point calibrations Cal 2 Solution F...

Page 29: ...TION Installation of correct software Install only software which is strictly intended for use with the analyzer Installation of other types may affect analyzer performance pH Blood Gas BG module Measures pH pO2 pCO2 and cCl See measuring component detail Electrolyte Meta bolite El Met module Measures cCa2 cK cNa cGlu and cLac See measuring section detail Met II module Measures creatinine Only ava...

Page 30: ...e 74 64 N2 Gas 2 cylinder Contains a gas mixture of 11 22 CO2 0 04 O2 balance 88 74 N2 Fan For cooling internal components Gas cylinder socket For mounting the gas cylinders Communication ports See section Communication Ports in this chapter Power switch For turning the analyzer on position I and off position O Power socket For connecting the power cord In USA If source is 120 V use Radiometer cor...

Page 31: ...lift upwards Sample path Transports samples solutions and gas mixtures pH BG module Contains the measuring chamber with the pH reference pCO2 pO2 and cCl electrodes El Met module Contains the measuring chamber with the cCa2 cK cNa cGlu and cLac electrodes a filter is installed for the cGlu and cLac electrodes Met II module Contains the measuring chamber with the cCrea A and cCrea B electrodes Only...

Page 32: ...trode pO2 electrode cK electrode cNa electrode pH electrode cCa 2 electrode cCrea B electrode cCrea A electrode The table below describes each electrode Module Electrode Type pH BG cCl E744 pCO2 E788 pO2 E799 Reference E1001 pH E777 El Met cLac E7077 cGlu E7066 cNa E755 cK E722 cCa2 E733 Met II cCrea A E8088 cCrea B E8089 NOTICE An orange filter is placed in the measuring chambers for the cGlu cLa...

Page 33: ... inlet flap post Preheater Probe attachment Part Function Probe attachment Secures inlet probe Open the clip to remove probe Preheater Heats all samples and gases to 37 C Inlet probe Automatically moves into the syringe to aspirate the required sample Capillary inlet flap post Holds the inlet flap for capillary samples Syringe inlet flap post Holds the inlet flap for syringe samples Capillary inle...

Page 34: ...odule Parts and functions FLEXQ module for automatic transport of samplers to the inlet is shown below FLEXQ position before or after analysis FLEXQ position during analysis Continued on next page Samplers Barcode reader Sampler tray Indicator diodes 2 8 ...

Page 35: ...ode A short beep indicates that the barcode has been read You can scan the Sampler ID on the analyzer s scanner and then place it in the sample tray or you can place the sampler in the sampler tray and let the FLEXQ scanner read the sampler barcode Sampler tray cover The sampler tray cover has three slots for the samplers the slots have optical switches for detecting the sampler The cover can be r...

Page 36: ...nter head and paper guide in order to adjust paper alignment Remember to return the lever to its original position as shown in order to print Drive roller Feeds the thermal paper through the printer Paper guide Located behind the drive roller it is between this and the drive roller that paper is fed Paper roll holder Holds the paper roll in place Cover Open to replace the paper roll Contains instr...

Page 37: ...ports are as follows Port Function Display unit port For connection to the analyzer s display Mouse port PS 2 connector used for the connection of a standard mouse user supplied Keyboard port PS 2 connector used for connection of a keyboard user supplied Serial port COM2 9 pin serial port used for HIS LIS communication or connection of an external barcode reader Network RJ45 ethernet interface con...

Page 38: ...nnecting USB devices e g a removable drive USB keyboard supported Other USB devices need an approved XP driver user supplied mouse or modem etc Fuse for printer unit The compartment contains 1 protective fuse 5 20 mm 4 Amp Slow blow T4AL order code number 450 035 Main fuse The compartment contains 2 protective fuses 5 20 mm 4 Amp High break T4AH Type Shurter No 0001 2510 order code number 450 144 ...

Page 39: ...s Label on the cylinder Pump tubing Label on the tubing packaging Fan filter Label on the box containing the filter Inlet gasket Label on the box containing the inlet gasket In addition to the items above you can enable every text box on the Patient Profile Patient ID Patient Result QC ID and Recording Fluid Replacement screens where it is possible to enter a barcode refer to Miscellaneous Setup i...

Page 40: ...ction Retractable cover Gives access to the carousel You can either slide the carousel cover open or press Menu Analyzer Status AutoCheck More Open Module Make sure that no objects prevent the cover from opening freely AutoCheck carousel Contains the AutoCheck ampoules packed according to the optimal packing list see Refilling the AutoCheck carousel in chapter 7 Replacements 2 14 ...

Page 41: ...ottom section For the analyzers without the FLEXQ module the Ready screen looks as follows The Ready screen appears automatically if the touch screen remains idle for more than 3 minutes The screen intensity reduces by 50 when the analyzer is not used The status bar varies slightly according to which screen you are in and the status of the analyzer Top section Example The status describes the curr...

Page 42: ...y no problem is detected on the given measuring channel Yellow parameter Error associated with the given parameter during last calibration or quality control measurement The parameter is unreliable and will have if requested in Corrective Actions in front of the result Red parameter Serious error associated with the given measuring channel Parameter cannot be used at all and will be displayed as o...

Page 43: ...elements Slot condition of each sampler tray slot 1 2 and 3 is indicated with the arrows that reflect the indicator diodes in the sampler tray Green Place the sampler into the slot or remove it from the slot Yellow Do not remove the sampler from the slot Blinking green Wait for the sampler to be identified Blinking yellow Remove the sampler from the slot Sampler ID appears when the sampler is plac...

Page 44: ...en is reserved for the analyzer messages and is entered in the Miscellaneous Setup see chapter 3 in this manual Other screen types and their elements are described on the following pages Icon and screen name identify each screen Example Icon Screen name The icon and title of a screen are the same as the button that gives access to that screen Continued on next page 2 18 ...

Page 45: ... one item at a time upward or downward A double arrow scroll button highlights an item at the top or the bottom of the screen Scroll bar Scroll keys The first line is highlighted To highlight another line use the up and down arrow buttons or touch this line in the box Enter the data using the screen keypad or keyboard In this text box you can select one of the predefined options Use the up and dow...

Page 46: ... is selected A function is deselected or deactivated Parameter is deselected Screen keypad allows the entry of numerical data on the screen Numerical keys from 0 to 9 Decimal point The buttons listed below have the following functions Press to confirm a numerical entry and to highlight the next line in the text box Press to delete a character from right to left or to type in the new data the box i...

Page 47: ...ter Press to confirm the entry and to return to the previous screen Backspace Press to delete characters from right to left Press to cancel any changes made in the activated text box and to return to the previous screen Press to delete an entry in the activated text box Shift Press to type a capital letter or symbol Press to lock the keyboard in order to type capital letters and symbols on the num...

Page 48: ...om of the screen can be selected in the Setup program Access Profiles in the Analyzer Security menu together with the access profiles for each operator for detailed information see the description in chapter 3 Installation and setup Note the functions of the following buttons Returns you to the previous screen in the same program e g in the Patient Results log it will return you from the Patient I...

Page 49: ...yzer is connected to the RADIANCE system Shows that an analyzer is connected to the QA Portal Shows the time of the next scheduled calibration The time changes when a calibration has been completed Shows the time of the next scheduled QC measurement The time changes when a QC measurement has been completed Shows that the remote operator is connected Click to make more icons visible Click to reduce...

Page 50: ...Check measurement To edit data in the data logs The menu above and the scope of actions are suitable for those users whose activities include performing measurements and occasional replacements Continued on next page Allowed actions at analyzer startup Utilities Start Progs Data Logs Auxiliary Progs Rinse Cleaning Protein Removal Decontamination Standby Temporary Shutdown Patient Results Log Patie...

Page 51: ...d 123456 Standard password 123456 See chapter 3 Installation and setup Analyzer Security in this manual for further information about the logon possibilities Confirm with Enter 3 Press Menu to access the complete menu see the next section The access possibilities for each user of the analyzer and their passwords are entered in Setup program Access Profiles see chapter 3 Installation and setup in t...

Page 52: ...up Load Setup Restore Default Setup Eject CD Standby Sample Counter Temporary Shutdown Long term Shutdown Setup Analysis Setup QC Setup Calibration Setup Replacement Setup General Setup Analyzer Security Print Setup Start Progs Data Logs Last patient result My results Log on Help Tutorials Analyzer Status Utilities RADIANCE Browser optional Patient Report Archive Quality Control Archive Calibratio...

Page 53: ...ess Profiles in the Analyzer Security menu Example You as a user can enter the following Rinse Patient Report and QC logs and Standby programs Then your menu after you have logged on will look like this Rinse Analyzer Status Log on Start Progs Patient Report Log QC log Utilities Data Logs Last patient result Help Standby For details see the chapter 3 Installation and setup and chapter 15 Radiomete...

Page 54: ...n the Analyzer Status button Analyzer Status button Red cannot be used Yellow unreliable Green OK To enter the Analyzer Status screen press Menu Analyzer Status Analyzer Status elements Traffic light color of the Analyzer Status button is determined by the traffic light colors of the following status elements Status element The colors indicate Calibration Status GREEN OK YELLOW error s in the last...

Page 55: ... present time others YELLOW a replacement is due System Messages GREEN no critical messages YELLOW non critical messages RED critical messages The analyzer cannot calibrate or measure AutoCheck GREEN no replacements due at the present time Status YELLOW a replacement is due Calibrations status The Calibrations status gives an overview of the status of the most recently performed calibration of eac...

Page 56: ...cified type is due according to the Calibration Schedule see Calibration Schedule chapter 3 Interval The time interval between calibrations as set up in the Calibration Schedule The following buttons are available During a calibration Result Press to display the result of the highlighted calibration Electrode Upd Press to display the electrode updatings for the ongoing calibration After a calibrat...

Page 57: ...II Solution for ABL8x7 FLEX analyzers only is used for quality control of high creatinine levels OK The last measurement was accepted One or more of the following occurred error in the last calibration analyzer error during last QC measurement a parameter measurement is outside the defined ranges or a Westgard Rule has been violated The next measurement is overdue and the previous measurement if a...

Page 58: ...lutions and gas cylinders Buttons Replace Press to enter the screen for replacements of fluids see chapter 7 Replacements Adjust Level Press to enter the Solution Level Adjustment program to make adjustments see chapter 3 in this manual Troubleshoot Press to view the error interpretation and operator actions see the description in chapter 11 Troubleshooting Close Press to exit to the Ready screen ...

Page 59: ...chapter 7 Log Activity Activate User Activities part of the screen to make this button visible When the button is visible press it to enter the User Activity program to edit the user activities list see chapter 3 in this manual Close Press to exit to the Ready screen See chapter 11 Troubleshooting System messages AutoCheck status AutoCheck Status is available only if the AutoCheck module has been ...

Page 60: ...n lot combination according to the scheduled setup Next Replacement To show the date and time for refilling the carousel according to the scheduled setup Available To show the presently available AutoCheck control solutions type lot and quantity of ampoules in the carousel Use the up down arrow buttons to highlight the desired solution Continued on next page 2 34 ...

Page 61: ...mpoules Button unrolls to access the following buttons Packing List Displays the Optimal Packing List screen Reset Cancels any pending quality control measurements Interrupts ampoule conditioning in the carousel Resets wet section programs Open Module Opens the cover of the AutoCheck module AutoCheck Programs Displays the AutoCheck Programs screen to start an AutoCheck measurement 2 35 ...

Page 62: ...ation Help The Contents screen displays all help topics Each topic is hyper linked to either the next topic level or to the appropriate help text screen Use the scroll bar or touch the text to search through the topics and access the relevant help information Press the Previous Topic button to display the help text of a previous screen The Index screen is an alphabetic list of subjects in the help...

Page 63: ... Preview shows the highlighted sequence animation To start a tutorial on full screen highlight the topic of interest from the menu using the arrows and press the Play button Topic Contents Blood Samples Videos of a capillary syringe or expired air sample introduction by highlighting it Quality Check Videos of manual or AutoCheck quality control Replacement Video sequences on various replacements T...

Page 64: ...ture show next picture Switch on the sound voice presentation of a sequence with volume regulation Switch off the sound Show the list of video sequences The button puts Tutorials in the background in order to perform an action and then to return to Tutorials again The x button exits Tutorials When a button is grayed out it is not functional 2 38 ...

Page 65: ...er of sample measurements calibrations and QC measurements made since the sample counter was last reset User column The following is registered Activity Number of Total Completed sample quality control measurements calibrations only Interrupted or aborted measurements are excluded Aborted Aborted sample quality control measurements calibrations due to sample errors wet section errors etc interrupt...

Page 66: ...inued Element Function Reset Counters For the analyzers with no logon protection of the Setup programs press this button to reset the counters in the User column Print Press to start the printout of information in Counters and in Parameters Close Press to return to the Ready screen 2 40 ...

Page 67: ...ntents This chapter contains the following topics Installation 3 2 Setup menu structure 3 3 Analyzer security 3 6 Analysis setup 3 13 Patient reports 3 26 Calibration setup 3 32 Quality control setup 3 35 Replacement setup 3 48 Parameters and input setup 3 55 Analyzer settings 3 62 Communications 3 68 Printers 3 77 Disk Functions setup 3 80 Corrective actions 3 83 Miscellaneous setup 3 86 ...

Page 68: ...meter representatives in your country The reason for it is that due to the analyzer s modular design each user can select only those modules that cover his her specific needs These modules are installed and checked at the user s place Installation of consumables and accessories are exactly the same as the procedures described in chapter 7 Replacements 3 2 ...

Page 69: ...nges Calibration Setup Cal Schedule Drift Tolerances Analysis Setup Capillary Modes Syringe Modes Patient Reports Reportable Ranges Reference Ranges Sample Pre registration Sample Logistics Setup Analyzer Security General Security Operators and Passwords Access Profiles Replacement Setup Replacement Schedule User Activities Solution Level Forecast Solution Warning Expiration Warning AutoCheck Warn...

Page 70: ... RADIANCE Connection LIS HIS Connection QA Portal Automatic Data Transmission Automatic Data Request Patient Lookup Setup Remote Support Miscellaneous Setup Corrective Actions Disk Functions Setup Automatic Backup Automatic Archiving Note that the exit from a setup program returns you to the Ready screen You will find it more convenient to place some buttons e g Utilities on the Ready screen to sh...

Page 71: ...ter or scan your user name and password or your logon barcode Confirm with Enter Print Setup This program allows you to print parts of the setup To select the parts of the setup for printing do the following Step Action 1 Press Menu Utilities Setup Print Setup 2 All setups are selected as a default Press the relevant check buttons to deselect the setup that you do not wish to be printed out 3 Pres...

Page 72: ... Utilities Setup Analyzer Security General Security To hand over the control of the operators and passwords to the RADIANCE system activate the check button in the Centralized User Management box With this option enabled you can only view the operators not add edit or remove any of them All users defined on the ABL are deleted and the list of users in the RADIANCE system is copied to the ABL NOTIC...

Page 73: ...ame and password can be scanned Logon barcode only This option allows you to enter or scan a Logon barcode in the Logon screen To allow an anonymous use of the analyzer i e use without logon use the up down arrow buttons to select Yes in the Anonymous use box default and select the desired access profile of the anonymous operator in the Access profile for anonymous operator box The Access profile ...

Page 74: ... Utilities Setup Analyzer Security Operators and Passwords Shows the list of actual operators Shows the list of available operator profiles When the analyzer is taken into use the following default operators are available Operator Has access to Manager All menu items and programs not service programs It is recommended to remove this operator with the standard password 123456 and enter the actual u...

Page 75: ...ters long and not more than 32 4 Re enter or re scan the password in the Confirm box 5 Enter or scan the logon barcode in the Logon barcode box The logon barcode must be at least four characters long The logon barcode and the password can be identical 6 Re enter or re scan the logon barcode in the Confirm box 7 Press Back If the password is not accepted the Add New Operator screen remains open and...

Page 76: ...e or edit the operators but only view the access profiles of the individual operators Access Profiles This program allows you to define the permitted actions the available menu items and button shortcuts of an access profile To enter this program press Menu Utilities Setup Analyzer Security Access Profiles To define the permitted actions of an access profile select the desired profile in the Profi...

Page 77: ...enus and Buttons Note that this button is grayed out for the service technician profile 2 Select the desired menu items in the Menu Items in Quick Menu box A grayed out item in the Menu Button Configuration screen indicates that only some subitems were selected in this group Clear checked items indicate that all subitems have been selected The buttons allows you to do the following Highlight menu ...

Page 78: ...hen in the Button configuration box press the button position that you wish to give the selected item 4 Select other five buttons in the same manner if desired 5 To deselect a button press it once again 6 Press Back to return to the Access Profiles screen Enabling the My Results option will give the operator an easy access to all Patient Results made by that operator by displaying the Patient Resu...

Page 79: ...ibed in this section Activate a button to enter the program The Syringe Modes Setup and Capillary Modes Setup are shown below Syringe Modes and Capillary Modes Setup Continued on next page To select a measuring mode To enable a mode The activated button will be selected as default mode when opening the inlet 3 13 ...

Page 80: ... 4 Enter corrections for the Other fluids mode by pressing Corrections see Entering corrections for Other Fluids Modes further in this section 5 Select the report layout for a measuring program by pressing Layout see Selecting a report layout further in this section NOTICES You can use one of the syringe measuring modes for test tubes Use Capillary 35 μL OXI for bilirubin analysis ctHb 0 on plasma...

Page 81: ...ers option in the Use dynamic parameters box as follows Parameters can be selected before a measurement Parameters can be selected after a measurement 4 Press the Back button to return to the Syringe Modes Setup or Capillary Modes Setup screen A parameter is disabled i e excluded from the Parameter Profile screen and the parameter bar in General Setup Parameters and Input Parameters Disabled versu...

Page 82: ...er 2 Return to the Analysis Setup choose the desired syringe or capillary program and press the Parameters button to enter the Parameter Profile screen 3 Activate the check button in the Use HbF correction box if Disabled for all levels has been selected in Miscellaneous Setup the text box and the check button in it will not be visible on this screen 4 Press the dynamic parameters check button in ...

Page 83: ...he Other Fluids mode and press the Corrections button on one of the Modes Setup screens Capillary or Syringe 2 Highlight the parameter with the arrow buttons and press Edit 3 Key in the slope and offset values Confirm each entry with Enter Please note that only values within the range programmed into the software will be accepted Press Back to confirm the entries and return to the previous screen ...

Page 84: ...ep Action 1 Select a measuring program 2 Press the Layout button on one of the Mode Setup screens 3 Select the layout for the measuring program from the list made in the Patient Report Setup see Patient report further in this chapter The selected layout will be the default layout for the given measuring program Press Back to confirm the settings 4 Continued on next page 3 18 ...

Page 85: ...limits To view the reference ranges and critical limits highlight a parameter in the Parameter list box using the arrow buttons View the settings for a highlighted parameter Selecting sample type To select a sample type highlight a parameter in the Parameter box using the arrow buttons Press the check button in the Sample type box and select a sample type using the arrow buttons in the box To deac...

Page 86: ... through the list of possible age limits As the list is scrolled the text on the age group bar changes accordingly 3 Repeat step 2 for each limit to be changed 4 Press Back when completed to return to the Reference Ranges and Critical Limits screen Activate the Age group check button 5 To deactivate age group differentiation press the check button again Setting reference and critical limits To set...

Page 87: ...Back when completed 6 Reportable ranges To change or enter a reportable range must be selected smaller than or equal to the measuring range do the following Step Action 1 Scroll to the desired parameter using the up down arrows or scroll bar 2 Key in the desired lower limit and confirm with Enter on the keypad 3 Key in the upper limit and confirm with Enter on the keypad Measured parameters show t...

Page 88: ...creen Press Close to exit the program and confirm the selected settings 6 See also Calibration verification in chapter 15 in this manual Sample Pre registration setup This program allows you to select interpretation of the barcode and the patient data that can be confirmed before a sample measurement To select the settings do the following Step Action 1 Use the up down arrow buttons to select the ...

Page 89: ...d return to the Ready screen 5 Sample Logistics Setup This program allows you to select the following the batch mode automatic sample handling Patient Identification shown on the Ready screen and to define maximum allowed sample age for each measured parameter Batch mode automatic sample handling The batch mode allows you to place your sampler in an empty slot in the FLEXQ sampler tray and leave t...

Page 90: ...the following time registration items in the Patient ID Draw time i e when the sample was obtained from the patient is entered by the operator on the Patient Identification screen on the analyzer or obtained from the RADIANCE system Sample registration i e when the sample was registered by the analyzer is automatically registrered by the analyzer Time before FLEXQ i e sample transport time to the ...

Page 91: ...tion 1 Activate the check button in the Calculation of sample age box 2 To select the same age for all parameters press Set all To select the sample age for each parameter individually highlight a parameter in the Sample aging time per parameter box using the up down arrow buttons 3 Select sample age for the highlighted parameter using up down arrow buttons 3 25 ...

Page 92: ... with the name New displayed on the right side of the screen in the Name box If you wish to make a copy of an existing layout and use it as a basis for a new layout select the desired layout and press Copy Copy will be added to the name in the Name box i e R default Copy Press the keyboard icon beside the Name box Type in a new name for your layout Confirm with Enter to return to the Patient Repor...

Page 93: ...elect the desired layout and press R Default To delete a highlighted layout press Delete Note that the Radiometer default layout cannot be deleted The button is disabled if only the Radiometer default layout is available Editing a layout To edit a layout do the following Step Action 1 Highlight a layout in the list by touching it on the screen 2 Press the Edit Patient ID Layout button to edit the ...

Page 94: ...st of selected items press the button 2 To remove a highlighted by touching it on the screen item from the Selected items box press the button 3 To make a highlighted item in the list of selected items mandatory press the Set as Mandatory button The item will be indicated by a on the Patient ID screen and must be entered during a measurement before a patient result can be viewed To remove the mand...

Page 95: ...ht the option using the arrow buttons and press Enter to confirm 3 Set or change other default values in the similar manner 4 Press Back to exit and confirm changes NOTICES It is not possible to set default values for all items The values can be changed on a result by result basis on the Patient Identification screen An item placed in the Selected items list does not appear in the Available items ...

Page 96: ... the arrow buttons to highlight a parameter group and press Include Exclude to include the group in the patient result It will be shown in the Selected items box 3 Select parameters for this parameter group by highlighting them one by one and pressing Include 4 Select another parameter group and parameters for this group in the same manner 5 Use layout commands New group items following this comma...

Page 97: ...em checked against reference ranges critical limits do the following Highlight a parameter Press Show Ranges to indicate it by xxx xxx Repeat for other parameters in the same manner If the xxx xxx is not included for a parameter checking against reference ranges critical limits is disabled for this parameter However checking against the reportable ranges is always performed NOTICE Refer to the Ref...

Page 98: ...e default drift tolerances Too narrow drift tolerances will cause electrode drift errors even for normal electrode fluctuations If the drift tolerances are made wider no warning will be given if the electrode should become unstable Significant measurement errors could result To define your own drift tolerances do the following Step Action 1 Highlight the desired parameter by touching it on the scr...

Page 99: ...nd select a calibration to be performed after a sample measurement To edit the schedule for automatic calibrations cleaning and tHb calibration do the following Step Action 1 Highlight the desired calibration or cleaning on the screen 2 Press the Edit button 24 hour scale shows the time for each scheduled automatic calibration or cleaning List of activities calibrations and cleaning Activity after...

Page 100: ...vailable Option Interval 1 Point calibration 30 min 1 hour 2 or 4 hours 2 Point calibration 1 hour 2 4 or 8 hours 1 Point pH BG calibration for the USA only 30 min 1 hour 2 hours tHb calibration Never 7 days 1 month 2 3 4 or 6 months Start time 00 00 00 15 00 30 00 45 23 45 or 12 midnight 12 15 am 12 30 am 12 45 am 12 midday 12 15 pm 11 45 pm Activity after measurement none 1 Point pH BG calibrati...

Page 101: ... or change a quality control solution to a specific slot NOTICE Changing a control solution assigned to a slot will delete all current quality control statistics obtained on that slot If you want a copy of the statistics for the last QC month create a WDC Report see chapter 8 Disk Functions NOTICE for the ABL8x7 FLEX analyzers only Slot 11 is assigned to the Cleaning Met II Solution used for high ...

Page 102: ...s in step 3 above appears Press Accept to continue with the removal of the control solution Press Cancel to cancel 5 To define whether an AutoCheck quality control measurement is to be run manually or automatically press the Manual Auto button Useful if the AutoCheck module is out of order The following quality control solutions can be used with the ABL800 FLEX analyzers Quality control system Ana...

Page 103: ... the Quality Control Systems Reference Manual for detailed information on statistics and its parameters To edit data for the control solution do the following Step Action 1 Use Next Slot to display the desired slot Press Edit 2 Select the parameter to be edited using Next Param or Prev Param Selected control solution Parameter Press Update to change the range to the one shown in the Lot to Date ra...

Page 104: ...heck button To change the SD value touch the SD field to highlight it and enter the value using the keypad Confirm the entry with Enter 6 Repeat the procedure for other parameters in the same manner 7 To update the control ranges for all parameters of a displayed level to the corresponding lot to date 2 SD range shown display the desired slot using Next Slot Press Update All 8 Press Continue to up...

Page 105: ...ess altered by the operator To select the settings do the following Step Action 1 Activate the Mandatory temperature check button A will appear next to an empty temperature box on the Quality Control Identification screen during each quality control measurement and a temperature must be entered otherwise the result cannot be retrieved 2 Highlight the default temperature in the Default temperature ...

Page 106: ...se the and buttons 2 To display other weekdays use the and buttons Symbols for manual and automatic quality control are as follows measurement s on the control solution manually performed measurement s on the control solution automatically performed To add a new quality control solution to a schedule do the following Step Action 1 Select the desired time 2 Press the Add button to display the scree...

Page 107: ...erformed 5 Highlight the Start time box Key in the time to perform a measurement and confirm with Enter on the keypad NOTICE The symbols for the automatic or manual quality control given on the previous page will automatically appear in the schedule 6 Highlight the Repeat box Select the interval the measurement should be repeated using the up down arrow buttons in the box 7 Press Back to return to...

Page 108: ... slot number Press Back to return to the QC Schedule screen 3 QC Statistics This program allows you to select the following the statistics factor the initiation of warning messages at the end of the statistical month To select the settings do the following Step Action 1 Statistics factor expands the control range to the statistics range it is a range within which quality control results must fall ...

Page 109: ...control results can increase the probability of detecting an error in the sampling procedure or in the analyzer itself or help detecting a shift or trend in your quality control results by comparing current measurement values of a control solution with previous values This program allows you to select Westgard Rules for all slots or for specific parameters To activate or deactivate the assigned We...

Page 110: ... current settings for the parameter 5 Display the desired parameter using the Next Param or Prev Param buttons Parameter 6 Activate the desired Westgard Rule s by pressing the corresponding check button Once edited all future quality control measurements on the parameter for the given slot will be evaluated according to the selected Westgard Rule s 7 Select Westgard Rules for other parameters or l...

Page 111: ...y to return to the settings as they were use the On Off button When a quality control measurement violates an applied Westgard Rule a W is added to the parameter in the result For a detailed explanation of how to interpret and evaluate results with respect to Westgard Rules see chapter 7 of the Quality Control Reference Manual Reference Westgard JO Barry PLL Cost effective quality control managing...

Page 112: ...äk rule do the following Step Action 1 Press the Add button to display the screen below 2 Select the desired parameter from the parameter list shown in the right side of the screen 3 Press the Left arrow button until the first Lower Limit box is highlighted and enter the desired lower limit 4 Highlight the next box and select or 5 Highlight the first Upper Limit box and select or 6 Highlight the n...

Page 113: ...äk rule do the following Step Action 1 Select the desired rule in the Rilibäk Ranges screen and press Edit to display the screen below 2 Use the Right or Left arrows to jump between the input boxes and edit the desired values Press Back to return to the Rilibäk Ranges screen 3 To remove a Rilibäk rule do the following Step Action Highlight the desired rule in the Rilibäk Ranges screen and press De...

Page 114: ...ment schedule This program allows you to schedule routine replacements along with the current scheduled date and interval for replacement The settings selected here are then used in the Replacements on the Analyzer Status screen To edit the schedule of replacement actions do the following Step Action 1 Highlight the replacement action to be scheduled and press Edit Continued on next page 3 48 ...

Page 115: ...vals below are guidelines only Under no circumstances do they guarantee the lifetime of the replacement items For analyzers with high throughput the replacement intervals should be adjusted accordingly in the Replacement schedule Recommended replacement intervals For an average of 40 samples per day Action Interval Replacing Crea A and Crea B electrode membranes 14 days Replacing metabolite membra...

Page 116: ...er activity To add the user activity do the following Step Action 1 Press Add to display the Edit User Activities Schedule screen 2 To add text press the keyboard icon and type the activity Confirm with Enter on the keyboard Choose the Interval with the up and down arrow keys in the Interval box 1 2 3 4 5 6 7 10 14 20 30 days or 2 3 4 6 8 12 18 24 months 3 Type the Next date using screen keypad Co...

Page 117: ...it the text Confirm the text with ENTER Change if desired the interval or next date confirm the date with Enter 3 Press Back to return to the User Activities screen 4 Edit other user activities in the same manner Deleting a user activity To delete a user activity from the list do the following Step Action 1 Press Delete on the User Activities screen 2 Press Continue to delete the activity Press Ca...

Page 118: ...warning level in using Increase or Decrease 3 Select warning values for solution levels in other bottles in the same manner Press Close to confirm the settings 4 Reagents Expiration Warning This program allows you to set the time for the analyzer to give a warning before the calibration and cleaning solutions with additives will expire To set the time for the warning do the following Step Action 1...

Page 119: ...tep Action 1 Select the solution bottle using the Next bottle or Prev bottle button the Rinse solution has been selected on the screen 2 Select the true level in with the up and down arrow buttons on the screen The bottom of each solution bottle has markings for solution levels Other Solutions Rinse Solution You can also remove the solution bottle to check the level and the analyzer will not enter...

Page 120: ...efault values α 1 00 and β 100 0 press the Set Default button Press Close to confirm the settings 5 AutoCheck Replacement Warning This program allows you to select the time for a reminder to appear in the System Messages in order to fill up the carousel To select time for the reminder do the following Step Action 1 Use the up down arrow buttons to select one of the settings No 1 hour 2 hours 4 8 1...

Page 121: ...epress parameters if any problems are detected lock a parameter make user defined corrections for each measured parameter make out of range suppression of oximetry parameters and bilirubin To disable enable a parameter do the following Step Action 1 Highlight a parameter on the screen using the scroll facilities Press Enable Disable to include or exclude the parameter from a parameter profile and ...

Page 122: ...d parameter will show red on the parameter bar and will change the overall analyzer status traffic light on the Analyzer Status button to red The parameter value will be absent from the printout However the locked parameter will be calibrated 2 To unlock a parameter highlight it and press Lock Unlock The traffic light on the Analyzer Status button will change from red to a color corresponding to t...

Page 123: ...L 3 Use the keypad to enter the following for the highlighted parameter Correction offset Confirm the entry with Enter Correction slope Confirm the entry with Enter Press Back to return to the previous screen and repeat steps 1 3 for another parameter if desired 4 NOTICE User defined corrections for blood measurements will influence the measurement results from blood and QC analyses and change the...

Page 124: ...ameters in a similar manner Press Close to return to the Ready screen 5 User defined Patient Data Items This program allows you to include other patient data in the Patient ID layout than those already available there To add a new item to the list do the following Step Action Press Add 1 Follow the procedure for editing an item from step 2 see the next page 2 Continued on next page 3 58 ...

Page 125: ...he up down arrow buttons and press Select For Text entry proceed to step 8 For Numerical entry proceed to step 4 4 Highlight Unit The keypad is now displayed Press the keyboard icon on the keypad and type in the new name of up to 20 characters Confirm with Enter 5 Decimals is now highlighted and the box with None 1 2 3 is displayed Choose the number of decimals with the up down arrow keys and pres...

Page 126: ... Add as many items as you wish in the same manner The check button can be activated only if the selection list contains two or more items Press Back to return to the User defined Patient Data Items screen The new entry will be included in the list 9 To include the new items in a Patient ID Layout press Menu Utilities Setup Analysis Setup Patient Reports Patient Report ID and follow the procedure d...

Page 127: ...r to save the text and return to the previous screen Your Note is now included in the list List of Notes for a selected option 3 To edit a Note highlight it in the Notes box using the up and down arrow buttons and press Edit The keyboard will be displayed with the Note text on it Edit the text and confirm with Enter 4 To delete a Note highlight it in the Notes box using the up and down arrow butto...

Page 128: ...ows you to change the analyzer s identification To enter analyzer ID do the following Step Action 1 Touch and highlight the Analyzer name box 2 Type in an identification name and or number for the analyzer up to 32 characters using the screen keypad or keyboard Confirm with Enter NOTICE Installation number cannot be changed Quote this number in any technical inquiries you have to Radiometer Contin...

Page 129: ... to be negligible However the aqueous QC solutions have a different capacity than blood to take up oxygen and correcting for different pO2 QC values at high altitudes is imperative as deviations from the respective values at sea level are significant To correct for the different pO2 values the QC control ranges are modified according to the altitude For detailed information please refer to the Qua...

Page 130: ...lyzer calculates the correct concentrations using the equilibration constants time and the ambient temperature entered by user in the Environment Setup Menu Utilities Setup General Setup Analyzer settings For ambient temperatures between 15 C and 28 C or temperatures fluctuating through the entire operating range 15 32 C of the analyzer enter 23 5 C For ambient temperatures constantly above 28 C a...

Page 131: ...een keypad Confirm with Enter A separator is automatically added between hours minutes and seconds 3 Repeat steps 1 2 to reset the Date To revert to the previous settings press Current 4 Acoustic signal setup This program allows you to set up a short beep to sound after certain events To activate the acoustic signal do the following Step Action 1 Activate the desired check button s 2 Select volume...

Page 132: ...sults are ready for viewing Inlet is open too long The inlet should be closed Beep before AutoCheck opens A beep sounds to indicate that an AutoCheck measurement is about to take place Language This program allows you to select a language of your choice from the list of languages available on your analyzer To change to another language do the following Step Action 1 Select the desired language wit...

Page 133: ...inued Step Action 3 If you pressed Continue Press Continue once again to restart the analyzer right away and to use the new selected language right away or Press Cancel to continue operating the analyzer with the current language until the next restart where the language then will be changed 3 67 ...

Page 134: ...he analyzer to the RADIANCE system RADIANCE Communication Setup NOTICE Connecting the analyzer to the RADIANCE system should be performed by the RADIANCE administrator in your institution To enable communication with the RADIANCE system do the following Step Action 1 Touch and highlight the Server address box Type in the TCP IP address of your RADIANCE PC using the screen keypad or keyboard 2 Touc...

Page 135: ...connection as well 5 The Output queue box shows the number of data queued up for transfer It will be sent to the RADIANCE system Otherwise clear the queue by activating the recycle bin icon Press Close to exit the screen 6 This program allows you to select the communication protocol for a connected device To select the communication protocol do the following LIS HIS Connection Setup Step Action 1 ...

Page 136: ...igh level protocol according to the requirements of the connected device Select between ASTM ASTM6xx HL7 version 2 2 HL7 version 2 5 or POCT1 A DML using the up down arrows in the box 4 Select the low level protocol as follows Use Serial or Serial RAW for the serial connection Use Network TCP IP for the network connection Use Network TCP IP ASTM for additional serial connection not all combination...

Page 137: ...ions for serial low level protocol Press Edit to display the Connection Specifications screen below b Connection specifications for network low level protocol Press Edit to display the Connection Specifications screen below HL 7 version 2 5 is used as an example c Connection specifications for POCT1 A DML low level protocol Continued on next page 3 71 ...

Page 138: ...econds to attempt re connection if connection failed Retransmit max Transmit timeout Use the keypad keyboard to enter the relevant information c Connection specifications for POCT1 A DML low level protocol Touch the screen to highlight the following boxes one after another Server address Port number Reconnect Interval Use the keypad keyboard to enter the relevant information This program allows yo...

Page 139: ... the keyboard 3 Press the check button in the Enable communication with QA Portal box to activate connection The Icon in the Connection status box indicates the state of the QA portal connection Enabled indicates an established connection to the QA portal The icon in the information bar will indicate the established connection as well Press Close to exit the screen 4 3 73 ...

Page 140: ...To select the settings do the following Step Action 1 Select a connected device in the From connection box using the up down arrows buttons 2 Activate the relevant check button s to request patient demographics from the connected RADIANCE system or LIS HIS when entering Patient ID entering Accession Number entering Sampler ID Press Close when completed 3 NOTICE If the requested patient data e g Pa...

Page 141: ... the relevant check button s to select the data to be sent to the highlighted connection NOTICE If the requested patient data e g Patient Last Name was received after exiting the Patient Identification screen the patient report will be transmitted without the requested data To prevent this select one of the patient data items transferred from LIS HIS as mandatory Patient Lookup Setup This program ...

Page 142: ...nician to log onto your analyzer and monitor its functions To select access do the following Step Action 1 Press the Enable remote access check button to allow a remote operator to log onto your analyzer When connected logged on the Remote operator appears on the analyzer status bar 2 Deactivate the check button to prevent a remote operator logging onto your analyzer NOTICE To select the access pr...

Page 143: ...analyzer ID and the sampler number Scanning the barcode will display the corresponding result To select options available on the screen do the following Step Action 1 Activate the desired check buttons for the automatic printout of the patient results QC results calibration results activity log messages and registration receipts for FLEXQ The last line will not be visible on the analyzers without ...

Page 144: ...ion 1 Highlight a printer from the list by using the arrow buttons 2 Press Select Deselect to select the highlighted printer for printing You can install any number of printers but only up to 10 printers can be selected To display the list of printers every time the Print button is pressed activate the check button in the Manual printing box If not activated all the selected printers will make a p...

Page 145: ...Installation and setup Printers Continued Printer Setup continued Step Action 5 To install a new printer press the Install Printer button This function can be used by Radiometer service engineer or a person with network knowledge 3 79 ...

Page 146: ...ect automatic backup of all data and system files Do the following Step Action 1 To select automatic backup of all data and system files activate the check button 2 Select time for auto backup by highlighting the Time box and typing the time using the screen keypad Confirm the entry with Enter Enter the interval between subsequent backups in the Interval box and type the number of days using the s...

Page 147: ...an be selected for the internal hard disk or the network When completed the correct destination should appear in the upper part of the box Automatic Archiving Setup This program allows you to select automatic archiving of the data logs by activating the relevant check button Do the following Step Action 1 To select automatic archiving on the analyzer s hard disk activate the check button 2 To sele...

Page 148: ...ontrol or calibration results or 2000 entries in the Activity log will be automatically removed from a data log and placed into the relevant archive The archives can be stored on the analyzer s hard disk and viewed in Archived Data logs or at a remote location For detailed information on archiving the old data please refer to chapter 8 Disk functions in this manual 3 82 ...

Page 149: ...s condition using the arrow buttons in the Corrective action s box see the table below 3 Select the desired traffic light signal yellow or green if available for the specified event by pressing the traffic light in the Traffic light signal box see the table below 4 Select corrective actions traffic light signal for the other conditions in a similar way Conditions and correction actions Conditions ...

Page 150: ... Corrective action Explanation on specific parameters The affected parameter s will be marked with in subsequent patient results Message on next Patient Result To mark the subsequent patient results on the Message screen Lock analyzer immediately when overdue If a quality control measurement is not run 1 minute after the scheduled time for it the analyzer will be locked As a QC takes more than 1 m...

Page 151: ...el Use ampoule last in schedule If a control solution scheduled for AutoCheck is missing in the carousel the measurement will be on the control solution type scheduled before this one NOTICES The critical system messages will always result in a red traffic light signal If the analyzer locks due to QC or replacement schedule reminders a critical system message will be generated and the traffic ligh...

Page 152: ... disabled only the Start button for samplers without a safeTIPCAP will be available Enable estimated derived parameters Enables estimation of the derived parameters based on default values even though the measured parameters have been deselected or are not available Fixed pO2 pCO2 decimals If enabled these parameters will be reported with a fixed number of decimals Enable general barcode support E...

Page 153: ...eturn to the Ready screen 3 Selecting HbF correction option This option disables HbF correction for all levels or enables it for all levels or for HbF levels higher than 20 HbF correction will be automatically disabled if FCOHb 0 5 in order to decrease a false HbF detection on adult blood samples and to ensure non biased oximetry results The guidelines for selecting deselecting HbF correction are ...

Page 154: ...rd Type the message and confirm with Enter To delete the current message press Delete on the keyboard or delete a message and type a new one if desired NOTICE The analyzer message can be up to 40 characters long Confirm the change with Enter on the keyboard to return to the Miscellaneous Setup screen 2 Screen saver To set the time for the screen saver to appear do the following Step Action 1 Check...

Page 155: ...the results Contents This chapter contains the following topics General information 4 2 Immediately before analysis 4 9 Measurements with FLEXQ 4 10 Introducing a blood sample 4 12 Introducing an expired air sample 4 15 Patient identification 4 17 Patient result 4 21 Calculation of FShunt and ctO2 a v 4 25 Patient result messages 4 26 ...

Page 156: ... system Parameter profile not received from the RADIANCE system Measuring modes will be those syringe modes that can provide the requested parameter profile these modes will be marked Flex The measuring modes are those that can be selected on the analyzer see Available modes and parameters below Default layout is always used The layout will be the one assigned to the selected measuring mode Availa...

Page 157: ...ny mode Depends on the selected mode Expired air pCO2 pO2 Ampoule QC All available 810 20 30 Syringe S85 μL Capillary C55 μL pH pCO2 pO2 and 810 ctHb sO2 820 ctHb sO2 FO2Hb FCOHb FMetHb 830 ctHb sO2 FO2Hb FCOHb FMetHb ctBil FHbF Capillary C35 μL OXI 810 ctHb sO2 820 ctHb sO2 FO2Hb FCOHb FMetHb 830 ctHb sO2 FO2Hb FCOHb FMetHb ctBil FHbF Capillary FLEXMODE See below Syringe Pleura pH pH Other fluids...

Page 158: ...2 FO2Hb FCOHb FMetHb ctBil FHbF Syringe S85 μL pH BG OXI Capillary C55 μL pH BG OXI pH pCO2 pO2 and 815 ctHb sO2 825 ctHb sO2 FO2Hb FCOHb FMetHb 835 ctHb sO2 FO2Hb FCOHb FMetHb ctBil FHbF Capillary C35 μL MET cGlu cLac Capillary C35 μL OXI 815 ctHb sO2 825 ctHb sO2 FO2Hb FCOHb FMetHb 835 ctHb sO2 FO2Hb FCOHb FMetHb ctBil FHbF Capillary FLEXMODE See below Syringe Pleura pH pH Other fluids any mode ...

Page 159: ...FCOHb FMetHb ctBil FHbF Capillary C35 μL MET cGlu cLac Capillary C35 μL OXI 817 ctHb sO2 827 ctHb sO2 FO2Hb FCOHb FMetHb 837 ctHb sO2 FO2Hb FCOHb FMetHb ctBil FHbF Syringe Pleura pH pH only Other fluids any mode Depends on the selected mode Expired air pCO2 pO2 Ampoule QC All available NOTICE The safeTIPCAP cannot be used with pleura fluids and as a consequence of this the Pleura pH measuring mode...

Page 160: ...ce of glucolic acid Never use analyzer for lactate measurements if there is any suspicion of presence of glycolic acid in blood as e g in case of ethylene glycol poisoning or xylitol infusion Glycolic acid interferes with the lactate sensor resulting in erroneously high lactate readings 2 CAUTION Risk of incorrect result Visually inspect the measuring chambers for blockages when lifting the inlet ...

Page 161: ...e CAUTION notices 2 and 4 above do not apply Interrupting a measurement To interrupt a measurement press Stop button Before using the FLEXQ To use the FLEXQ efficiently the setup should be made thoroughly Program Recommendations Analysis Setup Syringe Modes Make the report layout for each measuring program you are going to use including the Patient ID items and parameter profile Select the default...

Page 162: ...data source Patient Lookup Printers Automatic Printing Select printing of the registration receipt for FLEXQ measurements To make the measuring process automatic the following is required Batch mode selected in the Sample Logistics Setup Barcode interpretation patient ID Accession number Sampler ID selected in Sample Pre registration and corresponds to that on the RADIANCE system Analyzer connecte...

Page 163: ...roneous results Place a safePICO sampler in the FLEXQ sampler tray The sample will be automatically mixed before the measurement FLEXQ module Mixing a sample For the analyzers without FLEXQ module mix a blood sample in a sampling device as follows Sampling device Description Mix a capillary sample with a magnet Then move the mixing wire to the end of the capillary opposite to that from which the b...

Page 164: ...ps 1 4 for another sampler 5 6 The measurement starts The patient name and the time left till the result is ready are displayed on the Ready screen If further editing of the patient data has to be made press the button on the Ready screen to return to the Sample Registration screen 7 When the result is ready it will be automatically transmitted to its destination the RADIANCE system or LIS HIS Bat...

Page 165: ...or abort booking of the inlet by pressing No 3 When allowed on the screen open the inlet flap insert the sampling device in the inlet and press Start see Introducing a blood sample in this chapter Note that if the Urgent Manual Sample button is grayed out the inlets are free and the sample can be analyzed immediately Editing sample registration To change or add information to sample registration d...

Page 166: ...e pre registration was selected proceed to step 2 below 2 Lift the syringe inlet flap The following screen appears If sample pre registration was selected see Analysis Setup in chapter 3 press Accept to accept displayed patient data or Cancel to cancel the patient data 3 CAUTION Risk of incorrect result Always remove air bubbles from a sample before introducing it into the analyzer Air bubbles may...

Page 167: ...lding the safeTIPCAP Enter the information on the Patient Identification screen 9 Capillary samples To analyze a blood or other fluid sample from a capillary do the following Step Action 1 Check that the analyzer is in the Ready mode and scan the sample barcode Accept or cancel the displayed patient data selected in Sample Pre registration setup program see chapter 3 in this manual If no sample pr...

Page 168: ...les from a sample before introducing it into the analyzer Air bubbles may result in erroneous pO2 values 3 Hold the test tube at the syrin ge inlet 4 Select the desired mode by pressing the appropriate button 5 Press Start The probe will move out of the syringe inlet into the test tube See steps 6 9 for the syringe mode 6 9 CAUTION Risk of erroneous results Always meticulously follow the sampling ...

Page 169: ...rder to obtain the button on the screen 2 Place the syringe tip in the inlet NOTICE Radiometer recommends always to use heparinized samplers for pleural liquids to avoid introducing clots in the analyzer Press Start 3 4 When prompted by the analyzer status remove the syringe and close the inlet flap Enter the patient information on the Patient Identification screen 5 NOTICE If pleura samples with ...

Page 170: ...button on the screen 2 Place the syringe tip in the inlet NOTICE The Expired Air mode is exclusively used for samples of expired air Injection of blood or other liquid in this mode may cause damage to the analyzer Press Start 3 4 Inject the sample slowly following the volume bar on the screen Make sure to continue injecting the expired air sample as long as the volume is higher than 0 mL 5 When pr...

Page 171: ...the following Step Action 1 If desired select another report layout by selecting the Report layout item box on the screen and choosing the desired layout in the appearing list 2 Highlight the desired text boxes and use the keyboard to type the desired data and press Enter Sample demographics on the basis of an entered scanned Sampler ID i e all information about the sample measuring mode parameter...

Page 172: ...is select one of the patient ID items transferred from LIS HIS as mandatory Patient Lookup The Patient Lookup function allows you to transfer the patient information from a department s specific list to the Patient Identification screen Department Pat must be included in the report layout and filled in on the Patient Identification screen To use the Patient Lookup function do the following Step Ac...

Page 173: ...parated from the rest of the items on the Patient Identification screen You can select another report layout by highlighting the line on the screen and selecting the desired layout The patient report will be saved in this layout NOTICE If you are using mandatory input fields you are not allowed to change the report layout during measurement unless the mandatory fields have been filled It is possib...

Page 174: ...fication screen 1 2 To exclude a parameter deactivate the relevant button To include a parameter activate the relevant button Press Back to return to the Patient Identification screen and press Result to display the changed result 3 Press Print to print out the changed patient report 4 NOTICE The Selected Parameters screen displays all the parameters selected in the Parameter Profile for a given m...

Page 175: ...nter than the measurement you can do one of the following Press the Result button on the Ready screen Press Menu Latest Result Press Menu My Results Press Menu Data Logs Patient Results Log highlight the desired result and press Result Press Print to print out the patient report Parameter status The absence of any markings next to a parameter indicates that the parameter was measured without any f...

Page 176: ...ot be calculated or exceeds the numerical limit of the analyzer Values with user defined correction factors next to the value Critical limit Critical limit R Reportable ange ReferenceRange High parameter value Low parameter value nomarking Patient result approval Result approval is possible if the Enable Result Approval check button has been activated 3 in the Miscellaneous Setup program To use th...

Page 177: ...ted rerun the ID data can only be viewed not changed grayed out input boxes The Parameters Patient Lookup and Request buttons will not be available either In the Patient Report log you can filter patient reports according to the approval status The Approval button changes to Send if an external connection is used after the approval of the patient result has been made If result approval is used dat...

Page 178: ...e examined carefully by a clinician before a proper diagnosis is made To recall the Patient Identification screen press the ID button Recalling patient ID For detailed information refer to the topic Patient Identification in this chapter Patient result audit trail Any changes made to an existing result will be registered in the Audit Trail The Messages button is substituted with the Log button to ...

Page 179: ... v FO2 I RQ and T patient temperature into the Patient ID Analyze the mixed venous sample and record the pO2 v and sO2 v 2 3 Analyze the arterial sample On the Patient Identification screen select the sample type as Arterial or Capillary and key in the following values 4 pO2 v and sO2 v from the mixed venous sample step 2 above FO2 I if it differs from the default value of 0 21 for Fshunt RQ if it...

Page 180: ...eration Service Messages for the service technician with thorough knowledge of the operation and construction of the analyzer Buttons and functions The following buttons are available Button Function Result Press to return to the Patient Result screen Troubleshoot Press to display the error description and operator actions see Troubleshooting Messages chapter 11 for detailed information Print Pres...

Page 181: ...This chapter describes how to perform a quality control measurement and the subsequent presentation of results Contents This chapter contains the following topics General information 5 2 Preparing a control solution 5 4 Manual quality control measurement 5 6 AutoCheck measurement 5 7 Quality control identification 5 8 Quality control result 10 5 5 Quality control result messages 15 ...

Page 182: ... barcoded for easy entry Quality control frequency Quality control solutions are solutions with predetermined values that cover the clinically relevant ranges for the measured parameters the objective being to simulate a patient sample Each quality control system from Radiometer includes four levels of quality control solutions in order to cover the whole clinically significant range low normal an...

Page 183: ...parameter the analyzer is capable of measuring Refer to Measured parameters in chapter 13 for the analyzer measuring range for each parameter Statistics factor The factor by which the control range is expanded multiplied by to determine the statistics range The recommended statistics factor is 1 5 Statistics range The range within which a measurement must fall in order to be included in the qualit...

Page 184: ...t be used immediately after opening for one measurement on one analyzer only Required materials The following materials are required to make a manual measurement on a control solution Quality control system Materials required QUALICHECK3 QUALICHECK5 Four levels of control solutions H700 Ampoule adapter Ampoule opener Rubber gloves AutoCheck3 AutoCheck5 AutoCheck6 Four levels of control solutions H...

Page 185: ...er and break off the ampoule neck 4 Place the ampoule fully into the H700 adapter Before manual measurement on AutoCheck control solution Do the following Step Action 1 Place the ampoule in the H705 Ampoule holder 2 Holding the ampoule in its holder between two fingers shake it vigorously for at least 15 seconds 3 Place the H700 Ampoule adapter over the ampoule and press it down to open the ampoul...

Page 186: ...r information on entering data 5 When prompted by the analyzer remove the adapter and close the syringe inlet flap 6 Dispose of the used ampoules as infectious waste Reference Clinical laboratory waste management CLSI document GP5 A2 High Crea Check S8377 Cleaning Met II Solution is used to check the analyzer performance at a high creatinine level The check up is made automatically during the syst...

Page 187: ...ck measurement starts after 20 seconds see counter on the screen Proceed pressed the AutoCheck measurement starts immediately Postpone pressed the AutoCheck measurement will be delayed by five minutes Unscheduled AutoCheck measurement To start an unscheduled AutoCheck measurement do the following Step Action 1 Press Analyzer Status Quality Control 2 Highlight the solution to run an unscheduled mea...

Page 188: ...o enter information manually do the following Step Action 1 Highlight the item to be edited using the arrow buttons Solution and Lot Are automatically detected and entered if only one quality control system is used Otherwise highlight the desired solution from the screen and confirm with Enter If the same type of QUALICHECK AutoCheck solution is used then only the solution type will be identified ...

Page 189: ...4 Enter Operator on the keypad or keyboard and confirm with Enter filled in automatically when operator is logged on Scheduled Yes indicates that a QC is performed according to a planned QC in the Quality Control Schedule Scheduled No indicates that a QC is performed on behalf of the user To display the electrode updatings during measurement press the Electrode Upd button Electrode Updatings 5 9 ...

Page 190: ...ffset do not influence the quality control results unless the Apply parameter corrections to QC function has been activated in the Miscellaneous Setup Parameter status The absence of any markings next to a parameter indicates that the parameter was measured without any fault The following markings may appear next to a parameter Marking Explanation Error in the previous calibration or analyzer malf...

Page 191: ...ometer temperature corrections are made automatically by using the measured or typed in temperature For non Radiometer control solutions temperature corrections must be made manually Refer to manufacturer s literature for procedure For a detailed explanation of the evaluation of results refer to chapter 6 of the Quality Control Systems Reference Manual Reference To change data that can be edited n...

Page 192: ...e when the solution is installed in the analyzer the value shown as cCrea on the High cCrea Check screen above With time creatinine in the solution transforms into creatine the speed of this transformation depends on the ambient temperature Expected cCrea concentration in the Cleaning Met II Solution The upper lower drift limits for cCrea is 225 μmol L i e if the initial cCrea is 1500 μmol L the c...

Page 193: ...ture for the 14 day period in the Environment Setup see Analyzer settings in chapter 3 The ambient temperature on the High Crea Check ID screen is grayed out i e it can only be viewed The ambient temperature setting can be changed in the Environment Setup The Quality Control Plot screen appears once the Plot button is pressed Quality control plot The following diagram shows the details of a typica...

Page 194: ...lt Out of range symbols Measurement outside the control range and inside the statistical range Measurement outside both the control and statistical ranges Use the following buttons to do the following Next Param Prev Param Display the quality control plots for the requested parameter Next Slot Display plots of the next control solution slot Result View quality control result for the highlighted me...

Page 195: ...he first message is already highlighted and pressing Troubleshoot Follow instructions on the screen to remedy the error Use Tutorials for assistance When it is done press Troubleshooting completed 5 Press Back to return to the list of messages screen Press Print to print out the list of messages Press Note to display the keyboard type the note and confirm with enter If Notes for quality control re...

Page 196: ...5 Quality control ABL800 FLEX Operator s Manual 5 16 ...

Page 197: ... programs and the calibration results A short glossary of terms used in the chapter is also given Contents This chapter contains the following topics General information 6 2 Unscheduled calibrations 6 4 Interrupted pending or expired calibrations 6 5 tHb calibration 6 6 Calibration result 6 8 Calibration result messages 10 6 6 1 ...

Page 198: ...s per parameter Relates the measured values to the theoretical values of solutions and or gases of the same composition Gives the Drift 1 Drift 2 values and the status or zero point sensitivity of the electrodes two sensitivity values are given for the Crea B electrode and one for the Crea A electrode of the ABL8x7 FLEX analyzers 1 point pH BG the USA only Measures pCO2 and pO2 on one gas mixture ...

Page 199: ...after the last measurement was made The additional 1 point calibration does not change the intervals selected for the scheduled calibrations In cases when a scheduled 2 point calibration is imminent the additional 1 point calibration will be substituted with the 2 point calibration NOTICE for the USA only If an unacceptable pH drift is detected during a 1 point pH BG calibration the ongoing calibr...

Page 200: ...hour calibration period is only necessary after the replacement of electrodes and or electrode membranes The calibration intervals for the first 24 hours after restart are as follows Time after restart Calibration intervals First 4 hours 1 point calibration Every 30 minutes 2 point calibration Every hour Remaining 20 hours 1 point calibration Every hour 2 point calibration Every 4 hours NOTICE If ...

Page 201: ...int calibration having the highest priority If a calibration is pending a scheduled AutoCheck measurement will be postponed until after the calibration has been performed Expired calibrations A full calibration means that all parameters are calibrated Normally a full calibration is a 2 point calibration but in the case of glucose and lactate electrodes it is a 1 point calibration A calibration is ...

Page 202: ...r the barcode from the tHb Calibration Solution insert using the barcode reader or the keyboard To cancel the program press Close 3 When the barcode has been accepted a screen with requirements appears Requirements 1 3 should be fulfilled before you press Start 4 Tap the top of the tHb Calibration Solution ampoule to collect the liquid at the bottom and break off the ampoule neck using the ampoule...

Page 203: ...move the ampoule when prompted and close the inlet 4a If the calibration check value is within the insert limits the tHb calibration is accepted 4b If the calibration check value is outside the insert limits repeat the tHb calibration and then the calibration check immediately after it If the second tHb calibration and the calibration check fail again contact a service technician Can be ctHb or ct...

Page 204: ...trol Schedule Scheduled No indicates that a QC is performed on behalf of the user 1 or 2 point calibration results The calibration data is grouped together by parameter Bold characters Indicate data updated during this calibration Grey characters Indicate data taken from the previous calibration and not included in this calibration Indicates an error or the value outside the recommended range such...

Page 205: ...t An example of a successfully performed tHb calibration is shown below FCUV is a factor which expresses the ratio of the effective light path of the analyzer cuvette to that of a reference cuvette determined by Radiometer The value should be between 0 80 1 20 and have no errors i e no in it 6 9 ...

Page 206: ...board icon edited by pressing the Edit Note button or deleted by pressing the Delete Note button Print To print out the messages Back To return to the previous screen Message levels The message levels can be considered as a type of filter in which the messages displayed are based on the following Level Explanation User Messages for the user familiar with the basic daily operation of the analyzer a...

Page 207: ...ents This chapter contains the following topics General information 7 2 Replacing membranes or electrodes 7 6 Replacing pump tubes 7 9 Replacing inlet gasket and inlet probe 7 12 Replacing waste container fan filter printer paper 7 14 Replacing solutions and gases 7 16 Refilling the AutoCheck carousel 7 19 Automatic auxiliary programs 7 20 Decontamination and Protein Removal programs 7 21 Cleaning...

Page 208: ...en for replacements of electrodes membranes see the next page 3 Press Log Activity to enter the User Activity program to view user activities list see chapter 3 in this manual 4 Press Close to exit to the Ready screen The Hold mode ensures that all wet section activities are suspended and that the proper restart sequence will follow the exit from the Hold mode Entering the Hold mode To enter the H...

Page 209: ...placements highlight it with the up down arrow buttons and press Undo 5 If desired enter the operator initials and a note for the Activity Log by pressing the keyboard icon in the Operator box or the keyboard in the Note box Select a Note from the list with the up down arrow buttons Edit if desired a highlighted Note by pressing Edit and displaying the keyboard Remember to confirm a change with En...

Page 210: ... completed press Restart and then Accept Entering Fluid Replacements mode The Fluid Replacements mode ensures that the proper restart sequence will follow the exit from this mode To enter the Fluid Replacements mode do one of the following Press Analyzer Status Reagents Replace Remove a solution container Recording replacements in the Fluid Replacements mode To record replacements in the Fluid Rep...

Page 211: ...with the up down arrow buttons in the box and press Undo If desired enter the operator initials and a note for the Activity Log Press Restart and then Accept on the Confirm Replacement screen Restart after replacements If the barcode for the new Rinse Calibration or Cleaning solution has not been entered the analyzer will not restart and the pop up window appears with the message to enter the solu...

Page 212: ...ulling it off If the O ring remains on the electrode remove it If the electrode is stuck in its jacket due to salt crystals around the top of the jacket soak it in water until the crystals dissolve Further for the pO2 electrode Brush the electrode tip with the supplied brush 2 All electrodes Rinse the electrode with tap water and shake to remove excess drops of water Do not dry the electrode Furth...

Page 213: ...tissue Further for pCO2 and pO2 electrodes Remove any air bubbles trapped between the electrode tip and the membrane by pressing the tabs on the electrode jacket and moving the electrode up and down slightly in the electrolyte until the bubble disappears 6 All electrodes Dry the electrode contact 7 All electrodes Place the electrode into the measuring chamber and close the electrode connector push...

Page 214: ...es or electrodes Continued Replacing an electrode continued Step Action 5 All electrodes Dry the electrode contact and place the new electrode in the measuring chamber 6 If no more replacement actions are to be made mount all covers and parts and press Restart 7 8 ...

Page 215: ...nd the pump rotor and the other fastening slot 5 Place a new pump tube around the pump rotor 6 Secure the upper fastener of the end of the tube in the fastening slot 7 Gripping the other fastener wrap the tube around the pump rotor laying the tube along the top of the rollers Secure the fastener in the other fastening slot 8 Press the Rotate Pumps button to turn the pump and seat the tube This can...

Page 216: ...ning slot The short end of the tube is to be on the left the long end on the right 6 Gripping the longer fastener wrap the new tube around the pump rotor laying the tube along the top of the rollers Secure the fastener in the other fastening slot 7 Press the Rotate Pumps button to turn the pump and seat the tube This can also be done manually by turning the rotor a few rotations in both directions...

Page 217: ...e the lower tube in the same manner 4 Take the short end of one of the new yellow tubes and place the fastener into the lower right side fastening slot Gripping the other fastener wrap the tube around the pump rotor laying the tube along the top of the rollers Secure the fastener in the lower left side fastening slot 5 Press the Rotate Pumps button to turn the pumps and seat the tube This can also...

Page 218: ...either side and lifting it upward 3 Slide the new inlet gasket unit onto the mount and press down the top of the unit to secure it in place Mount the syringe inlet flap and then the capillary inlet flap 4 Press Restart To replace the inlet probe do the following Replacing the inlet probe Attachment and clip Tube Inlet probe Step Action 1 Remove the inlet flaps to enter the Hold mode 2 Remove the g...

Page 219: ...ction 5 Disconnect the tube from the inlet probe and the nipple on the inlet module 6 Connect the new tube to the nipple on the inlet module and to the new probe Then insert the inlet probe with the tube into the groove of the attachment and seat it properly Close the clip 7 Mount the inlet gasket unit and inlet flaps then press Restart 7 13 ...

Page 220: ...dded to the waste container before use or disposal The final concentration of disinfectant in a filled container should be 20 household bleach 1 sodium hypochlorite 10 formalin 3 7 formaldehyde or 20 glutaraldehyde 1 NOTICE Always handle a used waste container with care Keep the waste container standing at all times in order to prevent any leaks from it Replacing the fan filter If the filter is no...

Page 221: ...e roll The thermal side of the paper is on the outside of the roll 5 Aligning the leading edge of paper straight feed it behind the drive roller The paper will feed through the printer automatically once the internal sensor detects the edge of the paper Check that alignment is satisfactory Realign as required 6 Close the printer cover making sure the paper feeds out of the printer To realign the p...

Page 222: ...nt both the container and the DosiCapZip should be discarded to prevent incorrect concentrations in the solution 3 x 20 Invert the container at least 20 times to dissolve the additive 4 Place the container horizontally so that the solution may enter the DosiCapZip and leave it for 3 minutes 5 x 20 Invert the container again at least 20 times to fully dissolve the additive 6 Unscrew the lid from th...

Page 223: ...s 1 4 for the other solutions if required 5 6 For ABL8x7 FLEX analyzers only Press Accept to confirm that the additive has been added and to start the proper restarting sequence or press Back to prepare the Calibration or Cleaning Solution properly Press Restart to start the proper restarting sequence 7 Replacing gas cylinders To replace a gas cylinder do the following Step Action 1 Press Analyzer...

Page 224: ...s box as soon as the code has been scanned or typed To remove an item from the recorded replacements list highlight it with the up down arrow buttons in the box and press Undo Press Restart to start the proper restarting sequence 7 CAUTION Risk of personal injury Pressurized container Non flammable compressed gas Do not breathe gas Gas mixtures containing less than 19 5 oxygen may cause suffocatio...

Page 225: ...nalyzer will not register the action and will not scan the carousel contents 5 Close the cover either from the screen or on the module Reference Clinical laboratory waste management CLSI document GP5 A2 Messages after refilling AutoCheck carousel After a packed carousel has been placed in the AutoCheck module and scanned the following messages can be observed Message Explanation AutoCheck Packing ...

Page 226: ...he liquid transport system with solution is performed automatically during restart after replacement of any solution container Liquid sensor adjustment To adjust the liquid sensors in the Wet Section Pump calibration To calibrate the rotation of the analyzer s pumps is performed automatically during restart after replacement of the pump tubes Starting a program To start one of the above programs d...

Page 227: ...he program at this time press Close 3 4 Open the syringe inlet flap and place the syringe tip in the inlet Press Start to start aspiration of the solution and the program to begin 5 6 Remove the syringe and close the inlet flap as prompted on the screen When the program is completed the analyzer returns to the Ready screen 7 Replace the dummy electrodes with the cGlu cLac cCl cCrea A and cCrea B e...

Page 228: ...syringe inlet flap and place the syringe tip in the inlet Press Start to start aspiration of the solution and the program to begin 4 5 Remove the syringe and close the inlet flap as prompted on the screen When the program is completed the analyzer returns to the Ready screen 6 NOTICE The program can be terminated at any time by pressing the STOP button 7 22 ...

Page 229: ...5 Remount the electrode in the measuring chamber Remount cover and press Restart to restart the analyzer 6 To clean the syringe or capillary inlet do the following Step Action 1 Remove the capillary inlet flap by sliding it off to the right 2 Remove the syringe inlet flap by sliding it to the right 3 The analyzer is placed in the Hold mode after draining 4 Remove the inlet gasket by pulling it ver...

Page 230: ...water If you wish to clean the sampler tray cover separately do the following Step Action 1 Carefully lift the empty sampler tray cover as shown 2 Use a tissue lightly dampened in mild soapy water to clean it 3 Remount the sampler tray cover Disinfection of outer surfaces Disinfection of outer surfaces is performed when appropriate Disinfection frequency depends on local requirements and the use o...

Page 231: ...s Manual 7 Replacements List of references 1 Protection of laboratory workers from occupationally acquired infections Approved Guideline Second edition CLSI former NCCLS document M29 A2 Wayne Pa CLSI former NCCLS 2001 7 25 ...

Page 232: ...7 Replacements ABL800 FLEX Operator s Manual 7 26 ...

Page 233: ... tool for storing and retrieving data logs analyzer setup configurations and other data and system files Contents This chapter contains the following topics General information 8 2 Creating a WDC report 8 4 Backing up all data 8 6 Restoring all data 8 8 Exporting data logs 8 9 Importing exporting archives 11 8 8 8 Saving setup 13 Loading restoring setup 14 ...

Page 234: ...esignated location Restore All Data To restore a backup of all data files to the analyzer hard drive from a designated location Export Data Logs To export selected records from selected data logs Import Export Archives To export or delete archived data logs To import externally archived data logs Save Setup To save the current setup of your analyzer Load Setup To load a previously saved setup Rest...

Page 235: ...refers to data contained in the analyzer s internal database including but not limited to data logs setup and system files Data storage options Information is stored on or retrieved from an internal hard disk a network CD RW CD R RW or a removable drive USB mass storage device Disk handling rules The CD RW CD R RW and a removable drive USB mass storage device should be handled according to the ins...

Page 236: ...HECK Manual Storing a WDC report To make a WDC report do the following Step Action 1 Select the desired month in the Select period box using the up down arrows 2 Select destination by pressing the destination icon Highlight the desired destination removable or CD RW drive or another directory by touching it on the screen Use the Expand Collapse button to choose a source directory drive Press the B...

Page 237: ...o the WDC Report screen 4 Send the file to the selected destination by pressing Export data Or insert a disk and press Export data in the Export data box Wait until the WDC Report screen appears and remove the disk with the WDC report Error messages The following error messages may appear in the analyzer status Could not create output file if the wrong disk type e g filled or read only is inserted...

Page 238: ...disk or the network In case of data loss or similar problem the loss can be minimized by using the backup file and the Restore All Data function NOTICE It is the user s responsibility to ensure that all valuable data is regularly backed up During the warranty period of the ABL800 FLEX analyzers Radiometer accepts warranty responsibility for the original storage hardware and installed software only...

Page 239: ... 4 The backup process begins Network drive or internal hard disk drive backup continues without any further action from the operator CD or removable drive wait for the data to be prepared see the timer in the current task field located beside the status indicator in the upper left corner of the screen and press Start 5 If the analyzer status shows a Backup done message the process is complete Pres...

Page 240: ...ource drive directory 2 Select the drive directory by touching it on the screen If a CD RW is used place it in the CD drive If a removable drive is used connect it to the USB port Use Expand Collapse to choose a source directory then press Back to return to the previous screen 3 On the Restore All Data screen press Start to continue Or press Close to cancel and return to the Ready screen 4 The res...

Page 241: ...eet programs e g Microsoft Excel Access Lotus 123 etc NOTICE It is important that the disk to which data is being exported is not ejected from the disk drive during the process Exporting data logs To export data logs do the following Step Action 1 Activate the check buttons beside the data logs that are to be exported 2 Activate the calendar icon Type the From date confirm with Enter Type the To d...

Page 242: ... icon Activate the desired drive by touching it on the screen Press Expand Collapse to select the destination directory Press Back to return to the Export Data Logs screen 5 On the Export Data Logs screen press Start to begin the export of data to the selected destination 6 If the dates are different for each exported data log repeat steps 2 5 for each data log 8 10 ...

Page 243: ...mport externally archived data logs into the analyzer s archive directory from any location To export an archive do the following Step Action 1 Select the desired archive type by activating one of the four archive type buttons 2 Highlight the desired archive with the up down arrow buttons For exporting archives For importing archives Select source or destination Exporting an archive Continued on n...

Page 244: ...ined in a drive or within a folder highlight the drive or folder then press Expand Collapse Press Back to return to the Import Export Archives screen 4 On the Import Export Archives press the Export button Press Refresh to update the contents of a drive or directory Importing an archive To import an archive follow the procedure for exporting an archive using the right hand section of the screen an...

Page 245: ...ing the setup To store the current analyzer setup do the following Step Action 1 Press Edit Location to select destination 2 Select required location by touching and highlighting it on the screen If a CD RW is used place a CD RW in the CD drive If a removable drive is used connect it to the USB port Press Expand Collapse to select the destination directory Press Back to return to the Save Setup sc...

Page 246: ...n 3 to include an item 3 To open or close a group of items highlight the group title e g General and press the button 4 Press the Change Source button to select the source If a CD RW is used place it in the CD drive If a removable disk is used connect it to the USB port Select required source by touching and highlighting it on the screen Press the Expand Collapse button to access the required fold...

Page 247: ... Activity log It also describes the archiving of data logs and the optional feature RADIANCE browser Contents This chapter contains the following topics General information 9 2 Patient Results Log 9 4 Patient Profiles Log 9 7 Quality Control Log 11 9 9 9 9 Calibration Log 17 Activity Log 20 Replacement Log 9 23 Archived Data Logs 9 24 RADIANCE Browser optional 26 ...

Page 248: ...d and view patient profiles add edit or remove a patient profile Quality Control Log Contains up to 1500 quality control results from which you can view a quality control result view statistics and plots of results print and or send result search for a particular result and make a parameter trend for the selected quality control results Calibration Log Contains up to 1000 calibration results from ...

Page 249: ...tabase clean and responsive data can be archived into respective archived data logs If a need to examine the old archived data should arise the archived data can be reloaded Press Menu Data Logs Archived Data Logs to access the archived Patient Results Log Quality Control Log Calibration Log and Activity Log 9 3 ...

Page 250: ...e sample Time Date and time sample measurement was performed Sample type Shows the type of blood sample specified in Patient ID Status Indicates the status of the sample measurement OK a successful measurement an error detected or a parameter exceeded the reportable range Interrupted a measurement stopped by the operator Aborted a measurement stopped by the analyzer most likely due to insufficient...

Page 251: ...of patient reports do the following Step Action 1 Set the start date by using the 1 day 7 day 14 day or 30 day icons in the Criteria box Or type in the date using the keypad and confirming the entry with Enter 2 Change if necessary the end date by highlighting it and typing date other than the current date Confirm with Enter 3 Use the arrow buttons to highlight the desired search criteria Press Mo...

Page 252: ...ent reports will be displayed The Trend and Print buttons are now active 2 Press Trend to select the parameter s 3 Press View Trend to display the trend of the selected parameter s for the selected patient reports 4 To view the selected filter criteria press View Filter The criteria can only be viewed not changed To apply new criteria repeat the Filter function procedure described in this topic an...

Page 253: ...NCE system this patient information will always override that from the Patient Profiles log Patient Profiles log The patient profiles are listed in the order they were created The following data can be entered in a patient profile use the left right scroll bar to see the items Item Description Patient ID Lists the patient ID number Last Name Provides the patient s surname First Name Provides the p...

Page 254: ...pport should be activated in the Miscellaneous Setup see the procedure in Entering information with barcode reader in chapter 4 section Patient identification Or request if connected the data from LIS HIS by verifying the patient ID and pressing the Request button 3 To edit data on the screen highlight an item using the arrow buttons and type in the data using the screen keyboard or keypad Confirm...

Page 255: ...Entering information with barcode reader in chapter 4 section Patient identification Or request if connected the data from LIS HIS by verifying the patient ID and pressing the Request button 3 To edit data on the screen highlight an item using the arrow buttons and type in the data using the screen keyboard or keypad Confirm each entry with Enter 4 When completed press Back to return to the previo...

Page 256: ...w buttons highlight the search criterion and enter the data using the screen keypad or keyboard Or use a barcode reader to scan the Patient ID barcode 3 Press Find If a patient profile is found it will be highlighted on the Patient Profile Log screen If a patient profile is not found No item found that matches search criteria message appears in analyzer status Repeat step 2 or press Back to cancel...

Page 257: ...t Slot Control solution slot as defined in setup Solution Control solution type as defined in setup Lot Lot number of the control solution Status Indicates the status of the quality control measurement OK a successful measurement an error detected or a measured value exceeded a control statistical or measuring range Interrupted a measurement stopped by the operator Aborted a measurement stopped by...

Page 258: ... the filter criteria do the following Step Action 1 Press the Filter button on the Quality Control Log screen 2 Set the start date by using the 1 day 7 day 14 day or 30 day icons in the Criteria box Or type in the date using the keypad and confirming the entry with Enter Change if necessary the end date by highlighting it and typing a date other than the current date Confirm with Enter 3 Use the u...

Page 259: ...he criteria cannot be changed only viewed To print the displayed trend press Print To return to the screen in step 5 press Back Viewing quality control statistics Only those measurement values that fall within the statistical range are included in the statistical data Therefore parameters outside the measuring range or with a are not included Parameter The screen shows statistics for each control ...

Page 260: ...ber of measurements included in statistics for the slot Mean Calculated mean of the measurement values 2 SD Calculated 2 standard deviation of measurement values CV Coefficient of variation Control Range Current control range for the control solution level See Quality Control Systems Reference Manual for detailed information Printing QC statistics To print QC statistics do the following Step Actio...

Page 261: ...er Plot element Function Shaded block Date time and measured value for the highlighted measurement Use the arrow buttons to scroll the plot and view other measurements Control range limits Show the upper and the lower limits of the control range for the highlighted measurement Dots Show the number of measurements for the selected parameter To view a measurement result highlight a dot on the screen...

Page 262: ...Next Slot Display plots of the next control solution slot Result View quality control result for the highlighted measurement of the highlighted plot Print Print out the plot Back Return to the previous screen For the ABL8x7 FLEX analyzers only The plot for the High Crea Check of the ABL8x7 FLEX analyzers presents Creadiff The screen is similar to the quality control solution plot but the Next Para...

Page 263: ...r to see the items Item Description Time Date and time the calibration was performed Cal The ID number of a performed calibration Type Indicates the calibration type 1 point 2 point or tHb Status Indicates the calibration status OK a successful calibration an error detected or a parameter exceeded the measuring range Interrupted a calibration stopped by the operator Aborted a calibration stopped b...

Page 264: ...ilter criteria do the following Step Action 1 Press the Filter button on the Calibration Log screen 2 Set the start date by using the 1 day 7 day 14 day or 30 day icons Or type in the date using the keypad and confirm with Enter Change if necessary the end date by highlighting it and typing the date other than the current date Confirm with Enter or Select 3 Select the desired calibration type and ...

Page 265: ...described above and apply them Press Trend to select a parameter 2 Select a parameter only one for calibrations and press View Trend 3 To view the filter criteria press the View Filter the criteria cannot be changed only viewed To print the displayed trend press Print To return to the screen in step 5 press Back 4 To apply the new criteria repeat the Filter function procedure described in this top...

Page 266: ...me when the activity occurred Message Gives a message number and an explanation of the activity Operator note text appears as written NOTICE The columns displayed in the log and their positions can be changed Contact a qualified service technician Adding a message To add a message to the log do the following Step Action 1 Press Add Message on the Activity Log screen 2 If Notes were entered in Setu...

Page 267: ...3 Press Back to return to the Activity Log screen This function allows you to find an activity or to select a number of activities To set the filter criteria do the following Filter function Step Action 1 Press the Filter button on the Activity Log screen 2 Set the start date by using the 1 day 7 day 14 day or 30 day icons Or type in the date using the keypad and confirm with Enter Change if neces...

Page 268: ...et the message level to Manager or Service the Activity Log changes to Replacement Log 4 When all the criteria have been selected press Apply to start 5 The Activity Log displays the list of selected activities By selecting the message level you can see messages on the user manager or service levels The Add Message button is available on all levels 6 Press Filter to set other search criteria if de...

Page 269: ... Enter the Activity Log screen 2 Select the Manager or Service message level 3 Press the Filter button 4 Set the start date by using the 1 day 7 day 14 day or 30 day icons Or type in the date using the keypad and confirm with Enter 5 Highlight the criteria Replacement and press Apply 6 The Replacement Log appears with all the replacements and an Operator and Note field 7 Press Close to return to t...

Page 270: ...ives in chapter 8 Disk functions The archives are archived after date 500 reports from each log and 2000 entries from the Activity log Press Menu Data Logs Archived Data Logs and select the log archives Press the button on the screen to select the log archives As the functions are similar for all archives the Calibration Archive is used as an example Selecting archive stored on the analyzer To sel...

Page 271: ... an archive to another media e g computer or from another media to the analyzer do the following Step Action 1 Press Import Archive to move it The Import Export Archives screen will be displayed 2 Proceed as described in Importing exporting archives chapter 8 Disk functions Converting an archive into csv format To convert an archive into csv format do the following Step Action 1 Highlight an archi...

Page 272: ...e RADIANCE system do the following Step Action 1 Make sure that a connection to the RADIANCE server is established in the RADIANCE Communication Setup program 2 Press Menu Utilities RADIANCE Browser Access to the RADIANCE system The analyzer will exchange information with the RADIANCE system about your access profile and the contents of the RADIANCE main page will reflect the scope of your privile...

Page 273: ...ibes the Standby mode Temporary Shutdown Long Term Shutdown programs and the Forced Standby mode Contents This chapter contains the following topics General information 10 2 Standby mode 10 3 Full waste container 10 5 Temporary Sutdown 10 6 Long Term Sutdown 10 8 ...

Page 274: ...ms The following programs are available Standby Temporary Shutdown Long Term Shutdown To access the programs press Menu Utilities Then press the desired button to enter the program When the waste container becomes critically full the analyzer automatically enters Forced Standby mode 10 2 ...

Page 275: ...ent spillage from the waste container when it gets critically full By placing the analyzer on standby the consumption of solutions is reduced as the scheduled calibrations are suspended Entering Standby To put the analyzer into Standby mode do the following Step Action 1 Enter date and time for the analyzer to automatically exit the Standby mode using the arrow buttons 2 Press Enter Standby to ent...

Page 276: ...he scheduled date time If the Exit Standby button is not shown you have to logon to the analyzer as a user with permission to exit standby The analyzer will return to the Ready mode upon exit from Standby unless all parameters are marked Cal Expired analyzer is looked due to QC Expired Analyzer is locked due to Replacement overdue Pending calibrations and or QC measurements will be performed when ...

Page 277: ... the analyzer to the Ready mode do the following Step Action 1 Replace the waste container 2 Press the Exit Standby button For users with limited access selected in the Access Profiles program see chapter 3 this button may not be visible Press Menu Log on and type in your password If your access profile allows the exit from the Standby mode the Exit Standby button will be visible 10 5 ...

Page 278: ...ime do the following Step Action 1 Enter the program 2 Press Confirm Shutdown to continue Press Close to cancel 3 Follow the instructions on the screen to complete the temporary shutdown Restarting the analyzer To restart the analyzer after Temporary Shutdown do the following Step Action 1 Verify that the system requirements are met and all components are installed 2 Place the power switch in the ...

Page 279: ...status Leak test Rinse Over the first 24 hours after the cold start the analyzer will automatically perform a number of calibrations at specific intervals as follows The first four hours 1 point calibration every 30 minutes 2 point calibration every hour remaining 20 hours 1 point calibration every hour 2 point calibration every four hours During the startup availabe analyzer functions are indicat...

Page 280: ...the screen Screen Prompts and operator actions 1 Perform Decontamination use the button on the screen to enter the program Press Confirm Shutdown to continue or Close to cancel the procedure After this point there is no opportunity to cancel the shutdown 2 Remove the Rinse Cal 1 Cal 2 and Cleaning Solution containers Press Continue 3 Wait for the fluid transport path to drain 4 Place tubes on the ...

Page 281: ...Shutdown is now complete Radiometer recommends to place the analyzer on a trolley in its normal position and protect it from dust using a plastic cover Storing the analyzer Transporting the analyzer To transport the analyzer from one location to another put it back in its original packaging and seal To transport the analyzer without its original packaging follow the recommendations below A minimum...

Page 282: ...10 Analyzer shutdown ABL800 FLEX Operator s Manual 10 10 ...

Page 283: ...pics General information 11 2 Forced Hold causes 11 5 Analyzer messages 11 7 Fluid transport troubleshooting procedure 11 74 Inlet probe troubleshooting procedure 11 75 Inlet troubleshooting procedure 11 76 Leak troubleshooting procedure 11 77 Electrode troubleshooting procedures 11 78 Pump troubleshooting procedure 11 80 Fluid transport system description 11 81 ...

Page 284: ...s selected but the analyzer is not connected to the RADIANCE system the message Remove sampler will appear on the screen If two samplers were placed in the sampler tray one immediately after the other so that the FLEXQ had no time to register the first sampler the message Remove sampler will appear on the screen Operator actions in case of error To locate and remedy messages errors do the followin...

Page 285: ...e Help at the bottom of the screen Returns to the previous help topic Press to return to the Analyzer Status screen when all messages have been remedied Press to return to the Analyzer Status screen 4 Remedy the error as described in the Actions on the screen 5 Remedy other error s if present 6 Press Troubleshooting completed after all errors have been remedied The Help button will then reappear i...

Page 286: ...og at the time of their occurrence The items in the Activity Log are listed in chronological order and form a permanent record for the user of all system messages that have taken place Using the filter function see description in Activity Log chapter 9 in this manual you can select the desired type of messages and view them at the user manager and service levels 11 4 ...

Page 287: ... opened Cover removed or window opened Verify the cover is properly mounted and the window shut prior to restart Both inlet flaps removed Inlet flaps removed Verify the inlet flaps are properly mounted prior to restart The inlet cannot obtain proper position Inlet positioning error Contact service representative Inlet calibration failed Inlet calibration error Perform the procedure described on th...

Page 288: ... occurs when a leakage test has failed indicating a leak in the fluid transport system To correct the error do the following Step Action 1 Remove the analyzer covers and inspect the fluid transport system for leaks 2 Check for poor tube connections or worn tubes Repair as required 3 Check the inlet gasket change if required 4 Ensure that electrodes are properly mounted in the measuring chamber and...

Page 289: ...incomplete software upgrade Contact Radiometer service representative Removal condition Successful software consistency check 83 Value above reference range Parameter value is above the user defined reference range This is only a message not an error No action required 84 Value below reference range Parameter value is below the user defined reference range This is only a message not an error No ac...

Page 290: ...unt a new Cleaning Met II Solution Remembrane both Crea A and Crea B electrodes 93 Value above the reportable range Parameter value is above the reportable range See chapter 13 Specifications in the Operator s Manual 94 Value below the reportable range Parameter value below the reportable range See chapter 13 Specifications in the Operator s Manual Check for and remedy other errors related to the ...

Page 291: ...o a remote system may be lost If the problem persists check the communication hardware The remote system may lack buffer capacity 131 LIS HIS Failed to send packet A communication error occured while sending a message The message was not sent Check that the remote system is running and responding Check communication hardware including cables Repeat sending 132 LIS HIS Failed to receive packet An e...

Page 292: ...7 LIS HIS High level protocol received packet in wrong format An error occurred while parsing interpreting a message Check protocol configurations Contact Radiometer service representative 200 User msg This is only a message An operator has entered a note in the log No action required 201 Westgard Rule 1 2s violation Measured parameter value is outside the mean 2 SD range 202 Westgard Rule 1 3s vi...

Page 293: ...ode replacements Refer to Quality Control Systems Reference Manual for evaluation procedure 206 Westgard Rule 10 x violation Ten consecutive measurements are on the same side of the mean A trend or shift is indicated Patient results should be con sidered unreliable until the problem is remedied Check the electrode drift during last calibration Check Replacement Status for pending electrode replace...

Page 294: ...quired corrective action 212 System message s present One or more systems errors are present Check the System Messages Status for errors Take required corrective action 213 Automatic backup failed An error occurred during the scheduled data backup Check Automatic Backup Setup Check network and servers used for the backup Contact your IT engineer 214 Automatic backup succeeded The scheduled automat...

Page 295: ... Rinse 232 Oximetry calibration error Water spectrum intensity was too low or too high during absorbance calculation OXI measurements cannot be performed Perform a 2 point calibration Contact Radiometer Service Representative if the problem persists Removal condition Successful 2 point calibration 234 238 245 252 254 258 269 314 316 Oximetry hardware error The Oxi module has a hardware error Perfo...

Page 296: ...emic sample decrease the lipemic content by e g centrifuge or extraction Perform the measurement on a blood sample from a healthy donor Contact Radiometer service representative 293 Warning HbF detected and compensat ed for Detected FHbF is greater than 20 of ctHb Oxi parameters are automatically corrected No action required For information only 326 Empty Gas 1 cylinder Gas 1 cylinder is detected ...

Page 297: ...e control solution 331 No sample detected during sample aspiration No sample detected in the pH BG module Measurement is aborted Ensure that adequate sample volume is used Check the sample for clots Perform the Fluid Transport Troubleshooting procedure 332 333 pH BG module not filled Sample did not fill the pH BG module properly during aspiration Measurement is aborted Ensure that adequate sample ...

Page 298: ...ey might affect the measurement All parameters are marked with Ensure the sample is free of air bubbles and that sufficient volume is used Check the condition of the inlet gasket Replace as necessary 375 Calibration status out of limits The status value is outside the range for the given parameter pH 6 7 8 1 pCO2 6 2 260 mmHg or 0 83 34 66 kPa cK 0 5 12 mmol L cNa 10 250 mmol L cCa2 0 1 20 mmol L ...

Page 299: ... the Electrode Troubleshooting procedure Removal condition Successful 1 or 2 point calibration 378 Calibration sensitivity out of range The sensitivity value is out of range for the given parameter pH 92 103 pCO2 85 100 pO2 5 40 pA mmHg or 37 5 300 pA kPa cK 92 105 cNa 90 105 cCa 90 105 cCl 85 100 cGlu 100 1800 pA mM cLac 150 2000 pA mM cCrea 5 15 pA µM 1 cCrea 65 85 2 cCrea 50 200 or 3 5 20 pA µM...

Page 300: ...2 point calibration 386 Barometer out of range The barometer reading is out of the range 450 800 mmHg or 60 0 106 7 kPa Measurement results are marked with Check the measured pressure in Barometer Setup program and compare it to that of an external barometer Adjust the analyzer pressure accordingly Contact Radiometer service representative 408 Zero current error Zero current was too high during ca...

Page 301: ...me is used Replace Pump Tubing in pH BG and El Met modules and solution pump Contact Radiometer Service Representative 468 Inhomogene ous sample in Met II module Lower liquid sensor at Met II module detected air bubbles The affected parameters are marked with Repeat the measurement ensuring that the sample is free of air bubbles and that proper sample volume is used Replace Pump Tubing in pH BG El...

Page 302: ...Calibration Status Repeat the measurement Perform any pending replacements including electrodes Ensure the electrode is properly installed Ensure the analyzer is properly grounded Perform QC If the QC result value is within the control range the blood sample may be suspected Continue troubleshooting Perform the Electrode Troubleshooting procedure 478 pCO2 drifting The pCO2 drift value exceeds the ...

Page 303: ... is required 487 A new statistical month has begun remember to export WDC data A new statistical month has begun Make a WDC report disk Removal condition A WDC report disk has been made 493 Warning Bilirubin detected and compensat ed for Detected bilirubin concentration is greater than 50 umol L The corresponding plasma bilirubin concentration can be calculated as follows ctBil blood 1 Hct x ctBil...

Page 304: ... time limit The pH BG module was not filled properly with Rinse Solution Check the Rinse Solution for sufficient volume and proper mounting Replace as necessary Perform the Fluid transport troubleshooting procedure 503 Unable to fill inlet with continuous rinse segment during Pump Calibration Three attempts to fill the inlet probe with a continuous rinse segment have failed the Pump Calibration pr...

Page 305: ...ocedure Removal condition Successful Cleaning 508 Rinse error Rinse Solution was not detected during Rinse program Measurements and calibrations cannot be performed until the condition is removed Check the rinse solution for sufficient volume Replace as required If the message Inlet flow impeded 765 has been reported replace or clean inlet probe Perform Fluid transport troubleshooting procedure Re...

Page 306: ...was performed with Gas error present Activity is aborted Check preasure in gas cylinders Replace as required Verify that cylinders are properly installed Enter the Replacement screen via Replacement Status and re scan the barcode labels of the gas cylinders 521 Inhomoge neous sample Air bubbles were detected in the sample Results may have Ensure sampler and sample volume match the selected sample ...

Page 307: ...used until a successful pump calibration is performed Perform Pump troubleshooting procedure Contact Radiometer service representative 541 Solution pump error The solution pump failed to calibrate Previous calibration is used until a successful pump calibration is performed Perform Pump Troubleshooting procedure Contact Radiometer service representative 564 No Cleaning Solution detected by Oxi liq...

Page 308: ...ware error Perform a 2 point calibration Contact Radiometer Service Representative if the problem persists 574 Oximetry calibration error The measuring system has no calibration data It is not possible to make a measurement Perform a 2 point calibration Contact Radiometer Service Representative Removal condition Successful 2 point calibration 577 578 Option key error An error occurred in the analy...

Page 309: ... calibration outside limits tHb calibration failed Repeat tHb calibration Removal condition Successful tHb calibration 583 Measured value outside reportable range for the parameter The parameter value is outside the defined reportable range or the analyzer measurement range Check for and remedy other errors in the result and any errors in System Messages or Calibration Status Perform QC If the QC ...

Page 310: ...le volume matches the selected measuring mode Repeat the measurement ensuring sufficient sample volume Contact Radiometer service representative 597 Liquid detected in pH BG module during Gas Calibration Unexpected liquid is detected by the pH BG module during calibration Calibration is aborted Repeat calibration Perform Fluid transport troubleshooting procedure 600 Demo option will expire soon On...

Page 311: ...ssed since the last successful calibration of the parameter Calibrations of the parameter are considered invalid and values reported as Perform 1 or 2 point calibration Removal condition Successful 1 or 2 point calibration 618 Waste detector error The waste detector may be faulty or damaged Contact Radiometer service representative Removal condition Functioning waste detector installed 619 Waste c...

Page 312: ...er installed 622 Expected liquid level below 0 One or more of the solution barcodes was entered incorrectly during replacement The analyzer cannot monitor solution consumption Check the solution containers and replace as necessary Remember to scan barcodes Removal condition Solution containers correctly installed and solution barcodes correctly recorded by the analyzer 623 Solution empty Wet secti...

Page 313: ... No Cal 1 Solution detected by Oxi liquid sensor during Refill OXI module was not filled with Cal 1 Solution Check Cal 1 Solution level in the container Replace as necessary Perform Fluid transport troubleshooting procedure 634 No Rinse Solution detected by Oxi liquid sensor during Refill OXI module was not filled with Rinse Solution Check Rinse Solution level in the container Replace as necessary...

Page 314: ...calibration was aborted or not accepted Check solution levels and replace containers as necessary Check for and remedy System Messages Repeat the calibration Removal condition Successful calibration 652 Oxi liquid sensor did not receive Rinse from the Fluidic module Rinse solution was not detected by the OXI module Check Rinse Solution for sufficient volume and proper mounting Replace as necessary...

Page 315: ...during aspiration OXI module was not filled correctly during sample aspriration Ensure sample is free of clots Repeat measurement Perform the Fluid Transport Troubleshooting procedure 658 Inlet flaps removed The analyzer entered HOLD because both inlet flaps were removed Ensure the inlet flaps are properly mounted prior to restart Removal condition Inlet flaps properly mounted 659 Cover removed or...

Page 316: ...ter out of range Measured barometer value is outside the measuring range 60 106 7 kPa Contact Radiometer service representative 663 Leakage A leak was detected in the fluid transport system Remove the analyzer covers and inspect the fluid transport system for leaks Check the inlet gasket pump tubes and ensure electrodes are mounted correctly Repair as necessary Restart the analyzer During restart ...

Page 317: ...e last analyzer activity If not repeat measurement calibration Check Rinse Solution level in the container Perform Rinse Removal condition Rinse without Conditioning error 678 Heater error One or more measuring modules are over heated Ensure the ambient temperature is between 15 and 32 degrees Celsius Shut down the analyzer using the Temporary Shutdown function then restart the analyzer Replace fa...

Page 318: ...y Shutdown function then restart it Contact Radiometer Service Representative Removal condition El Met module ready or software configured without El Met module support 682 Oxi module not active The Oxi module is not responding due to internal communication problem or software configuration does not match the analyzer type Shut down the analyzer using the Temporary Shutdown function then restart i...

Page 319: ...esentative Removal condition Gas pressure transducer offset within the required range 692 ABL not connected to RADIANCE The analyzer is not connected to RADIANCE Contact your RADIANCE IT engineer Check RADIANCE communication setup including TCP IP address port No and password Check that RADIANCE is responding Check network connections Removal condition RADIANCE connection established or disabled 6...

Page 320: ...ill AutoCheck carousel according to the packing list 699 AutoCheck QC measure ment started due to cali bration error The analyzer was set up to perform AutoCheck measurements in case of 1 or 2 point calibration errors Check Calibration Status and remedy any reported calibration errors 700 Scheduled AutoCheck not run due to errors in last calibration Last calibration contained an error and the anal...

Page 321: ...heck Replacement Status and replace as required Unlock analyzer in Miscellaneous Setup program Removal condition No replacement pending 708 Corrective action not possible due to empty AutoCheck carousel Scheduled AutoCheck measurement was requested but the carousel was empty Refill AutoCheck carousel 709 El Met module not expected Software configuration does not match analyzer type Contact Radiome...

Page 322: ...hanical error A mechanical error occurred in one of the AutoCheck sub modules Check the AutoCheck module cover Close if opened If error persists contact Radiometer service representative 715 AutoCheck communica tion error Communication error between AutoCheck submodules Shut down the analyzer using the Temporary Shutdown function then restart the analyzer Contact Radiometer Service Representative ...

Page 323: ...re marked with 721 Insufficient sample in Met II module Air bubbles were detected in the sample with possible implications on measurement accuracy All affected parameters are marked with Ensure that sample is free of air bubbles Ensure that sample volume matches the selected sample mode Check inlet tube Replace if necessary Repeat measurement 722 Sample error Insufficient or inhomogeneous sample d...

Page 324: ...ransport troubleshooting procedure 728 No Cal 2 Solution detected by inlet during Refill pH BG module was not filled correctly with Cal 2 Solution during Refill Check Cal 2 solution level Replace container as necessary Perform Fluid transport troubleshooting procedure 729 No Cal 1 Solution detected by inlet during Refill pH BG module was not filled correctly with Cal 1 Solution during Refill Check...

Page 325: ...ent in AutoCheck carousel use inserts Removal condition Barcodes read in for all ampoules present in the AutoCheck carousel 739 Solution s composition not identifiable AutoCheck ampoule solutions do not match labeling Repeat measurement Contact Radiometer service representative if the problem persists 744 AutoCheck Laser Setup Error AutoCheck barcode reader has failed Restart analyzer If the error...

Page 326: ...justed The estimated solution level was adjusted by the operator No action required 751 Message 751 is only found in the Activity Log to inform the user about activities that have taken place The message is blank empty in the database and when an activity occurs the actual status information is appended to it resulting in the logged 751 message If the setting Log All Measuring Activities is enable...

Page 327: ...for error to disappear Replace fan filter if dirty Shield analyzer from direct sunlight and other heat sources Contact Radiometer Service Representative Removal condition AutoCheck temperature within the required range 764 Liquid detected in pH BG module during Expired Air sample Liquid sample detected during aspiration in the Expired Air mode Do not use the Expired Air mode for liquid samples 765...

Page 328: ...ter service representative Removal condition RADIANCE connection established 768 ABL not connected to RADIANCE ABL StatLink version too low The analyzer has been refused connection to RADIANCE because the ABL StatLink version is lower than the RADIANCE StatLink version Contact RADIANCE IT engineer or Radiometer service representative Removal condition RADIANCE connection established 770 Failed to ...

Page 329: ...alues is completed No action required 778 Inlet gasket should be replaced soon Inlet gasket is nearly worn out and should be replaced soon Replace inlet gasket 779 Cleaning failed The last Cleaning was aborted or interrupted Check solution level and replace container as necessary Check for and remedy System Messages Repeat Cleaning Removal condition Successful Cleaning 780 RADI ANCE communica tion...

Page 330: ...tic archiving completed Automatic archiving selected in Disk Functions Setup completed successfully Informative message No action required 787 Export of data logs started Export of data logs was started by the user Informative message No action required 788 Hypochlorite detected remembrane Glu Lac Cl and both Crea electrodes Measurement on a substance resembling hypochlorite has been performed Any...

Page 331: ...nt sample free of clots and air bubbles 792 Liquid sensor calibration error Inlet lower liquid sensor failed to calibrate Repeat liquid sensor calibration Perform the Fluid Transport Troubleshooting procedure Contact Radiometer service representative 793 pH BG pump asymmetry error The pH BG module pump failed to calibrate pump asymmetry The same calibration values will be used for both directions ...

Page 332: ...m the Pump Troubleshooting procedure Contact Radiometer service representative 797 Waste pump asymmetry error The Waste pump in the Solution module failed to calibrate pump asymmetry The same calibration values will be used for both directions until a successful calibration of pump asymmetry is performed Perform the Pump Troubleshooting procedure Contact Radiometer service representative 798 User ...

Page 333: ...zed software Software option key is not installed Analyzer cannot be used Contact Radiometer service representative 808 Calibration drift not available A calibration drift value could not be calculated since this is the first calibration result after calibration drift monitoring was started This message may appear on the first calibration result after the analyzer has been turned on or after the p...

Page 334: ...cked parameter has been unlocked Informative message No action required 852 Radiance Message from RADIANCE Informative message No action required 853 LIS HIS Missing Communi cation Option key No valid option key for LIS HIS communication is installed on the analyzer Contact Radiometer service representative 854 No leading air segment in inlet s lower liquid sensor within time frame Air segment in ...

Page 335: ...ample handling adapted to 35uL range decay to pH only Due to insufficient or inhomogeneous sample the analyzer has automatically chosen an adaptive measuring mode in order to report as many of the desired parameters as possible If missing parameters are needed repeat the measurement with sufficient sample free from clots and air bubbles 867 pH BG sample handling adapted to 55uL range 868 pH BG Oxi...

Page 336: ...ing mode applied pH BG Oxi 2 873 Adaptive measuring mode applied pH BG Met Oxi 874 Adaptive measuring mode applied decay to all micro mode Due to insufficient or inhomogeneous sample the analyzer has automatically chosen an adaptive measuring mode in order to report as many of the desired parameters as possible If missing parameters are needed repeat the measurement with sufficient sample free fro...

Page 337: ...be aligned with the syringe inlet aspiration of the sample was not possible Remove all the samplers from the sampler tray the sampler registration is lost If the sampler tray is blocking the syringe inlet or AutoCheck module try to push it gently to its home position If the syringe inlet is not blocked scan the sampler barcode using the analyzer s barcode reader and perform a manual measurement To...

Page 338: ...2 solution during calibration Check level in Cal2 solution bottle Replace bottle as necessary 881 LIS HIS Missing CIC Com munication Option Key No valid Option Key for CIC communication is installed on the analyzer Contact Radiometer service representative 882 Mixer tray slip detected A small positioning problem of the mixer tray has been detected and corrected Lift the sampler tray cover and chec...

Page 339: ...n reset and all related reminders have been removed as a result of a RADIANCE command No action required Informative message only 887 Adaptive measuring mode disabled Due to insufficient or inhomogeneous sample the analyzer would normally automatically have chosen an adaptive measuring mode but this option has been disabled Measurement is aborted Repeat the measurement with sufficient sample free ...

Page 340: ...g reagent as backup During pump calibration measurement of internal volume part failed Causes the Fluid Transport Control program to abort Check Rinse Solution for sufficient volume Replace as necessary Perform Pump Calibration Perform the Fluid Transport Troubleshooting procedure Removal condition Successful pump calibration 893 Sample in Met II s upper liquid sensor detected prematurely during a...

Page 341: ...G Met El Oxi 2 897 Adaptive measuring mode applied pH BG Met El Oxi 3 898 Adaptive measuring mode applied pH BG Met El Crea Oxi 899 Adaptive measuring mode applied pH BG Met El Crea Oxi 2 Due to insufficient or inhomogeneous sample the analyzer has automatically chosen an adaptive measuring mode in order to report as many of the desired parameters as possible If missing parameters are needed repea...

Page 342: ...report as many of the desired parameters as possible If missing parameters are needed repeat the measurement with sufficient sample free from clots and air bubbles 909 Met II not filled within time limit Met II module did not fill properly with calibration solution Causes the calibration program to abort Check the solution containers for adequate volume Replace as required Perform the Fluid Transp...

Page 343: ...d Transport Troubleshooting procedure Removal condition Successful pump calibration 924 Inlet s liquid sensor to Oxi s liquid sensor volume could not be confirmed 1 During pump calibration measurement of internal volume part failed Causes the Fluid Transport Control program to abort Check Rinse Solution for sufficient volume Replace as necessary Perform Pump Calibration Perform the Fluid Transport...

Page 344: ...m to abort Check Rinse Solution for sufficient volume Replace as necessary Perform Pump Calibration Perform the Fluid Transport Troubleshooting procedure Removal condition Successful pump calibration 929 TIPCAP conflict detected 1 930 TIPCAP conflict detected 2 The detection of the TIPCAP failed The activity is aborted Remove the inlet flaps and the inlet gasket Inspect the condition of the inlet ...

Page 345: ...as not in proper position within the required time limit Remove the inlet gasket and inspect the condition of inlet probe and gasket Replace as necessary Install all parts Restart analyzer Contact Radiometer Service Representative Removal condition Successful inlet calibration 935 Cal1 Solution Crea will expire soon The additive used in the Calibration Solution 1 to calibrate Crea will expire soon...

Page 346: ...alibrate Crea Replace the Calibration Solution 1 bottle remember to add the additive Removal condition Fresh bottle installed 939 Cal2 Solution Crea is expired The additive used in the Calibration Solution 2 to calibrate Crea is expired The solution is more than 14 days old It is no longer possible to calibrate Crea Replace the Calibration Solution 2 bottle remember to add the additive Removal con...

Page 347: ...uration 945 Met II module not active The Met II module is not responding due to internal communication problems or software configuration does not match the analyzer type Shut down the analyzer using the Temporary Shutdown function then restart it Contact Radiometer Service Representative Removal condition Met II module ready or software configured without Met II module support 946 Conditioning er...

Page 348: ...rtable range See chapter 14 Specifications in the Operator s Manual Check for and remedy other errors related to the result system messages or calibration status Perform QC If the QC result is accepted the blood sample may be suspected Perform measurement on new blood sample Perform the Electrode Troubleshooting procedure 953 Measured QC value above the control range Crea A Creatine value is above...

Page 349: ...ical range Crea A The parameter value is above the upper limit of the user defined statistical range Measurement is not included in the statistics Verify procedure and repeat the measurement Refer to the Quality Control Systems Reference Manual for details on the evaluation of the results 958 Solution lifetime exceeded A solution is more than 14 days old and cannot be used for Crea calibration or ...

Page 350: ...rrect positions on the analyzer Replace Calibration Solutions and perform a 2 point calibration Remembrane both Crea A and Crea B electrodes Removal condition Successful 2 point calibration 960 Measure ment unstable Crea A An electrode response fault occurred during measurement on the Crea A electrode Check for and remedy other errors in System Message or Calibration Status Repeat the measurement ...

Page 351: ...shooting procedure 962 Ambient temperature not defined Ambient temperature has not been defined by the user in Environment Setup Until the ambient temperature has been defined a default value of 25 C is used during High Crea Check and the internal Crea calibration calculations Please maintain an ambient temperature between 18 C and 29 C Enter ambient temperature in Environment Setup see Operator s...

Page 352: ...thin the specifications See chapter 14 Specifications in the Operator s Manual Check for and remedy other errors related to the result system messages or calibration status Perform a High Crea Check If the High Crea Check result is accepted the blood sample may be suspected Perform measurement on a new blood sample Perform the Electrode Troubleshooting procedure 969 FLEXQ module not expected Softw...

Page 353: ...lution outside range of pH BG Calibration 979 1 point pH BG Calibration upgraded due to large pH drift 1010 Discrepancy between pO2 and sO2 The pO2 and sO2 deviates so much from the standard Oxygen Dissociation Curve that an error is assumed Causes may be The pO2 electrode may have measured the pO2 of a bubble of atmospheric air The patient may be treated with Oxygen enriched air yet still have a ...

Page 354: ... file 1013 Volume Calibration Failed Wet Section internal Volume Measure ment 1014 Volume measure ment failed pH BG module to Oxi s LS 1015 Volume measure ment failed El Met module to Oxi s LS 1016 Volume measure ment failed Met II module to Oxi s LS 1017 Volume measure ment below limit pH BG module to Oxi s LS Continued on next page Messages at manager level T continued ...

Page 355: ...lume measure ment below limit El Met module to Oxi s LS 1019 Volume measure ment below limit Met II module to Oxi s LS 1020 Volume measure ment above limit pH BG module to Oxi s LS 1021 Volume measure ment above limit El Met module to Oxi s LS 1022 Volume measure ment above limit Met II module to Oxi s LS 1023 Software Upgrade Initiated 1024 Upgraded From 11 73 ...

Page 356: ... the fluid transport system as this may help to identify the problem see Fluid transport system description for details And check the fluid transport system for clots 2 Remove the cover to the measuring modules and check the following The electrodes are properly mounted in the measuring chamber and the electrode connector is latched shut The pump tubings and connectors have no leaks or damage The ...

Page 357: ...g Step Action 1 Remove the analyzer cover and the inlet flaps 2 Check that the inlet probe and gasket are mounted properly 3 Remove the inlet gasket and check for wear or damage Replace as required If the inlet probe has not retracted move it in by pressing the probe attachment back Note that you will feel resistance while moving the probe in 4 Check the condition of the inlet probe If it appears ...

Page 358: ...To troubleshoot possible obstructions in the inlet do the following Step Action 1 Remove the inlet gasket unit and inspect its condition If it appears worn or damaged replace it Rinse the gasket and its openings by filling a syringe with distilled water and injecting the water through both the syringe and capillary openings 2 Remove the inlet probe and tube 3 Fill a syringe with distilled water Ta...

Page 359: ...lyzer covers and inspect the fluid transport system for poor tube connections or worn tubes Repair as required 2 Ensure that electrodes are properly mounted in the measuring chamber and the electrode connector is latched shut 3 Mount all parts and press Restart The leak detection is performed automatically during the restart The error is corrected when the analyzer enters the Ready mode If the err...

Page 360: ...s troubleshoot the reference electrode Reference electrode troubleshooting procedure To troubleshoot the reference electrode do the following Step Action 1 Remove the electrode and check the measuring chamber for clots clean the measuring chamber with a cotton stick moistened with distilled water Make sure that no cotton fibers are left in the measuring chamber 2 Replace the electrode membrane 3 C...

Page 361: ...3 Call a 1 point calibration If the error persists replace the electrode To troubleshoot the cCrea A and cCrea B electrodes do the following cCrea electrodes troubleshooting procedure Step Action 1 Remove the electrodes and check the measuring chamber for clots clean the measuring chamber with a cotton stick moistened with distilled water Make sure that no cotton fibers are left in the measuring c...

Page 362: ...ainer for sufficient volume and proper mounting Replace as required 2 Inspect the pump tube s for leaks wear and proper seating Replace as required 3 Call the Liquid Sensor Adjustment program 4 Call the Pump Calibration program This program is performed automatically after any replacements made in step 2 above 5 If the error persists contact a service representative 11 80 ...

Page 363: ... is shown below The available moduls depends on the analyzer version pH BG module El Met module Met II module Oximetry module Gas2 Gas1 Solution valve A detailed illustration of the fluidic module is given below Continued on next page Diagram of the fluidic module Pump Membrane valve Liquid sensor Optional Cal 1 Cal 2 Cleaning P1 P2 V1 V2 V3 V4 V5 V6 V7 V8 Cuvette Waste Rinse Cal1 Cal2 Cleaning Ri...

Page 364: ... air to the wet section V8 Pulled to enable flow to the waste container used when the sample is transported into the measuring modules P1 Waste pump Includes two tubes with larger inner diameter than the other pump tubes It aspirates from the inlet and transports solutions and sample to the waste container The pump rotation is always counterclockwise P2 Solution pump Includes one tube Transports s...

Page 365: ...fy possible sources of error Possible cause Indication Recommended action Obstruction in inlet Fluid flowing upwards through pH BG El Met and Met II modules during Stage 1 Perform inlet troubleshooting procedure Erratic flow of fluid through all three modules that contains excessive air bubbles Fluid does not move through the small canals off the waste pump tubes just above the pump rotor Excessiv...

Page 366: ...11 Troubleshooting ABL800 FLEX Operator s Manual 11 84 ...

Page 367: ...t accurate results For more comprehensive information regarding blood sampling see the references at the end of this chapter Contents This chapter contains the following topics Causes of errors in preanalytical phase 12 2 Preparation prior to arterial venous sampling 12 5 Preparation prior to capillary sampling 12 7 Sampling devices 12 8 Storage and preparation prior to analysis 12 9 Sampling proc...

Page 368: ...sport storage preparation prior to transfer of the sample into the analyzer Causes of error The possible causes of errors during the preanalytical phase and preventative measures are given below Cause of error Major affected parameters Preventative measures Air bubbles in sample pO2 Remove air bubbles immediately Clot in sample pH Use correct pre analytical handling Use Cleaning additive Capillari...

Page 369: ...ficial light or sunlight ctBil For patients receiving phototherapy lights should be extinguished prior to drawing the sample Inappropriate amount of flush solution is discarded from the catheter Electrolytes and metabolites Discard sufficient volume from the catheter before taking a blood sample Infusion solution given in the same arm Electrolytes and metabolites Stop infusion for a period or use ...

Page 370: ...pecific blood sample please refer to documentation for specific sampling devices Use electrolyte balanced heparin to minimize bias from heparin on electrolyte values CAUTION Risk of erroneously high results Do not add sodium fluoride to the blood samples as it gives erroneously high cNa and low cCa2 cGlucose and cLactate results Sodium fluoride also damages the Glucose and Lactate electrodes Prepa...

Page 371: ...ctBil Arterial and venous sampling sites The recommendations and considerations for selecting a sampling site are as follows Sample Site Advantages disadvantages Arterial Radial artery Good collateral circulation Easy access Prior to sampling from the radial artery perform a Modified Allen s Test to confirm adequate collateral circulation Brachial artery Difficult to puncture due to location Great...

Page 372: ...e with a relative volume of 0 5 or more of the blood volume in the syringe is a potential source of significant error 2 3 The effect of such an air bubble increases with the storage time and agitation of the sample Mix sample thoroughly with heparin immediately after sampling by inverting the sampler several times and then rolling the sample between your palms A line If aspirating the sample do so...

Page 373: ...tus of the patient Make a puncture using a lancet or the like so that blood flows freely Do not squeeze the area Remove the first drop of blood since it may be diluted with tissue fluid Take the sample from the center of the second blood drop To prevent air from entering the capillary take the sample from the center of the drop Squeezing or milking the puncture site is to be avoided as this will r...

Page 374: ...sampler for arterial puncture or A line sampling PICO50 2 mL Arterial blood sampler for the aspiration of arterial blood from A lines SafePICO Self filling arterial blood sampler for arterial puncture or A line sampling contains a ball for automatic sample mixing in the FLEXQ sampler tray The following CLINITUBES for capillary blood sampling available from Radiometer are recommended D956G 70 210 D...

Page 375: ...hould be avoided whenever possible or at least kept to a minimum If it is not possible to analyze the sample immediately analyze it within 30 minutes after collection when stored at room temperature 5 12 Alternatively store the sample in ice water 0 4 C The storage time should not exceed 1 hour 13 Samples with expected high pO2 values or for special studies like shunt studies should be analyzed im...

Page 376: ... several times and rolling it between the palms of your hands Capillary samples Thoroughly mix the sample with heparin using a mixing wire and magnet Capillary blood sample measurements In order to perform in accordance with the analyzer performance specifications Radiometer highly recommends to follow the recommendations below Capillary blood sample measurements When performing capillary blood sa...

Page 377: ... When performing measurements on fetal scalp blood introduce the capillary sample into the analyzer from the cap end free from Vaseline smear In case both capillary ends are smeared dry one of the ends with a lint free tissue before measurement Due to their inherent characteristics fetal scalp blood samples are generally regarded as potentially difficult to work with An important prerequisite for ...

Page 378: ...ls then expel air and heparin through the needle 3 Extend the patient s arm Apply the tourniquet for a venous puncture 4 Locate the blood vessel with the finger tip and clean the skin area with antiseptic and a sterile gauze sponge or cotton wool 5 Insert the needle in the vessel with the bevel upward Withdraw the syringe plunger gently to collect blood 6 Release the tourniquet if used remove the ...

Page 379: ...gertip Clean the skin area with antiseptic and a sterile gauze sponge or cotton wool 4 Collect the sample according to the procedure in your institution 5 Apply dry gauze or cotton wool over the puncture site 6 Close the test tube with a cap then mix the contents by inverting it or rolling it between your palms about 20 times 7 Apply a pressure dressing over the puncture site and elevate the site ...

Page 380: ...ing To collect an expired air sample do the following Step Action 1 Collect the patient s expired air in the Douglas bag 2 Connect a syringe minimum 20 mL with a rubber cap to the bag 3 Fill and empty the syringe twice then fill it with the sample Close the syringe with the rubber cap 12 14 ...

Page 381: ...h J Schönberger J Postmus P Effects of four different methods of sampling arterial blood and storage time on gas tensions and shunt calculation in the 100 oxygen test Eur Respir J 1996 10 910 13 8 Mahoney JJ Harvey JA Wong RJ Kessel VLA Changes in oxygen measurements when whole blood is stored in iced plastic or glass syringes Clin Chem 1991 37 1244 48 9 Woolley A and Hickling K Errors in measurin...

Page 382: ... guideline Capillary blood gas sampling for neonatal and pediatric patients Respir Care 1994 39 12 1180 83 Moran RF Bergkuist C Graham GA et al Considerations in the simultaneous measurement of blood gases electrolytes and related analytes in whole blood Proposed Guideline CLSI former NCCLS Publication C32 P Villanova Pa NCCLS 1993 13 17 5 6 Christiansen TF Measurement of potassium in whole blood ...

Page 383: ...ers This chapter contains the following topics Measured parameters 13 2 Input parameters 13 5 Derived parameters 13 6 Sample handling 13 8 Calibration and maintenance programs 13 11 Analyzer requirements 13 13 Analyzer specifications 13 14 Approvals and patents 13 16 Introduction Contents ...

Page 384: ...d in the International vocabulary of basic and general terms in metrology VIM The following measured parameters are available independent of analyzer configuration Parameter Unit Measuring range Test range pH pH scale 6 300 8 000 6 85 7 55 cH nmol L 10 0 501 28 141 pCO2 mmHg Torr 5 0 250 17 160 kPa 0 67 33 3 2 27 21 3 pO2 mmHg Torr 0 0 800 20 580 kPa 0 00 107 2 67 77 3 ctHb g dL 0 00 27 7 2 5 23 g...

Page 385: ... 1081 9 0 270 cLac mmol L meq L 0 0 30 0 5 15 mg dL 0 270 4 5 135 cCrea mol L 10 1800 50 1500 mg dL 0 11 20 4 0 57 17 0 ctBil mol L 1 1000 0 400 mg dL 0 0 58 5 0 0 23 4 mg L 0 585 0 234 The values are for the analyzer with the activated Out of range suppression function In case this function has not been activated the measuring ranges will be as follows Parameter Unit Measuring range sO2 FO2Hb 2 0...

Page 386: ...test range Radiometer advises you to repeat the measurement by means of another method Parameter Unit Measuring Range Test range pCO2 mmHg 5 0 250 15 150 kPa 0 67 33 3 2 00 20 00 pO2 mmHg 0 0 800 15 530 kPa 0 00 107 2 70 Parameter Unit Measuring Range Test range p amb mmHg Torr 450 800 450 800 kPa 60 0 106 7 60 0 106 7 All parameters available on the analyzer Pleural liquid Expired air Baro Other ...

Page 387: ... 20 5 RQ Respiratory quotient ratio of carbon dioxide production and oxygen consumption 0 00 2 00 0 86 pO2 v Oxygen tension in mixed mmHg 0 0 xxx x venous blood kPa 0 00 xx xx sO2 v Oxygen saturation 0 0 100 0 in mixed venous blood fraction 0 000 1 000 Q t Cardiac output L min 0 0 xxx x V O2 Total oxygen consumption mL min 0 xxxx mmol min 0 0 xxx x VCO Volume of carbon monoxide mL 0 0 xxx x p50 st...

Page 388: ...termined by analyzer pH T T cH T T pCO2 T T cHCO3 P cBase B ctHb cBase B ox ctHb cBase Ecf cBase Ecf ox cHCO3 P st ctHb ctCO2 P ctCO2 B VCO2 V dry air pH st Hct ctHb pO2 T T pO2 A FO2 I RQ pO2 A T FO2 I RQ T pO2 a FO2 I FO2 I pO2 a T FO2 I FO2 I T p50 p50 T T p50 st pO2 A a FO2 I RQ pO2 A a T FO2 I RQ T pO2 a A FO2 I RQ pO2 a A T FO2 I RQ T Continued on next page List of parameters ...

Page 389: ...Hb FO2 I RQ FShunt T ctHb FO2 I RQ T RI FO2 I RQ RI T FO2 I RQ T Qx ctHb p50 st VO2 V dry air sO2 FO2Hb FHHb V B ctHb VCO FCOHb 1 FCOHb 2 Anion Gap K Anion Gap cCa2 pH 7 4 mOsm GFR if non AA Crea Sex Age GFR if AA Crea Sex Age NOTICE All parameters are calculated in SI units If other units are selected the results are obtained by converting the SI units into those selected For detailed information...

Page 390: ...suring time sec Cycle time sec Samples per hour Syringe S195 Other fluids S195 Ampoule QC 195 L 80 150 24 Capillary FLEXMODE Other fluids FLEXMODE no message 195 L 80 150 24 Capillary FLEXMODE Other fluids FLEXMODE message 869 or 870 30 40 L or 40 55 L 100 170 21 Capillary FLEXMODE Other fluids FLEXMODE message 871 or 872 50 70 L 100 170 21 Capillary FLEXMODE Other fluids FLEXMODE message 873 65 1...

Page 391: ...per hour Syringe S85 Other fluids S85 Ampoule QC 85 L 80 170 25 Capillary FLEXMODE Other fluids FLEXMODE no message 85 L 80 145 25 Capillary FLEXMODE Other fluids FLEXMODE message 869 or 870 30 40 L or 40 55 L 100 170 21 Capillary FLEXMODE Other fluids FLEXMODE message 871 or 872 50 70 L 100 170 21 Capillary C55 55 L 100 170 21 Capillary C35 Oxi not active on the ABL810 BG only 35 L 80 145 25 Syri...

Page 392: ...9 or 870 30 40 L or 40 55 L 80 145 25 Capillary FLEXMODE Other fluids FLEXMODE message 871 or 872 50 70 L 80 145 25 Capillary FLEXMODE Other fluids FLEXMODE message 873 65 100 L 80 170 21 Capillary FLEXMODE Other fluids FLEXMODE message 874 90 L 100 170 21 Syringe S95 Capillary C95 95 L 100 170 19 Syringe S85 85 L 80 170 21 Capillary C55 55 L 80 145 25 Capillary C35 Met 35 L 80 145 25 Syringe Pleu...

Page 393: ... 1 2 2 2 2 2 tHb Manual 2 2 2 Duration 3 min Program Started Duration min ABL837 27 17 ABL835 25 15 ABL830 20 10 ABL805 Cleaning Every 8 or 24 hours or called by operator 4 4 4 4 Tubing Refill After changing all solution bottles or called by operator 4 4 4 4 Decontami nation Called by operator 4 2 2 2 Protein Remover Called by operator 3 2 2 2 Liquid Sensor Adjustment Called by operator 3 3 3 3 Fo...

Page 394: ... 10 ABL805 Pump Calibration Called by operator 4 4 3 4 Rinse After each measurement calibration or called by operator 1 80 sec 80 sec 80 sec Flush Automatically 1 50 sec 50 sec 50 sec Draining Automatically 21 sec 21 sec 21 sec ABL830 approximately 21 min ABL835 05 approximately 24 min ABL837 27 17 Approximately 26 min Auxiliary programs continued System alignment ...

Page 395: ...h break T4AH Type Shurter No 0001 2510 WARNING Risk of fire Fire hazard Replace fuse as marked Start up Cold start typically 25 minutes Warm start 5 minutes Gas pressure Operating pressure 1 0 38 bar Maximum pressure 38 bar Location Indoor use only Relative humidity 20 to 80 Operating temperature 15 C to 32 C Storage temperature 20 C to 60 C Altitude correction Up to 3000 meters above sea level at...

Page 396: ...liant with IEEE 802 3 10 Mbps CSMA CD standards External printer port Bi directional parallel ECP EPP SPP port 25 pin connector Keyboard Mouse Keyboard PS 2 mouse interface External VGA Screen Connector for VGA screen Printer Built in thermal paper 11 cm wide Barcode reader Built in Reading distance contact 70 mm Barcode length max 65 mm Bar width 127 m 5 mil Number of characters 62 Code types 128...

Page 397: ...filled carousel Scanning time 60 sec with filled carousel Manual quality control measurement possible Yes Remote control Remote monitoring and start of measurement via the RADIANCE system The specifications for the FLEXQ module are as follows Number of samplers in the sampler tray up to 3 Sampler type safePICO with safeTIPCAP Positioning of samplers in the sampler tray Random Sample mixing time 7 ...

Page 398: ...trol and laboratory use EMC requirements Part 1 General requirements The equipment complies with the immunity requirements in EN 61326 2 6 Electrical equipment for measurement control and laboratory use EMC requirements Part 2 6 Particular requirements In vitro diagnostic IVD medical equipment One or more of the following patents and patent applications may apply US Patent Nos US6051389 US6099804 ...

Page 399: ...ng information Overview This chapter lists accessories used for the analyzer This chapter contains the following topics Analyzer accessories 14 2 Quality control 14 5 Sampling devices 14 7 Introduction Contents ...

Page 400: ...e 945 620 E7066 Lactate Electrode 945 619 E7077 Crea A electrode 945 662 E8088 Crea B electrode 945 663 E8089 Dummy Electrode 945 626 Item Code No Type Reference Membrane Box 4 units 942 058 D711 pO2 Membrane Box 4 units 942 064 D799 pCO2 Membrane Box 4 units 942 063 D788 K Membrane Box 4 units 942 059 D722 Na Membrane Box 4 units 942 062 D755 Cl Membrane Box 4 units 942 061 D744 Ca Membrane Box 4...

Page 401: ...Cleaning Met II Solution 100 mL 6 944 136 S8377 Calibration Solution 1 175 mL 6 944 135 S1827 Calibration Solution 2 150 mL 6 944 134 S1837 Rinse Solution 600 mL 944 155 S4987 Item Code No Type Gas Cal 1 10 bar Onboard gas bottle 962 169 Gas Cal 2 10 bar Onboard gas bottle 962 170 Gas Cal 1 34 bar Onboard gas bottle for non EU countries 962 183 Gas Cal 2 34 bar Onboard gas bottle for non EU countr...

Page 402: ...8 Item Code No Type Thermal Paper 8 rolls 984 070 Hypochlorite Solution 943 906 S5362 Inlet Gasket 902 668 Inlet Probe 902 797 Inlet Probe Tube 841 780 Inlet Syringe Handle 902 669 Inlet Capillary Handle 902 670 Pump Tube for electrode modules 842 328 Waste Pump Tube yellow 2 pcs 842 326 Pump Tube for solutions 842 327 Fan Filter 924 073 Clot Catcher for the ABL800 FLEX analyzer 250 units 906 020 ...

Page 403: ...UE 944 051 S7360 Level 4 GREEN 944 052 The QUALICHECK5 quality control system contains the following solutions Type Description Code S7730 Level 1 RED 944 017 S7740 Level 2 YELLOW 944 018 S7750 Level 3 BLUE 944 019 S7760 Level 4 GREEN 944 020 The AutoCheck3 quality control system contains the following solutions Type Description Code S7335 Level 1 RED 944 082 S7345 Level 2 YELLOW 944 083 S7355 Lev...

Page 404: ...096 S7865 Level 4 GREEN 944 097 The Range QUALICHECK quality control system contains the following items Type Description Code S7930 Level 1 box of 30 ampoules 944 151 S7940 Level 2 box of 30 ampoules 944 152 S7950 Level 3 box of 30 ampoules 944 153 H700 ABL700 QC Adaptor 924 036 Ampoule Opener 920 712 Type Description Code Quality Control Systems Reference Manual 989 046 QUALICHECK Short form Ins...

Page 405: ...CO70 PICO70 25G 5 8 100 units 956 547 PICO70 PICO70 22G 1 w o needle cube 100 units 956 563 PICO70 safePICO70 22G 1 with needle shield device 100 units 956 608 PICO70 safePICO70 23G 5 8 with needle shield device 100 units 956 609 PICO70 safePICO70 22G 1 with needle shield device 100 units 956 624 PICO70 Item Code no Type CLINITUBES with balanced heparin 125 µL including mixing wire and capillary c...

Page 406: ...G x 32 mm 0 7 1 5 mL 100 units 956 611 safePICO Self fill with safeTIPCAP without needle shield device 23G x 16 mm 0 7 1 5 mL 100 units 956 612 safePICO Self fill with safeTIPCAP without needle shield device 22G x 25 mm 0 7 1 5 mL 100 units 956 613 safePICO Self fill with needle shield device and safeTIPCAP 22G x 32 mm 0 7 1 5 mL 100 units 956 614 safePICO Self fill with needle shield device and s...

Page 407: ...settings contents of various Ini files and calibration verification procedure This chapter contains the following topics Radiometer default settings 15 2 Contents of setup settings 15 15 Calibration verification 15 18 Interfacing facilities 15 20 Introduction Contents ...

Page 408: ...arts of the Setup to be set back to Radiometer defaults Default settings for General Security are as follows Item Default setting Enable Centralized User Management Off Authenticate operator by Logon barcode as primary Allow anonymous use Yes Logoff Time 3 min Profile for anonymous user User Continued on next page Radiometer default setup screen Analyzer Security ...

Page 409: ...rform measurement B Perform calibration C Perform replacements D Perform Disk Functions E View Data Logs F Edit data in logs G Enter Setup Programs H Enter Service Programs I Start AutoCheck J Approve results Columns D E G and H are controlled via the Menu and Button Configuration screen settings not via the check buttons on the Access Profiles screen X means restricted access to data logs User ca...

Page 410: ...poule QC Capillary FLEXMODE Capillary C55 L Capillary C35 L OXI ABL805 Syringe Syringe S165 L Syringe S95 L Syringe Pleura pH Ampoule QC Capillary Capillary FLEXMODE Capillary C95 L Capillary C55 L pH BG Capillary C35 L MET ABL800 N A N A Not available at the time of the release All user defined modes and Other Fluids mode are deleted All modes are set to Radiometer default layout Reference ranges...

Page 411: ... settings included in the R Default Layout bold text a new title xxx xxx the reference range for a parameter Blood Gas Values pH xxx xxx pCO2 xxx xxx pO2 xxx xxx New Line Oximetry Values ctHb xxx xxx sO2 xxx xxx FO2Hb xxx xxx FCOHb xxx xxx FHHb xxx xxx FMetHb xxx xxx FHbF xxx xxx New Line Electrolyte Values cK xxx xxx cNa xxx xxx cCa2 xxx xxx cCl xxx xxx New Line Metabolite Values cGlu xxx xxx cLa...

Page 412: ... Base Status cBase Ecf st P 3 HCO c Default settings for Drift tolerances are as follows Parameter Drift 1 Drift 2 Units pH 0 020 0 020 pCO2 2 5 5 mmHg pO2 6 6 mmHg ctHb 10 N A pA cK 0 2 1 5 mmol L cNa 3 1 mmol L cCa2 0 05 0 2 mmol L cCl 2 3 mmol L cGlu 0 5 N A mmol L cLac 0 2 N A mmol L cCrea 15 15 mol L Continued on next page Analysis Setup defaults continued Calibration Setup defaults ...

Page 413: ...Quality Control Statistics are as follows Item Default setting Statistics factor 1 5 Remind to print statistics each month No Remind to export WDC data each month No Default settings for Quality Control Mandatory Input are as follows Item Default Setting Mandatory temperature No Default temperature 25 o C QC Schedule settings are deleted AutoCheck Setup replacement warning before carousel empty No...

Page 414: ...Never Lactate Electrode Membrane Never Crea A and Crea B Electrode Membranes Never Reference Electrode Membrane Never K Electrode Never Na Electrode Never Ca Electrode Never Cl Electrode Never Glucose Electrode Never Lactate Electrode Never Crea A Electrode Never Crea B Electrode Never Reference Electrode Never pH Electrode Never pCO2 Electrode Never pO2 Electrode Never Inlet Gasket Never Rubber T...

Page 415: ... 000 pCO2 Yes No No 0 0 1 000 mmHg pO2 Yes No No 0 0 1 000 mmHg ctHb Yes No No N A 1 000 g dL FHHb Yes No No N A N A No FO2Hb Yes No No N A N A No FHbF Yes No No 0 1 000 Yes sO2 Yes No No 0 0 1 000 No FCOHb Yes No No 0 0 N A No FMetHb Yes No No 0 0 N A No ctBil Yes No No 0 1 000 mol L Yes cK Yes No No 0 0 1 000 mmol L cNa Yes No No 0 1 000 mmol L cCa2 Yes No No 0 00 1 000 mmol L cCl Yes No No 0 1 ...

Page 416: ...ctHb g dL Oximetry fractions Saturation Gas fractions FO2 I Sensitivity pH cK cNa cCa2 cCl Hct pO2 a A FShunt RI cK cNa cCa2 cCl mmol L cGlu cLac mmol L Temperatures o C ctO2 ctCO2 Vol D O2 mL min V O2 mL min Age years Weight kg Height m Altitude m Birth weight g pO2 sensitivity PA mmHg cCrea sensitivity 1 pA M cCrea sensitivity 2 and 3 Continued on next page General Setup defaults continued ...

Page 417: ...P Numerical cmH2O 1 CMV Numerical Rate 1 SIMV Numerical Rate 1 Flow by Numerical L min 1 HFV Numerical Rate 1 I E Ratio Numerical 2 Wave Numerical None ICD9 Code Numerical None Oxygen Device 1 Numerical None Oxygen Device 2 Numerical None Diagnostic Code Numerical None Default settings for User defined Notes No notes defined Default settings for Language English Default settings for Acoustic Signa...

Page 418: ...No setting Green Default settings for Miscellaneous Setup are as follows Event Default setting Analyzer locked Not set Use safeTIPCAP Yes Enable Estimated Derived Parameters No Fixed pO2 pCO2 decimals No Enable General Barcode Support Yes Enable Patient Result Approval No Apply Parameter Corrections to QC Yes Log All Measurement Activities No Show Parameter Bar Yes Auto temp unit conversion No HbF...

Page 419: ...matic Archiving are as follows Item Default setting Patient report log On Calibration log On Quality control log On Activity log On Store archives on the analyzer On Default settings for Communication Setup are as follows Item Default setting RADIANCE Connection Off LIS HIS Connection None QA Portal Off Automatic Data Request When entering sampler ID on Automatic Data Transmission Patient results ...

Page 420: ...ABL800 FLEX Operator s Manual 15 14 Radiometer default settings Continued The following setups have no Radiometer settings Environment setup time and date setup analyzer identification setup Setups without Radiometer settings ...

Page 421: ...e setup see Loading restoring Setup in chapter 8 Each setup group of settings is described in this section The following settings i e screens and their data will be restored in the Parameters group Item Setup screens Sample Modes Syringe Mode Capillary mode Parameter Setup Offset and slope only Parameter Units Units Setup Corrections Parameter Setup Repression and Out of range suppression only Cri...

Page 422: ...utomatic Data Transmission Automatic Data Request Patient Lookup Setup Operators and Passwords Logon Protection Level and Logoff Time only Miscellaneous Setup All except Analyzer Locked Automatic Printing Automatic Archiving Automatic Backup Save Setup Destination Load Setup Source Backup All Data Destination Export Data Logs Destination Function External keyboard enabling Function Enable remote a...

Page 423: ... Passwords Access Profiles Pre def Notes User defined Notes The following ini files i e screens and their data will be restored in the Schedules etc group Item Setup screens QC Schedule QC Schedule QC schedule is restored for the slots with the control solutions installed in them The schedule follows the slots not the QC levels Rilibäk Ranges Rilibäk rules are restored Wetsection Setup Calibration...

Page 424: ... layout and measuring mode Step Action 1 Make a new report layout called e g Cal Verification based on the Radiometer default layout see Patient Report Setup in chapter 3 2 Press Patient ID layout and deselect all items except for the Patient ID and Sample type Set default sample type to Cal Verification 3 Press Edit Patient Results Layout and deselect all parameters except for the measured parame...

Page 425: ...ove the sampling device and close the inlet flap 6 Enter the information on the Patient Identification screen Use a dedicated identifier for each solution e g Level 1 as Patient ID 7 After all measurements on the calibration verification solutions have been completed review the data by filtering it in the Patient Results log or transfer the data to a data analysis program see Exporting Data Logs i...

Page 426: ...analyzer An external alphanumeric keyboard may be used instead of the on screen keyboard to enter data However to select individual buttons on the analyzer s screen a mouse must be used or the operator must touch the screen An IBM enhanced personal computer keyboard is the sole item that is required for connection to the analyzer NOTICE The keyboard layout must correspond to the language version u...

Page 427: ... Quality control results Calibration data System messages Recommendations 1 Use a shielded data cable with an RJ45 connector to connect the analyzer to a network 2 The analyzer is first connected to the computer controlling the information system via one of the following two interfaces A serial line RS232 Interface An Ethernet interface TCP IP 3 Once the analyzer has been physically connected to t...

Page 428: ...15 Radiometer settings ABL800 FLEX Operator s Manual 15 22 ...

Page 429: ...6 Analyzer settings setup 3 62 Analyzer specifications 13 14 Analyzer status 2 28 Analyzer status at a glance 2 28 Approvals and patents 13 16 Archived data logs 9 3 9 24 Arterial blood samplers 12 8 AutoCheck measurement 5 7 AutoCheck module 2 14 AutoCheck module specifications 13 15 AutoCheck status 2 33 5 15 AutoCheck warning program 3 54 Automatic archiving setup 3 81 Automatic auxiliary progr...

Page 430: ... 7 24 the inlet flaps and inlet gasket 7 23 the measuring chambers 7 23 Cleaning the analyzer 7 23 Cleaning the FLEXQ sampler tray cover 7 24 CLINITUBES 12 8 Communication ports 2 11 Communications setup 3 68 Complete menu 2 26 Conditions and correction actions 3 83 Connecting a mouse 15 20 Connecting an alphanumeric keyboard 15 20 Connecting to a network 15 21 Converting an archive into csv forma...

Page 431: ...se 11 83 Executing the temporary shutdown program 10 6 Exiting standby 10 4 Expired air sampling 12 14 Expired calibrations 6 5 Explanation of corrective actions 3 84 Exporting an archive 8 11 Exporting data logs 8 9 External barcode reader 15 21 F Finding a patient profile 9 10 FLEXMODE 1 3 4 6 FLEXQ module 2 8 FLEXQ module specifications 13 15 Fluid transport system description 11 81 Fluid trans...

Page 432: ...ution 5 6 Measurements on animal blood 1 3 Measurements with FLEXQ 4 10 Measuring modes with FLEXQ 4 2 Measuring section 2 5 Menu at analyzer startup 2 24 Menu structure 2 24 Messages after refilling AutoCheck carousel 7 19 Miscellaneous setup 3 86 List of options 3 86 Mixing a blood sample in a capillary 4 9 in a syringe 4 9 in a test tube 4 9 Moving archive 9 25 N Names 1 2 O Online aid faciliti...

Page 433: ... setup program 3 39 QC ranges program 3 37 QC schedule program 3 40 QC solutions program 3 35 QC statistics program 3 42 Quality control Entering information manually 5 8 filter criteria 9 12 General information 5 2 Glossary of terms 5 3 Quality control frequency 5 2 Quality control log 9 11 Quality control plot 9 15 Quality control plot 5 13 9 15 Quality control result status markings 5 10 Qualit...

Page 434: ...24 Sample counter 2 39 Sample logistics setup 3 23 Sample pre registration 3 22 Samples Preparation prior to analysis 12 10 Sampling devices 12 8 14 7 Sampling devices for FLEXQ 14 8 Sampling with a standard syringe 12 12 Sampling with a test tube 12 13 Saving setup 8 13 Scheduled AutoCheck measurement 5 7 Screen elements buttons 2 22 center section 2 17 check buttons 2 20 information bar and icon...

Page 435: ...ions QC 5 11 Temporary shutdown 10 6 Test tube samples 4 14 tHb calibration check 6 7 tHb calibration result 6 9 The shutdown procedure 10 8 Thermal printer 2 10 Time date setup 3 65 To adjust the internal barometer 3 63 To enter the altitude 3 63 To enter the ambient temperature 3 64 Transporting the analyzer 10 9 Tutorials 2 37 U Units setup 3 57 Unknown quality control solutions 5 11 Unschedule...

Page 436: ......

Page 437: ...ufacturer ABL800 FLEX operator s manual from software version 6 10 Publication 201104 Edition C Code number 994 909 Radiometer Medical ApS Åkandevej 21 2700 Brønshøj Denmark www radiometer com If you have any questions or need assistance please contact your local Radiometer representative ...

Page 438: ...Date of issue ABL800 FLEX Operator s manual ...

Reviews: