Radio Shack MD-982 Owner'S Manual Download Page 7

Using t

he Pre

s

et

 Aut

o

-Rhy

th

m

s

7

-

';$1#4&

"

5

2.+6

"

6

10'5

The preset tones numbered 90 through 96 
on your keyboard let you automatically play 
two different musical instruments or sound 
effects independently on opposite sides of 
the keyboard. 

The instrument listed first in the tone’s name 
plays on the left half of the keyboard (below 
middle C). The instrument listed next plays 
on the right half of the keyboard (above 
middle C). For example, BS/PNO (No. 90) 
plays a bass tone on the left half of the 
keyboard and a piano tone on the right.

2

'4%755+10

"

5

170&5

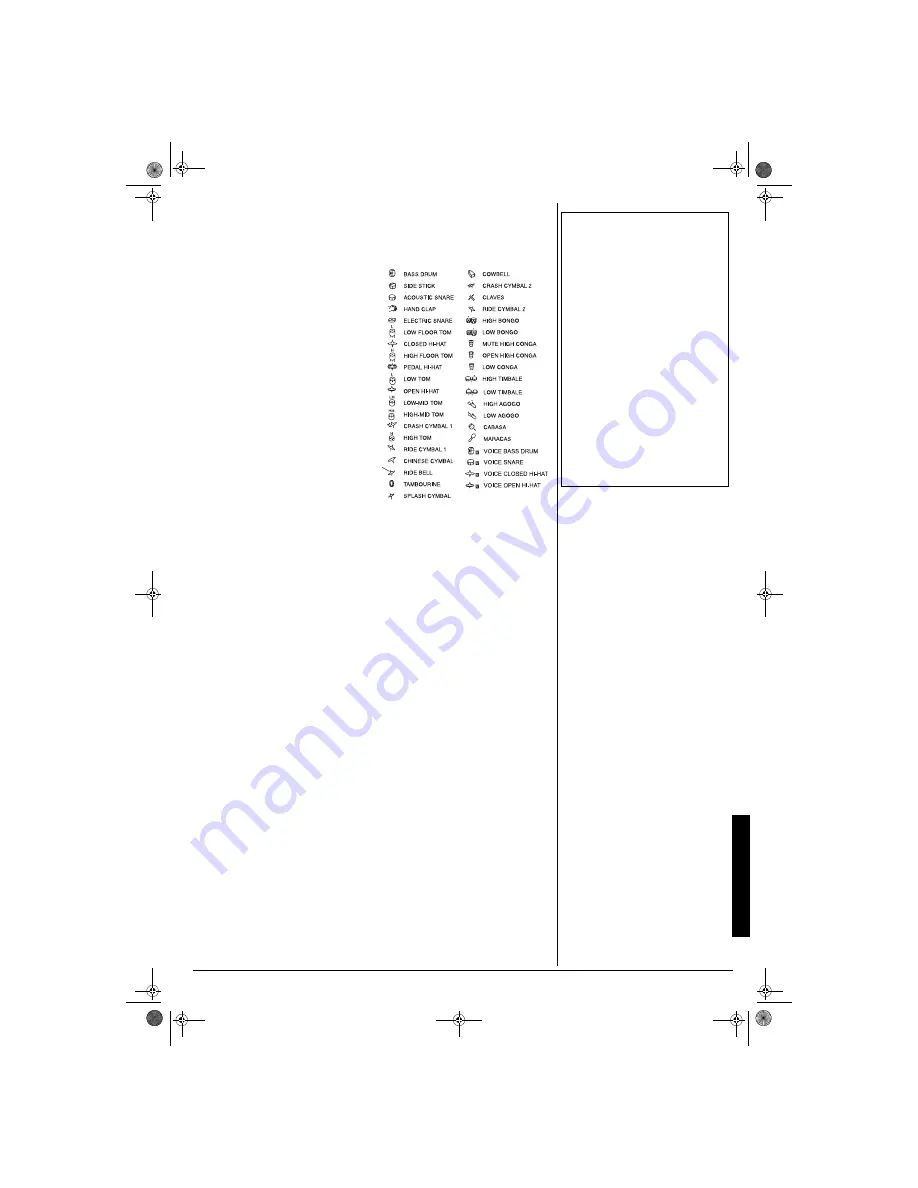
PERCUSSION (No. 99) lets you play the 39 
different percussion sounds shown here. 
The symbol for each sound appears above 
the corresponding key on the keyboard. 

±

75+0)

"

6*'

"

24'5'6

"

#761

/

4*;6*/5

Your keyboard has 100 preset auto-rhythms 
that provide a steady beat for your music. 
The name and two-digit number of each 
preset auto-rhythm is listed on the 
keyboard’s top panel.

You can play a preset auto-rhythm on the 
keyboard in any of the following ways:

• Select and play a rhythm (see 

“Selecting/Playing an Auto-Rhythm”)

• Synchronize the start of a rhythm with 

your music (see “Using SYNCHRO”)

• Briefly vary the pattern of a rhythm (see 

“Using FILL-IN”)

5

'.'%6+0)

1

2

.#;+0)

"

#0

"

#

761

/

4

*;6*/

1. Press 

RHYTHM

. An indicator appears to 

the right of RHYTHM and the number of 
the current auto-rhythm appears. 

±

2. To select a different rhythm, choose an 

auto-rhythm from the 100 RHYTHMS 
list and enter its two-digit number on the 
keypad. Or, repeatedly press 

+

 or 

 to 

move to the next higher or lower 
numbered rhythm.

3. Press 

START/STOP

 to start the selected 

auto-rhythm. 

4. Adjust 

MAIN VOLUME

 and 

ACCOMP 

VOLUME 

to the desired level (see 

“Adjusting the Accompaniment Volume” 
on Page 8).

5. To change the auto-rhythm speed, 

press 

TEMPO


 or 

. The current 

tempo setting appears.

6. Play the keyboard along with the auto-

rhythm.

7. To select a different rhythm, repeat 

Steps 1 and 2.

8. To stop the auto-rhythm, press 

START/

STOP

 again.

7

5+0)

"

5;0%*41

This feature lets you synchronize the start of 
an auto-rhythm with the beginning of your 
music.

After you select and enter an auto-rhythm, 
press 

SYNCHRO/FILL-IN

. The bars of the 

metronome flash to show the keyboard is in 
standby mode.

Begin playing the keyboard. The keyboard 
automatically begins to play the rhythm 
when you press any key within the first 1

1

/

2


octaves of the lower end of the keyboard 
(the first 18 keys from the left side of the 
keyboard).

7

5+0)

"

(+..

/

+0

This feature lets you insert a short (1- to 2-
measure) variation in the beat pattern of a 
selected auto-rhythm.

Press and release 

SYNCHRO/FILL-IN

 while 

the auto-rhythm is playing. The keyboard 
inserts a 1- to 2-measure variation, then the 

±

"

016'

"

±

"

Percussion Sounds

When you select the Fingered or Concert 
Chord mode, the keys in the lower 1

1

/

2

 octaves 

become the accompaniment keys and do not 
produce percussion sounds. See “Using Auto 
Accompaniment” on Page 8.

Selecting/Playing an Auto-Rhythm

The keyboard automatically selects the 
rhythm Club Pop (No. 00) when you turn 
the power on.

Precede a single-digit number with an 0. 
For example, to select POP BALLAD (No. 
05), press 0 5.

If you incorrectly enter the first digit of the 
rhythm, press RHYTHM to clear the entry 
and return to the last selected auto-rhythm.

You can adjust the tempo to play an auto-
rhythm from 20 to 255 beats per minute.

To quickly slow down or speed up the 
tempo, hold down TEMPO


 or

.

To reset the tempo to its default (original) 
speed, press TEMPO


 and 


at the 

same time.

42-4056.fm  Page 7  Friday, April 26, 2002  9:14 AM

Summary of Contents for MD-982

Page 1: ...nd your keyboard can do You can play the tunes either one at a time or consecutively and you can turn off the melody or accompaniment portion so you can play along with the tunes see Playing the Prere...

Page 2: ...WER MODE is set to OFF 2 Set the AC adapter s voltage switch to 9V 3 Insert the Adaptaplug adapter into the adapter s cord so it reads TIP 4 Connect the AC adapter s barrel plug to DC 9V on the back o...

Page 3: ...l amplifier to your keyboard insert the cable s plug into PHONES OUTPUT on the back of the keyboard then connect the other end of the cable to the amplifier s input jack s such as AUX IN or TAPE IN Ra...

Page 4: ...ithout disturbing others or an external amplifier so you can play for a crowd neither supplied Transpose Function lets you instantly change the key of the music even while you are playing see Changing...

Page 5: ...red To adjust only the accompaniment volume except tunes 80 to 99 press ACCOMP VOLUME then enter the desired volume level using the number keys between and or press or within 5 seconds 5 To move to a...

Page 6: ...TH SOUND 60 SYN LEAD 1 61 SYN LEAD 2 62 SYN LEAD 3 63 SYN CALLIOPE 64 SYN PAD 1 65 SYN PAD 2 66 SYN PAD 3 67 GLASS HMCA 68 COUNTRY FARM 69 SYN BASS 70 PEARL DROP 71 COSMIC SOUND 72 SOUNDTRACK 73 SPACE...

Page 7: ...Adjusting the Accompaniment Volume on Page 8 5 To change the auto rhythm speed press TEMPO or The current tempo setting appears 6 Play the keyboard along with the auto rhythm 7 To select a different...

Page 8: ...keys at the same time The lowest note you play determines the key of the chord For example if the lowest note is C the keyboard plays a C chord 1 Set POWER MODE to CONCERT CHORD 2 Enter a two digit a...

Page 9: ...he display shows the chord you entered the keys to press to form the chord on the bottom keyboard the fingers you need to use to play the chord on the center hands and the notes that make up the chord...

Page 10: ...ds the sound exactly as it was played on the first device 0 6 100 6 105 To connect your keyboard to another MIDI equipped device you must use a MIDI cable available at RadioShack To send MIDI data fro...

Page 11: ...NE MIDI until A oXZ 9 A oXZ 9 A oXZ 9 A oXZ 9 appears 2 Within 5 seconds press or to select the channel you want 016 5 176 6 2 06 6 10 46 The MIDI Implementation Chart on Page 17 shows specific detail...

Page 12: ...ume is turned down Repeatedly press MAIN VOLUME to increase the volume The headphones are connected Disconnect the headphones Power supply problem Make sure the batteries are fresh and inserted correc...

Page 13: ...chords you play most often This illustration shows which fingers on your left hand match the numbers on the charts The illustration also appears on your keyboard s display You cannot play chords marke...

Page 14: ...14 Standard Fingering Chord Charts 42 4056 fm Page 14 Friday April 26 2002 9 14 AM...

Page 15: ...15 Note Table 016 6 Legend 1 Tone number 2 Maximum polyphony 3 Range type see Page 17 4 Corresponding general MIDI number see MIDI Data on Page 10 42 4056 fm Page 15 Friday April 26 2002 9 14 AM...

Page 16: ...g MIDI data Range transposed to nearest octave when receiving MIDI data or using the keyboard s transpose function 1 The received MIDI data is played one octave lower 2 The received MIDI data is playe...

Page 17: ...rt 17 2 06 6 10 46 2 If MAIN VOLUME is set to 0 or 1 V velocity is set to 75 If MAIN VOLUME is set to 2 or higher V is set to 100 4 Depends on GM tone map setting See Changing MIDI Settings on Page 11...

Page 18: ...y DC 9V Jack PHONES OUTPUT Jack Output Impedance 78 Ohms Output Voltage 4V RMS MAX MIDI IN MIDI OUT Jack Standard DIN Jacks SUSTAIN Jack 1 4 Inch Standard Jack Power Sources DC 6 AA batteries AC 120V...

Page 19: ...Notes 19 016 5 42 4056 fm Page 19 Friday April 26 2002 9 14 AM...

Page 20: ...roduct defect during the warranty period take the product and the RadioShack sales receipt as proof of purchase date to any RadioShack store RadioShack will at its option unless otherwise provided by...

Reviews: