background image

9

Preparation

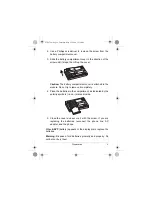
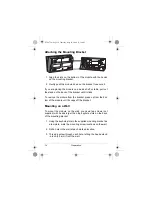
2. Use a Phillips screwdriver to remove the screw from the

battery compartment cover.

3. Slide the battery compartment cover in the direction of the

arrow until it stops, then lift up the cover.

Caution: The battery compartment cover is attached to the
module. Do not try to remove it completely.

4. Place the batteries in the compartment, as indicated by the

polarity symbols (+ and –) marked inside.

5. Close the cover and secure it with the screw. If you are

replacing the batteries, reconnect the phone line, AC
adapter, and the phone.

When 

BATT

 (battery) appears or the display dims, replace the

batteries. 

Warning:  Dispose of old batteries promptly and properly. Do
not burn or bury them.

43-947.fm  Page 9  Thursday, May 25, 2000  11:36 AM

Summary of Contents for CID-947

Page 1: ...Owner s Manual Please read before using this equipment CID 947 79 Memory Caller ID Module with Backlight 43 947 fm Page 1 Thursday May 25 2000 11 36 AM...

Page 2: ...ing Your Local Area Code 16 Operation 17 Receiving and Storing Calls 17 Reviewing Call Records 17 Redialing From Call Record Memory 21 Deleting Calls 21 VIP Call List 22 Troubleshooting 24 Care and Ma...

Page 3: ...is intended to alert you to the presence of uninsu lated dangerous voltage within the product s enclosure that might be of sufficient magnitude to con stitute a risk of electric shock Do not open the...

Page 4: ...he display lights when you press any button making it easy to view and change informa tion even in a dimly lit area Dial Back lets you redial a telephone number stored in the Caller ID call memory and...

Page 5: ...dule on a desk shelf or table or mount it on a wall Note Your module requires four AAA batteries not supplied to protect its memory during a power outage This module has been tested and found to compl...

Page 6: ...ne We refer to this power draw as the device s ringer equivalence number or REN The REN is on the bottom of your module If you use more than one phone or other device on the line add up all of the REN...

Page 7: ...TV or radio interference even when it is operating properly To elimi nate interference you can try one or more of the following cor rective measures reorient or relocate the receiving antenna increas...

Page 8: ...standard alkaline or rechargeable or recharge able batteries of different capacities When you replace the batteries do not press any buttons on the module after you remove the old batteries Doing so...

Page 9: ...dule Do not try to remove it completely 4 Place the batteries in the compartment as indicated by the polarity symbols and marked inside 5 Close the cover and secure it with the screw If you are replac...

Page 10: ...d adapter meets these specifications Using an adapter that does not meet these specifications could damage the module or the adapter Always connect the AC adapter to the module before you connect it t...

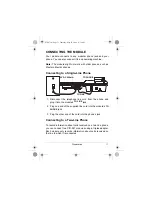
Page 11: ...he phone and plug it into the module s TO LINE jack 2 Plug one end of the supplied line cord into the module s TO PHONE jack 3 Plug the other end of the cord into the phone s jack Connecting to a Two...

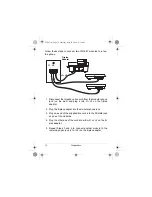
Page 12: ...er 2 Plug the triplex adapter into the modular phone jack 3 Plug one end of the supplied line cord into the TO LINE jack on one of the modules 4 Plug the other end of the cord into either L1 or L2 on...

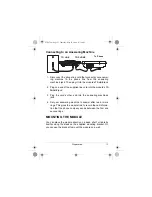
Page 13: ...s other end into the answering machine s jack 4 Set your answering machine to answer after two or more rings This gives the module time to record the call informa tion that the phone company sends be...

Page 14: ...et press up from the bot tom of the module until it snaps off the bracket Mounting on a Wall To mount the module on the wall you need two screws not supplied with heads larger than the keyhole slots o...

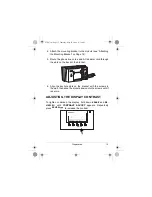
Page 15: ...the back of the bracket 6 Align the keyhole slots on the bracket with the screws in the wall then slide the module down onto the screws until it is secure ADJUSTING THE DISPLAY CONTRAST To lighten or...

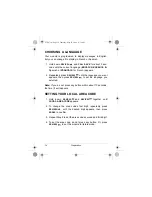
Page 16: ...ss REVIEW to set the language you selected Note If you do not press any button within about 10 seconds the time if set appears SETTING YOUR LOCAL AREA CODE 1 Hold down REVIEW and REVIEW together until...

Page 17: ...ll indicator on the right side of the module flashes the display lights and NEW and the total number of calls appear During an incoming VIP call the new call indicator flashes continuously REVIEWING C...

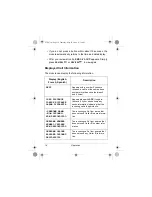
Page 18: ...once between 2 and 9 times LONG DISTANCE LONGUE DISTANCE LARGA DISTANCIA Appears along with LDC long dis tance call if your phone company sends information indicating that the incoming call is long d...

Page 19: ...The caller has blocked any Caller ID information from being sent SERVICE ERROR ERREUR DE LIGNE ERROR EN LINEA Call information was distorted before reaching the module Normal static on the telephone...

Page 20: ...N VIP LLENO Appears when the VIP number mem ory is full DELETE ALL EFFACER TOUT BORRAR TODO Delete all Caller ID records from mem ory except VIP records NO DATA SENT PAS DE DONNEES NO ENVIADO Call inf...

Page 21: ...hone before pressing CALL BACK DELETING CALLS Deleting a Single Call 1 Repeatedly press or hold down REVIEW or REVIEW until you see the call record you want to delete 2 Press ERASE The module deletes...

Page 22: ...system lets you save up to 20 call records in its VIP call list so they will not be deleted if you delete all calls from the sys tem s memory This lets you save a list of important callers Follow thes...

Page 23: ...ll records decreases by 1 To review VIP call records press VIP MEM then repeatedly press REVIEW or REVIEW To delete a VIP call record press VIP MEM select the call record you want to delete then press...

Page 24: ...ust the contrast as described in Adjusting the Display Contrast on Page 15 You have an incoming call but do not receive any Caller ID information You answered the call before the module received the c...

Page 25: ...xtremes can shorten the life of electronic devices damage bat teries and distort or melt plastic parts Keep the module away from dust and dirt which can cause premature wear of parts Handle the module...

Page 26: ...as built in protection circuits to reduce the risk of damage from surges in telephone line and power line current These protection circuits meet or exceed the FCC require ments However lightning strik...

Page 27: ...27 Notes Notes 43 947 fm Page 27 Thursday May 25 2000 11 36 AM...

Page 28: ...uring the warranty period take the product and the RadioShack sales receipt as proof of purchase date to any RadioShack store Ra dioShack will at its option unless otherwise provided by law a correct...

Reviews: