background image

23

Using the Memory Card

To keep a record of the numbers you
stored in the phone’s upper and lower
memory locations, lift off the clear plastic
cover over the card surrounding the
memory buttons. Then write the per-
son’s or company’s name next to the ap-
propriate memory location. Replace the
clear plastic cover.

Reviewing Stored Numbers

To review a number stored in an upper
memory location, press the desired
memory location button.

To review a number stored in a lower
memory location, press 

LOWER

, and

then press the desired memory button.

Note: Only the last fourteen digits of the
stored number appear on the display. If
there is no memory stored, 

EMPTY

 ap-

pears on the display.

Dialing Stored Numbers

If you are dialing a number stored in up-
per or lower memory, lift the handset or
press 

SPEAKERPHONE

 and press 

LINE

1

 or 

LINE


2

 to select which telephone

line you prefer.

To dial a number stored in upper memo-
ry,

 press the desired memory location

button.

To dial a number stored in lower memo-
ry

, press 

LOWER

, then press the desired

memory location button.

Deleting Stored Numbers

To delete a number stored in memory

,

press the memory location button for the
number you want to delete, then press

DELETE

 twice.

To replace a number stored in memory
with another number

, see “Storing Num-

bers Into Memory” on Page 21.

43-935.fm  Page 23  Friday, January 14, 2000  3:07 PM

Summary of Contents for 43-935

Page 1: ...Cat No 43 935 OWNER S MANUAL Please read before using this equipment Two Line Caller ID Phone With Speakerphone 43 935 fm Page 1 Friday January 14 2000 3 07 PM...

Page 2: ...ormation Two Telephone Lines allows you to select which line you prefer Caller ID Memory Dial lets you se lect a stored phone number from Caller ID memory then dial it with the touch of a button Five...

Page 3: ...refer to this power draw as the device s ringer equivalence num ber or REN The REN is shown on the bottom of your phone If you are using more than one phone or other device on the line add up all the...

Page 4: ...reduce the risk of fire electric shock and or injury always follow these basic safety precautions when using your tele phone equipment 1 Read and understand all instruc tions 2 Follow all warnings and...

Page 5: ...1 Do not use the telephone to report a gas leak in the vicinity of the leak 12 Never install telephone wiring during a lightning storm 13 Never install jacks in a wet location unless the jack is speci...

Page 6: ...tteries 8 When inserting batteries into this product the proper polarity or direc tion must be observed Reverse in sertion of batteries can cause charging and that may result in leakage or explosion 9...

Page 7: ...Identifying the Indicators 16 Ringer Indicators 16 Display and Light Indicators 16 Using Caller ID 17 Caller ID Display Information 17 Reviewing Call Records 18 Area Code 19 Dialing Numbers In Call R...

Page 8: ...e bottom of the phone and remove the cover 2 Place the batteries in the compart ment as indicated by the polarity symbols and marked inside 3 Replace the cover and secure it with the screw When appear...

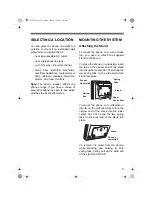
Page 9: ...unt the phone on a wall or desk top you need to attach the supplied stand to the phone To place the phone on a desk top insert the tab on the narrow end of the stand into the upper center slot Then sn...

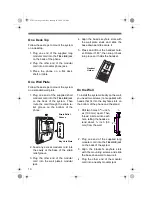
Page 10: ...4 Align the base s keyhole slots with the wall plate studs and slide the base downward to secure it 5 Press and lift out the handset hold er Rotate it 180 then snap it back into place so it holds the...

Page 11: ...t the phone to AC power Cautions You must use a Class 2 power source that supplies 9V DC and delivers at least 300 mA Its center tip must be set to negative and its plug must fit the phone s DC 9V jac...

Page 12: ...to adjust the dis play s contrast from 1 to 8 Notes If CONTRAST X disappears before you press REVIEW 8 or 9 re peat Steps 1 3 If you did not connect an AC adapter you can only adjust the display cont...

Page 13: ...phone the first time or any time you need to reset the phone s clock use a pointed object such as a straightened paper clip to press RESET 12 00 AM appears on the display Notes The telephone company...

Page 14: ...the display accord ing to the line in use The SPEAK ERPHONE and LINE 1 or LINE 2 indicators light 3 Adjust VOLUME to a comfortable lis tening level 4 Dial the number The number ap pears on the display...

Page 15: ...displayed numbers Press FLASH again to return to the first call Notes If you do not have any special phone services pressing FLASH might disconnect the current call Pressing FLASH does not hang up the...

Page 16: ...2 blink Both Line 1 and Line 2 are held LINE 1 EXTENTION LINE 1 lights An extension phone on Line 1 is in use LINE 2 EXTENTION LINE 2 lights An extension phone on Line 2 is in use LINE 1 EXTENTION on...

Page 17: ...is from Line 2 L D C Appears when an in coming call is long dis tance Appears the first time you review a call s infor mation 1 4 1 5 X Appears if there are one or more incoming new calls saved in me...

Page 18: ...s in structed by your ser vice provider If MESSAGE appears and you do not have mes sage waiting press DE LETE twice and MESSAGE disappears PRIVATE NAME PRIVATE NUMBER Appears if the caller chose to bl...

Page 19: ...code by repeating Steps 1 4 Follow these steps to review stored area codes 1 Press STORE LOCATION appears on the display 2 Press CALL BACK AREA CODE NO 1 appears 3 Press REVIEW 8 or 9 to review the ar...

Page 20: ...isplay Press and hold down DELETE for about 5 seconds The system beeps and de letes all call records and 0 CALL ap pears Note If you do not press any button within 30 seconds while deleting call recor...

Page 21: ...STORE The system beeps then stores the number Notes If you do not press STORE within 30 seconds the system returns to the current time display To start over repeat Steps 1 4 If you answer a call befor...

Page 22: ...bers for special services such as bank by phone or al ternate long distance you can store each group of numbers in its own mem ory location Then when calling special services dial the service s main n...

Page 23: ...the stored number appear on the display If there is no memory stored EMPTY ap pears on the display Dialing Stored Numbers If you are dialing a number stored in up per or lower memory lift the handset...

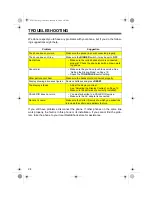
Page 24: ...handset cord is connected properly Check the phone jack with a known work ing phone Cannot dial Make sure the you have touch tone service See Setting the Dialing Mode on Page 12 Check the TONE PULSE s...

Page 25: ...ropping it can damage circuit boards and cases and can cause the phone to work improperly Use only fresh batteries of the required size and recommended type Bat teries can leak chemicals that damage y...

Page 26: ...phone company notifies you of these changes in advance so you can take the neces sary steps to prevent interruption of your phone service LIGHTNING Your Caller ID Phone has built in protec tion circui...

Page 27: ...27 NOTES 43 935 fm Page 27 Friday January 14 2000 3 07 PM...

Page 28: ...ring the warranty period take the product and the RadioShack sales receipt as proof of purchase date to any RadioShack store RadioShack will at its option un less otherwise provided by law a correct t...

Reviews: