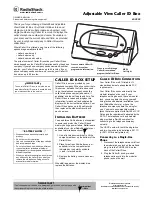


3
S
ETTING
U
P
T
HE
C
ALLER
ID
Be sure to peel the film off the screen before
using your Caller ID box.
1. When the time appears, hold down
and
at the same time until
ENTER
LANGUAGE
and then
ENG ESP FRA
appear.
ENG
flashes.
2. Press
or
to select the desired
language. Press
DELETE
to confirm.
LCD
CONTRAST
and
1 2 3 4 5
appear, and
3
flashes.
3. Press
or
to select the contrast
level (from 1 – 5). Press
DELETE
to
confirm.
ENTER AREA CODE
, and
_ _ _
appears, and the first
_
flashes.
4. Press
or
to select the area code.
Press
DELETE
to confirm the selection.
5. Repeat Step 4 to set the second and
third digit.
6.
ENTER TIME DATE
appears and the hour
digit flashes.
7. Press
or
to select the desired
hour. Press
DELETE
to confirm.
AM
appears for an AM hour and
PM
appears for a PM hour.
8. Repeat Step 7 to set the minutes,
month and date.
Ô
R
ECEIVING
C
ALLS
During an incoming call,
NEW
appears and
the red New Call light flashes while the
phone is ringing. The number of new and
total calls appear. The red light flashes
slowly, until all calls are reviewed.
Ô
• If only the caller’s phone number is
received, the caller’s phone number with
the call time and date appear.
• If an incorrect, invalid or incomplete signal
is received,
– LINE ERROR –
appears.
• If the name and number are unlisted,
– PRIVATE CALL –
appears with the call time
and date.
• If the name and number are not available,
– UNAVAILABLE –
appears with the call time
and date.
• For long distance calls,
LONG DISTANCE
appears.
R
EVIEWING
C
ALL
R
ECORDS
Each call record includes the time and date
of the call, the call number (determined by
the order in which the calls are received),
the caller’s telephone number, and the
caller’s name (if available).
1. Press
or
to review the calls.
Ô
Once you have viewed all the new calls,
END OF NEW CALL
appears.
After you view all the saved calls,
END
OF LIST
appears.
2. Press
or
to view them again.
D
ELETING
C
ALL
R
ECORDS
Deleting a Single Record
1. Press
or
until you
see the record you want
to delete.
2. Press
DELETE
twice to
delete the record. The
remaining call records are
renumbered
automatically.
Deleting All Records
1. After reviewing all new
messages, press and
hold
DELETE
for about 3
seconds.
ERASE ALL CALLS?
appears.
2. While
ERASE ALL CALLS?
appears, press
DELETE
again.
– NO CALLS –
appears.
To cancel deletion, do not press any
buttons. After about 20 seconds,
ERASE ALL
CALLS?
disappears.
CARE
Keep the Caller ID box dry; if it gets wet,
wipe it dry immediately. Use and store the
Caller ID box only in normal temperature
environments. Handle the Caller ID box
carefully; do not drop it. Keep the Caller ID
box away from dust and dirt, and wipe it with
a damp cloth occasionally to keep it looking
new.
If your Caller ID box is not performing as it
should, take it to your local RadioShack
store for assistance. To locate your nearest
RadioShack, use the store locator feature on
RadioShack's website
(www.radioshack.com), or call 1-800-The
Shack (843-7422) and follow the menu
options. Modifying or tampering with the
Caller ID box's internal components can
cause a malfunction and might invalidate its
warranty and void your FCC authorization to
operate it.
Ô
NOTE
Ô
Setting Up the Caller ID box
If no keys are pressed for 20 seconds, the
Caller ID box exits setup.
Receiving Calls
The red New Call indicator flashes until all the
new calls have been reviewed.
Reviewing Call Records
• If
RPT
appears, you have multiple new calls
from the same number.
• If you receive a call from a number
previously stored in memory, the old record’s
data is replaced with the new call’s time and
date, and
NEW
appears.
DELETE


