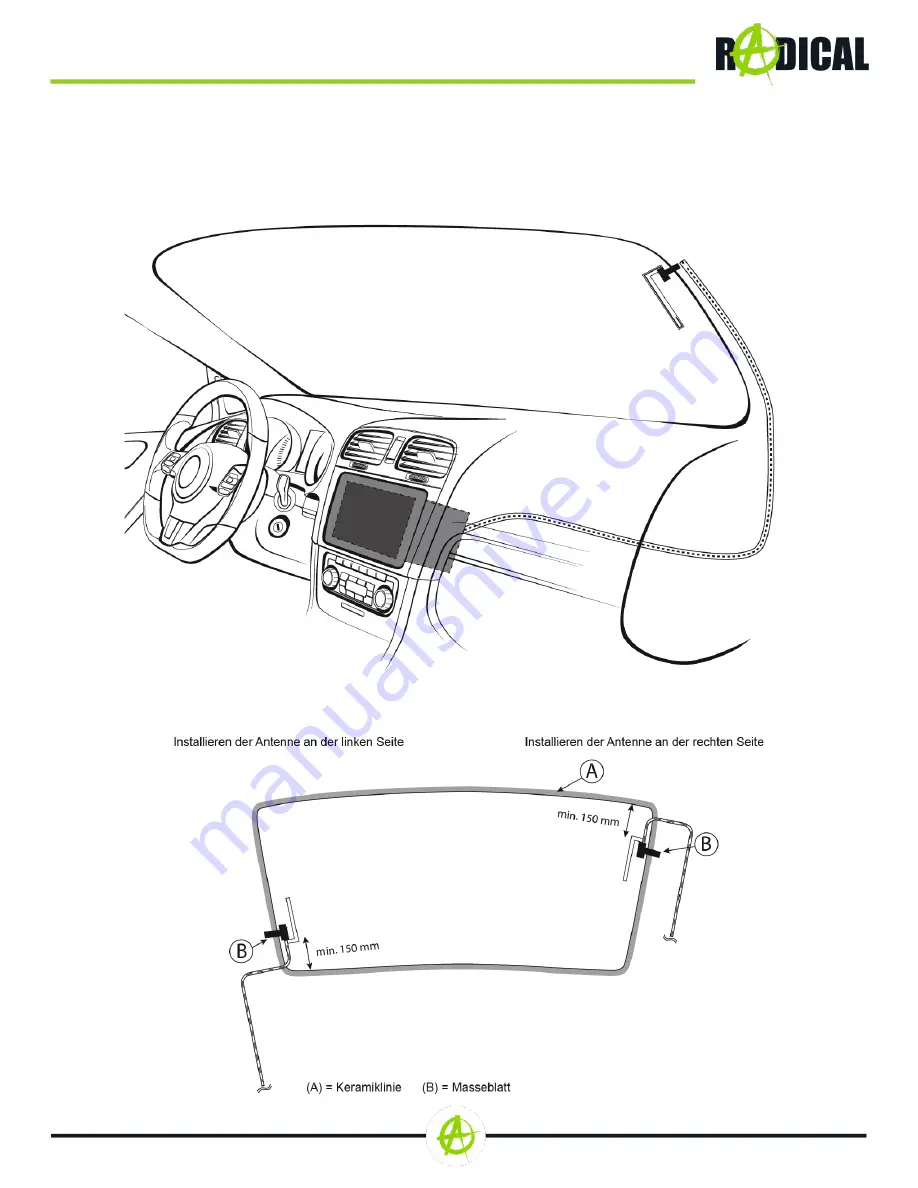
DAB-Antenne
Verlegen Sie das Antennenkabel an der A-Säule herab im Armaturenbrett entlang in den
Radioschacht.
BESTIMMEN DER ANTENNEEINBAUPOSITION
Page 1: ...MONTAGEANLEITUNG D E V I C E I N S TA L L AT I O N M A N U A L D E E N R C11VW2 V W G o l f V I I...
Page 2: ...te aufgef hrt sind und den Zustand wie er vom jeweiligen Fahrzeughersteller angeboten wird Davon abweichende Ausstattungen und Installationen k nnen zu Komplikationen und Fehlfunktionen f hren LIEFERU...
Page 3: ...en Sie die Schaltereinheit mit der Taste f r den Warnblinker nach vorne heraus um anschlie end die Anschlussstecker zu entriegeln 4 Entnehmen Sie die Schaltereinheit um dann die Radioblende zu entfern...
Page 4: ...cker an der R ckseite und entfernen Sie die Multimediabedieneinheit 7 Falls Ihr Fahrzeug im Handschuhfach mit einem Steuerger t f r die Informationselektronik ausgestattet ist m ssen Sie dieses zuerst...
Page 5: ...er ts Nr 1 mit dem Stecker des Fahrzeugs und schliessen Sie den Verriegelungsmechanismus des Steckers Verbinden Sie anschliessend das CAN Bus Interface Nr 12 mit dem Hauptanschlusskabel Verbinden Sie...
Page 6: ...DAB Antenne Verlegen Sie das Antennenkabel an der A S ule herab im Armaturenbrett entlang in den Radioschacht BESTIMMEN DER ANTENNEEINBAUPOSITION...
Page 7: ...weg 1 CH 5330 Bad Zurzach Switzerland Hiermit erkl rt ACR Br ndli V geli AG dass der verwendete Funkanlagentyp der Richtlinie 2014 53 EU entspricht Der vollst ndige Text der EU Konformit tserkl rung i...
Page 8: ...st on the previous page and in a condition as offered by the respective vehicle manufacturer Other differing configurations and installations may result in complications and malfunctions THE KIT INCLU...
Page 9: ...multimedia operating panel 3 Next pull out the switch panel with the button for the hazard flasher to unlock the connecting plug 4 Take out the switch panel to remove the radio front panel 5 Reach int...
Page 10: ...ck all connectors on the backside and remove the OE radio completely 7 If your vehicle is equipped with an external control module for the infotainment system you have to remove it first Use the remov...
Page 11: ...10 Connect one of the main connection cables No 11 of the Radical device No 1 to the Plug connector of the car and close its locking mechanism Following this connect the CAN bus interface No 12 to the...
Page 12: ...DAB antenna Route the antenna cable downwards along the A pillar along the dashboard and into the radio bay WORKING OUT THE INSTALLATION POSITION OF THE ANTENNA...
Page 13: ...1 CH 5330 Bad Zurzach Switzerland Hereby ACR Br ndli V geli AG declares that the type of radio equipment used complies with the 2014 53 EU Directive The full text of the EU Declaration of Conformity i...