True to the Music
®
Radial Engineering Ltd.
JDX 500 Module
GETTING STARTED
Before making any connections, start by turning off your audio system and turning all
volume levels down. This helps protect equipment from turn-on transients that could damage
loudspeakers and other sensitive equipment. We recommend using a power bar with an on-
off switch as this makes it easy to turn on and off the 500 series rack, monitors and so on,
using a single switch. Carefully plug the JDX into your 500 series rack to avoid stress on the
card edge connector. Screw the module in to ensure it does not accidentally get dislodged.
Guitar and amp connections to and from the JDX are made on the front panel while
connections to the recording system or PA are done on the rear panel. Most 500 series
racks are equipped with XLR connectors. When you plug the JDX into your 500 series rack,
it will automatically route the card-slot input and output jacks to the module. With the Radial
Workhorse, the I/O is augmented with ¼” TRS connectors, D-Subs and the Mix Buss signal
to feed the Workhorse mixer.
Start by setting up the JDX panel controls as follows:
1. 180º POLARITY REVERSE: outward position (in phase)
2. LIFT: inward position (lifted)
3. LPF: outward position (bypassed)
4. TONE SHIFT fi lter: control fully clock-wise
5. LF-EXT: outward position (normal LF response)
6. GUITAR: outward position (LED not fl ashing)
7. 300W: outward position for 100 watt or less amps.
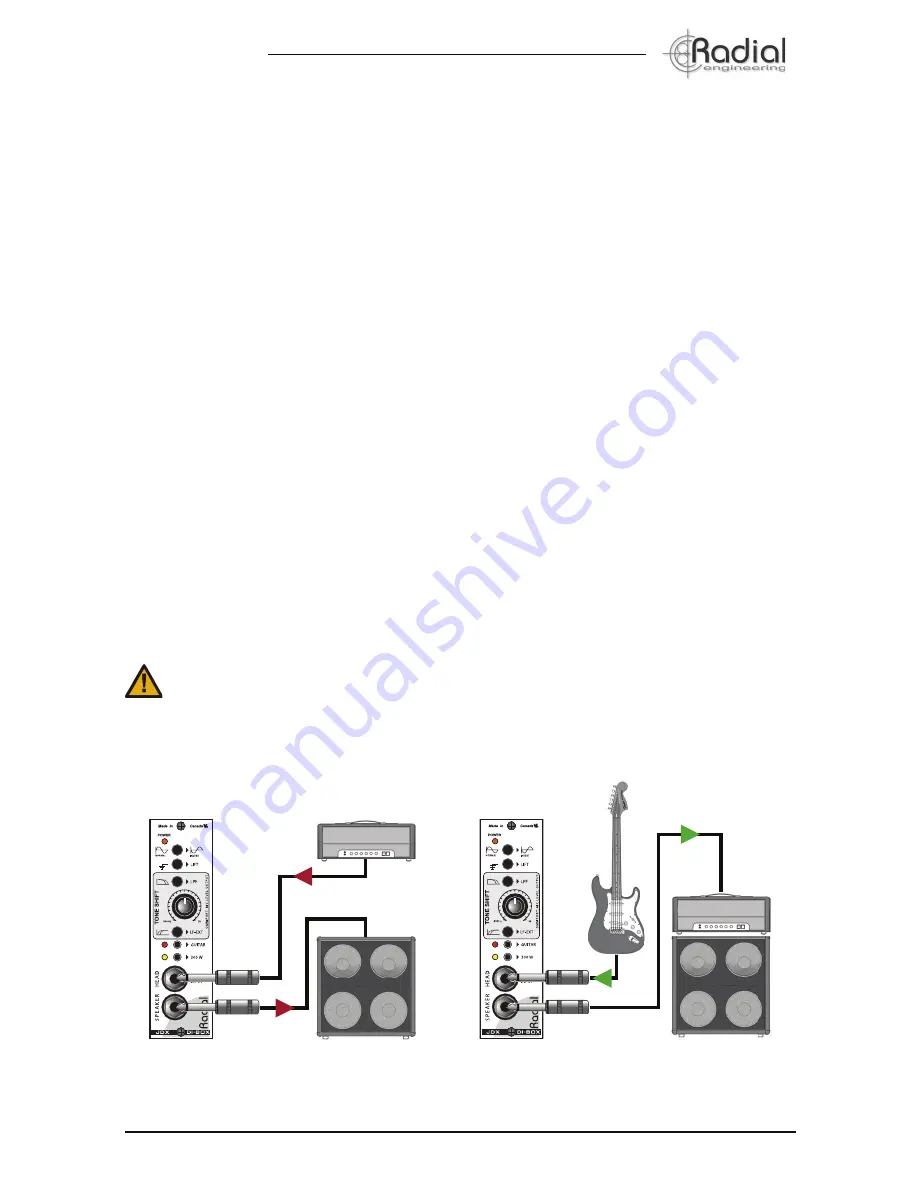
Keep in mind that the JDX is not a load box. This means that if you are
using high power output devices like a guitar amplifi er, the JDX must be
connected to a speaker or some form of load resistor. Failure to do so can
cause the JDX to blow up into a bazillion pieces and ruin your whole day!
5
AMP MODE: Speaker-level from amp into JDX
and thru-put to speaker cabinet. Speaker load
must be connected. Use 12awg. speaker cables.
GUITAR MODE: Instrument input and thru-put to
amplifi er input. Use guitar cables to connect.
Speaker In
Amp Out
Guitar Out
Guitar In


