background image

9

DE

i

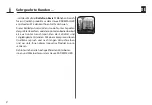
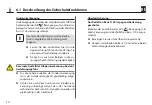
3.4  Fachbegriffe - Begriffserklärung

DIN EN 13659 

„Abschlüsse außen - Leistungs- und Sicherheitsanforde-
rungen.“


Diese Norm legt die Leistungsanforderungen fest, 
die an einem Gebäude befestigte Abschlüsse außen 
erfüllen müssen. Sie behandelt auch signifikante 
Gefährdungen für Konstruktion, Transport, Einbau, 
Betrieb und Wartung der Abschlüsse.

Behang


Rollladen

Hinderniserkennung


Trifft der Rollladen bei der  AB (

t

)-Bewegung auf 

ein Hindernis, wird der RolloTron Basis 1100 ausge-
schaltet, s. Seite 14.

Überlastsicherung


Blockiert der Antrieb bei der AUF (

)-Bewegung 

(z. B. durch Vereisung) wird der RolloTron Basis 1100 
ausgeschaltet, s. Seite 14.

Endpunkte


In jede Laufrichtung des Rollladens wird ein End- 
punkt definiert und eingestellt bei deren Erreichen 
der RolloTron Basis 1100 abschaltet und den Roll-
laden anhält.

Laufzeitbegrenzung - Kurzzeitbetrieb (KB)


Der Rollladen-Gurtwickler RolloTron Basis 1100 ist 
nicht für den Dauerbetrieb ausgelegt. Der Kurz-
zeitbetrieb definiert die maximal zulässige Laufzeit,  
s. Seite 6/15.

Summary of Contents for RolloTron Basis 1100

Page 1: ...1823 45 19 Elektrischer Rollladen Gurtwickler RolloTron Basis 1100 Original Betriebs und Montageanleitung 1 DE Electronic Roller Shutter Belt Winder RolloTron Basic 1100 Translation of the Original O...

Page 2: ...er Aspekten des gr ten Komforts und der optimalen Bedienbarkeit als auch unter Gesichtspunkten der Solidit t und Langlebigkeit entstanden Mit einem kompromisslosen Qualit tsanspruch und nach langen Ve...

Page 3: ...r 17 8 Sicherheitshinweise zur Montage 18 8 1 Sie ben tigen folgendes Werkzeug 18 8 2 Montagevorbereitungen 19 9 Sicherheitshinweise zum elektrischen Anschluss 21 9 1 Das Anschlusskabel am RolloTron B...

Page 4: ...eginnen Diese Anleitung ist Teil des Produkts Bewahren Sie sie gut erreichbar auf F gen Sie diese Anleitung bei Weitergabe des RolloTron Basis 1100 an Dritte bei Bei Sch den die durch Nichtbeachtung d...

Page 5: ...r zum Tod f hren sofern sie nicht vermieden wird VORSICHT Diese Gef hrdung kann zu geringf gigen bis mittel schweren Verletzungen f hren sofern sie nicht vermie den wird ACHTUNG Diese Gef hrdung kann...

Page 6: ...ierenden Gefahren verstehen Kinderd rfennichtmitdemGer tspielen Reinigung und Benutzer Wartung d rfen nicht von Kindern ohne Beaufsichtigung durchgef hrt werden Beobachten Sie w hrend der Einstellunge...

Page 7: ...kleiner als 0 15 m s sein muss 3 1 Bestimmungsgem e Verwendung Verwenden Sie den RolloTron Basis 1100 nur zum Heben und Senken von Rolll den mit zul ssigem Gurtband Verwenden Sie nur Original Ersatzt...

Page 8: ...senken lassen er darf nicht klemmen Die Montagefl che f r den RolloTron Basis 1100 muss eben sein 3 2 Nicht bestimmungsgem e Verwendung Die Verwendung des RolloTron Basis 1100 f r andere als den zuvo...

Page 9: ...der AB t Bewegung auf ein Hindernis wird der RolloTron Basis 1100 ausge schaltet s Seite 14 berlastsicherung Blockiert der Antrieb bei der AUF Bewegung z B durchVereisung wird der RolloTron Basis 1100...

Page 10: ...stecker e 1 x Wickelradfachabdeckung f 1 x Abdeckblende g 1 x Zugentlastung inkl Montageschrauben h 1 x Gebrauchsanleitung ohne Abbildung 4 Lieferumfang Vergleichen Sie nach dem Auspacken den Packungs...

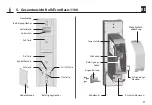
Page 11: ...e Ab Taste Setztaste Umlenkrolle Wickelrad Befestigungs haken Zugentlastung Kabelkanal Befestigungsl cher Anschlussklemmen SO WI Taste 5 Gesamtansicht RolloTron Basis 1100 Wickelradfach abdeckung Gurt...

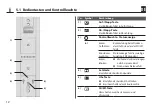
Page 12: ...tzen konstantes Leuchten kurzes Blinken R ckmeldung beim Dr cken der Uhr Taste oder der SO WI Taste Statusanzeige f r die jeweilige Funktion 10 Sekunden W hrend der Einstellungen oder bei einem Reset...

Page 13: ...e Anschlusskabel mit Netzstecker oder bei Bedarf ber eine fest verlegte Zuleitung Funktionsmerkmale und Steuerungsm glichkeiten Manuelle Bedienung Automatikbetrieb je eine Schaltzeit f r AUF und AB t...

Page 14: ...ur spr nglicheFahrtrichtungwiederm glich berlastsicherung Der RolloTron Basis 1100 ist gegen berlastung gesch tzt Blockiert der Antrieb bei der AUF Bewegung z B durch Vereisung wird der RolloTron Bas...

Page 15: ...H03VVH2 F Zul ssige Umgebungs temperatur 0 C bis 40 C Schalldruckpegel LpA 70 dB A Verhalten bei Netzausfall Nach einem Netzausfall blinkt die Kontrollleuchte Nach dem Dr cken der Auf oder Ab t Taste...

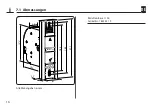
Page 16: ...16 DE SO WI R A D E M A C H E R 165 132 185 211 35 139 27 61 i 7 1 Abmessungen Alle Ma angaben in mm RolloTron Basis 1100 Artikel Nr 1823 45 19...

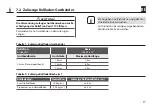
Page 17: ...ikel Nr Basis 1823 45 19 Gurtbandbreite Gurtst rke Maximale Gurtl nge 23 mm Standardgurtband 1 0 mm 7 6 m 1 3 mm 6 2 m 1 5 mm 5 2 m Tabelle 2 Zul ssige Rollladenfl che m2 Rollladentyp Gewicht m2 zul s...

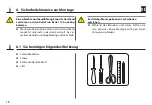
Page 18: ...cklerso dassdasGurtband m glichst senkrecht in das Ger t einl uft Sie ver meiden dadurch unn tige Reibung und Verschlei Schraubendreher Schere Zollstock oder Ma band Stift 8 1 Sie ben tigen folgendes...

Page 19: ...laden ganz herunter bis die Lamellen vollst ndig geschlossen sind 2 2 Bauen Sie den alten Gurtwickler aus und wickeln Sie das Gurtband ab VORSICHT EsbestehtVerletzungsgefahrdurchdievorgespann te Feder...

Page 20: ...ie vermeiden dadurch unn tige Reibung und Verschlei am Gurtband Zubeh r s Seite 40 3 Das Gurtband vorbereiten 3 1 Schneiden Sie das Gurtband ca 20 cm unterhalb des Gurtkastens ab 3 2 Schlagen Sie das...

Page 21: ...m Netz und sichern Sie sie gegen Wiedereinschalten Pr fen Sie die Anlage auf Spannungsfreiheit 9 1 Das Anschlusskabel am RolloTron Basis 1100 anschlie en i i Der elektrische Anschluss kann sowohl mit...

Page 22: ...n AchtenSieaufeinesichereVerlegungdesAnschluss kabels Das Anschlusskabel darf beim Anschrauben des RolloTron Basis 1100 nicht gequetscht und besch digt werden Kabelkanal i 2 Verlegen Sie das Anschluss...

Page 23: ...i 2 Dr cken Sie die Auf Taste solange bis der Be festigungshakenimWickelradfachguterreich bar ist i Da noch keine Endpunkte eingestellt sind bleibt der Antrieb stehen sobald Sie dieTaste loslassen VO...

Page 24: ...se 6 Dr cken Sie die Auf Taste solange bis sich das Gurtband einmal ganz um das Wickelrad ge wickelt hat 7 Ziehen Sie das Gurtband beim Aufwickeln so stramm dass sich die Umlenkrolle mitdreht 8 Ziehen...

Page 25: ...men 1 SchiebenSiedenRolloTronBasis1100indenGurtkasten und schrauben Sie ihn mit den beiliegenden Schrauben fest WARNUNG Ein besch digtes Anschlusskabel kann einen Kurz schluss verursachen Achten Sie d...

Page 26: ...wicht gespannt wird 2 Die Tasten loslassen sobald der Rollladen die gew nschte Position f r den oberen Endpunkt erreicht hat Der Rollladen stoppt und der obere Endpunkt ist gespeichert ACHTUNG DieFals...

Page 27: ...den stoppt und der untere Endpunkt ist gespeichert i Achten Sei beim Einstellen des unteren End punktes darauf dass das Gurtband beim Er reichen des Endpunktes nicht zu schlaff wird Endpunkte ver nder...

Page 28: ...g vor den programmierten Automatik funktionen 1 Den Rollladen ffnen Der Rollladen f hrt nach einem kurzen Tastendruck bis zum oberen Endpunkt 2 oder Den Rollladen zwischenzeitlich stoppen 3 Den Rollla...

Page 29: ...Taste nur kurz antippen 2 Beachten Sie die Kontrollleuchte Zur Quittierung f r das Dr cken der SO WI Taste blitzt die Kontrollleuchte kurz auf Danach wird der Status der Sommer Winterzeit Einstellung...

Page 30: ...hmen Sie die Einstellung der Schaltzeiten einmalig zu der Zeit vor zu der sich Ihr Roll laden ffnen oder schlie en soll Zum Beispiel um 8 00 Uhr morgens falls sich der Rollladen jeden Morgen um 8 00 U...

Page 31: ...ie Uhr Taste ca 1 Sekunde dr cken 2 Beachten Sie die Kontrollleuchte Zur Quittierung f r das Dr cken der Uhr Taste blitzt die Kontrollleuchte kurz auf Danach wird der Status der Zeitautomatik angezeig...

Page 32: ...100 wieder herstellen 1 Entfernen Sie die Abdeckblende von den unteren Montageschrauben und Einstelltasten i 2 SO WI Die Tasten gleichzeitig 4 Sekunden lang dr cken 3 Die Kontrollleuchte blinkt schnel...

Page 33: ...ie Tasten gleichzeitig 4 Sekunden lang dr cken 3 Den Rollladen vollst ndig schlie en 4 Die Ab Taste weiter dr cken und halten 5 Ziehen Sie dabei das Gurtband soweit wie m glich oben aus dem RolloTron...

Page 34: ...sis 1100 ausbauen z B bei Umzug i VORSICHT Es besteht Verletzungsgefahr durch das Wickelrad Fassen Sie nicht bei laufendem Motor in das Wickelradfach Ziehen Sie immer den Netzstecker bevor Sie in das...

Page 35: ...mer gedr ckt und zie hen Sie anschlie end das Gurtband soweit wie m glich aus dem RolloTron Basis 1100 heraus 5 L sen Sie das Gurtband vom Befestigungshaken und ziehen Sie es vollst ndig aus dem Rollo...

Page 36: ...cht mehr stehen bleibt M glicherweise haben sich die Endpunkte durch die Banddehnung verstellt Stellen Sie die Endpunkte neu ein s Seite 26 der Rollladen stehen bleibt sobald die Bedien taste losgelas...

Page 37: ...en Fehler Schmieren Sie schwerg ngige Stellen wenn n tig mit Gleit wachs ein d Der Rollladen ist m glicherweise zu leicht Beschweren Sie den Rollladen indem Sie z B in die unterste Lamelle ein Flachei...

Page 38: ...anlage f hren Kontrollieren Sie bitte regelm ig den RolloTron Basis 1100 und alle Komponenten Ihrer Rollladen anlage auf Besch digung Pr fen Sie den RolloTron Basis 1100 regelm ig auf korrekte Funktio...

Page 39: ...39 DE 21 Zugkraftdiagramm Zuggewicht Kg 2 Gurtbanddicke 1 0 mm 3 Gurtbanddicke 1 3 mm 4 Gurtbanddicke 1 5 mm 5 Gurtbandl nge m i 2 3 4 5...

Page 40: ...i Der vollst ndige Text der EU Konformit tserkl rung liegt dem Produkt bei und ist beim Hersteller hinterlegt RADEMACHER Ger te Elektronik GmbH Buschkamp 7 46414 Rhede Deutschland 23 Zubeh r Zur Anpa...

Page 41: ...ngel beseitigt RADEMACHERkostenlosentwederdurchReparaturoder durchErsatzderbetreffendenTeileoderdurchLieferung eines gleichwertigen oder neuen Ersatzger tes Durch Ersatzlieferung oder Reparatur aus G...

Page 42: ...r de www rademacher de Service Hotline 01807 933 171 Telefax 49 2872 933 253 service rademacher de Technische nderungen Druckfehler und Irrt mer vorbehalten Abbildungen unverbindlich 30 Sekunden koste...

Page 43: ...45 19 Electronic Roller Shutter Belt Winder RolloTron Basic 1100 Translation of the Original Operating and Assembly Manual 43 EN Elektrischer Rollladen Gurtwickler RolloTron Basis 1100 Original Betrie...

Page 44: ...ler shutter belt winder has been designed to provide optimal convenience and operability as well as in terms of ensuring solidity and durability Having ap plied uncompromising quality standards and th...

Page 45: ...You will require the following tools 60 8 2 Preparation for installation 61 9 Safety instructions for the electrical connection 63 9 1 Connecting the connecting cable to the RolloTron Basic 1100 63 10...

Page 46: ...nual is a component of the product Please store it in an easily accessible place When passing the RolloTron Basic 1100 on to a third party this manual must be passed on as well Damage resulting from n...

Page 47: ...ay result in serious injury or death if not avoided CAUTION This hazard may result in minor or moderate injury if not avoided ATTENTION This hazard may lead to property damage 2 2 Symbols and depictio...

Page 48: ...gers may resulted from this Childrenmustnotplaywiththedevice Cleaningand usermaintenancemaynotbecarriedoutbychildren without supervision Watchthemovingrollershutterandkeepotherpeo ple away from the ar...

Page 49: ...is less than 0 15 m s 3 1 Intended use Only use the RolloTron Basic 1100 for opening and clos ing roller shutters with a permissible belt i Mechanical locks of any kind are not suitable for automated...

Page 50: ...smoothly and should not stick The mounting surface for the RolloTron Basic 1100 must be flat 3 2 Improper use Using the RolloTron Basic 1100 for purposes other than previously mentioned is impermissi...

Page 51: ...e roller shutters hit an obstacle in the DOWN t direction the RolloTron Basic 1100 is switched off see page 56 Overload cut off IfthedrivejamsintheUP direction forexample due to ice the RolloTron Basi...

Page 52: ...Reel compartment cover f 1 x Cover plate g 1 x Traction relief mechanism incl assembly screws h 1 x Instruction manual not illustrated 4 Included in delivery After unpacking please check and compare...

Page 53: ...Down button Set button Deflection roller Reel Fastening hook Traction relief Cable duct Fastening holes Connecting terminals SO WI button 5 Overview RolloTron Basic 1100 Reel compartment cover Belt i...

Page 54: ...briefly continuous light flashes briefly Return signal when pressing the timer button or the SO WI button Status display of the respective function 10 seconds During the setting process or when resett...

Page 55: ...d via the enclosed connecting cable with a mains plug or if required a fixed installed lead Features and control options Manual operation Automatic mode with a separate switching time for UP and DOWN...

Page 56: ...ection again Overload cut off The RolloTron Basic 1100 is equipped with an over load cut off system IfthedrivejamsintheUP direction forexample due to ice the RolloTron Basic 1100 is switched off First...

Page 57: ...ient tem perature 0 C to 40 C Noise pressure level LpA 70 dB A Conduct in the event of power failure The indicator light flashes in the event of a power failure The flashing is switched off by pressin...

Page 58: ...58 EN SO WI R A D E M A C H E R 165 132 185 211 35 139 27 61 i 7 1 Dimensions All dimensions in mm RolloTron Basic 1100 Item no 1823 45 19...

Page 59: ...Belt thick ness Maximum belt length 23 mm Standard belt 1 0 mm 7 6 m 1 3 mm 6 2 m 1 5 mm 5 2 m Table 2 Permissible shutter surface area m2 Roller shutter type Weight m2 Permissible shutter surface are...

Page 60: ...tallthebeltwindersothatthebeltrunsasstraight as possible into the device in order to avoid unnec essary friction and wear Screwdriver Scissors Carpenter s gauge or measuring tape Pen 8 1 You will requ...

Page 61: ...hutter system 2 1 Let the roller shutter move fully down until the slats are completely closed 2 2 Remove the old belt winder and unreel the belt CAUTION Thereisariskofinjuryfromthepre tensionedspring...

Page 62: ...t box This helps to prevent unnecessary friction and wear to the belt Accessories see page 82 3 Prepare the belt 3 1 Cut the belt off approx 20 cm under the belt box 3 2 Fold the end of the belt over...

Page 63: ...ins power supply cable and secure it to prevent any reconnection Check that the system is de energised 9 1 Connecting the connecting cable to the RolloTron Basic 1100 i i The electrical connection can...

Page 64: ...rcuit Ensure that the connecting cable is laid safely The connecting cable muse not be pinched or dam aged when screwing on the RolloTron Basic 1100 Cable duct i 2 Lay the connecting cable in the cabl...

Page 65: ...ket i 2 PresstheUpbuttonuntilthefasteninghookare easily accessible in the reel compartment i As no end points have been set yet the drive will stop as soon as you release the button CAUTION There is a...

Page 66: ...socket 6 PresstheUpbuttonuntilthebelthasfullywound once around the reel 7 Pull the belt tight when winding so that the deflection roller turns at the same time 8 Remove the mains plug again from the...

Page 67: ...this may cause noise during operation 1 SlidetheRolloTronBasic1100intothebeltboxandscrew it tight using the screws provided WARNING A damaged connecting cable may cause a short circuit Ensure that the...

Page 68: ...hutters 2 Release the buttons as soon as the roller shutter reaches the desired position for the upper end point The roller shutters stop and the upper end point is stored ATTENTION Settingthewrongupp...

Page 69: ...end point The roller shutters stop and the lower end point is stored i Please ensure that the belt is not excessively slack when reaching the lower end point Changing or correcting the end points 5 M...

Page 70: ...rammed automatic functions 1 Open the roller shutters By briefly pressing the button the roller shutters will move to the upper end point 2 or Stop the shutters in the interim 3 Close the roller shutt...

Page 71: ...SO WI button 2 Pay attention to the indicator light The indicator light flashes briefly to confirm that the SO WI button has been pressed The status of the sum mer winter setting will then be display...

Page 72: ...order to set the switching times you must carry out this step once at the time that the roller shutters are to open or close For example carry out the step at 8 00 o clock in the morning if you want t...

Page 73: ...r button for approx 1 second 2 Pay attention to the indicator light The indicator light flashes briefly to confirm that the timer button has been pressed The status of the auto matic timer will then b...

Page 74: ...tory settings 1 Remove the cover plate from the lower assembly screws and setting buttons i 2 SO WI Simultaneously press and hold the buttons for 4 seconds 3 The indicator light flashes rapidly 4 Rele...

Page 75: ...ltaneously press and hold the buttons for 4 seconds 3 Fully close the roller shutters 4 Continue to press and hold the down button 5 In this process pull out the belt as far as possible from the top o...

Page 76: ...Basic 1100 e g in the event of a move i CAUTION There is a risk of injury from the reel Never reach into the reel compartment when the motor is running Always remove the mains plug before touching the...

Page 77: ...ntain pressure on the disengaging bracket and pull the belt out of the RolloTron Basic 1100 as far as possible 5 Release the belt from the fastening hook and pull it out completely from the RolloTron...

Page 78: ...ured end points The end points may be displaced due to elongation of the belt Re adjust the end points see page 68 the roller shutters stop as soon as the control button is released The end points are...

Page 79: ...lt Lubricate any stiff areas with gliding wax if necessary d The roller shutters are too light Increase the weight of the roller shutters by for example adding a piece of flat steel to the bottom slat...

Page 80: ...r shutter system Please check the RolloTron Basic 1100 and all of your roller shutter components regularly for dam age Regularly check the RolloTron Basic 1100 for correct functioning The blinds must...

Page 81: ...81 EN 21 Tractive force diagram Lifting weight Kg 2 Belt thickness 1 0 mm 3 Belt thickness 1 3 mm 4 Belt thickness 1 5 mm 5 Belt length m i 2 3 4 5...

Page 82: ...i The full text of the EU declaration of conformity is included with the product and is kept on file by the manufacturer s RADEMACHER Ger te Elektronik GmbH Buschkamp 7 46414 Rhede Germany 23 Accessor...

Page 83: ...ch occur withinthewarrantyperiodfreeofchargeeitherbyrepair orbyreplacementoftheaffectedpartsorbysupplyinga new replacement unit or one to the same value There is no general extension of the original w...

Page 84: ...Service Hotline 01807 933 171 Fax 49 2872 933 253 service rademacher de Subject to technical modifications misprints and errors excepted Illustrations not binding 30 seconds free of charge subsequent...

Reviews: