background image

1mm

1mm

1000

Torrenta KDD

K / L

980

900
880

800
780

!

Torrenta KDD

A1/A2

900

1000

800

900

1000

800

A1

A2

5

2

1A

1B

2.1

2.2

2.1

18

18

3

3

3

3

3

3

OK

OK

OK

OK

OK

OK

K

L

L

K

A1

A2

20mm

20mm

!

!

Summary of Contents for Torrenta KDD

Page 1: ...ciu SK GB PL D UA H RO Istruzioni di montaggio Montageanleitung Instrukcja monta u Pokyny k instalaci CZ RUS Instrucciones de ensamblaje IT FR ES AE Nie wyrzucaj instrukc j i D o n o t d i s c a r d i...

Page 2: ...ng Vodoodpudiv m povlakom obalen strana Bo n ukazatel strany s povrchovou pravou V zleperget r teggel bevont oldal Partea cu indicator de acoperire Indica on du c t d applica on du rev tement Lato del...

Page 3: ...2 1 R 3 Easy Clean R Easy Clean R 12 16 15 14 13 8 4 5 9 3 10 R 11 R 6 7 R 7 R...

Page 4: ...10 R 10 2 1 R 2 1 1 2 1 L 4 2 3 2 14 2 15 2 16 2 5 8 17 2 6 8 8 9 2 2 7 L 7 R 2 SW4 SW2 SW2 5 18 8 12 2 7 R 2 2 1 L 2 1 R 10 L 1 10 R 1 1 1 10 2 1 7 L 13 2 Monta z listw progow Installa on with thres...

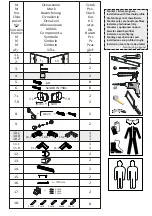
Page 5: ...1mm 1mm 1000 Torrenta KDD K L 980 900 880 800 780 Torrenta KDD A1 A2 900 1000 800 900 1000 800 A1 A2 5 2 1A 1B 2 1 2 2 2 1 18 18 3 3 3 3 3 3 OK OK OK OK OK OK K L L K A1 A2 20mm 20mm...

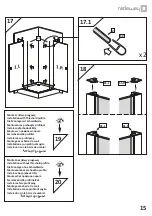
Page 6: ...1 5mm 1 5mm 6 3 4 2 2 18 18 3 3 3 6 6 3 8 2 1 3 4 OK OK 5 x8 5 5 3 3 15...

Page 7: ...ggel bevont oldal Partea cu indicator de acoperire 6 1 16 16 2 2 Easy Clean R OK 2 1 16 3 3 2 1 2 x2 15 OK 5 1 0mm 15 3 3 2 2 7 6 Easy Clean R Oznaczenie strony na o enia pow oki Side of the coa ng in...

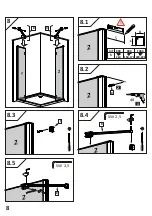
Page 8: ...8 2 2 8 1 8 3 8 4 8 8 8 8 8 8 Y X Y S 800 210 900 150 170 X SW 2 5 8 S 1 2 1000 220 240 8 2 2 SW 2 5 8 5 2 8 2 2 2...

Page 9: ...1 R 1 L 7 R 9 9 9 1 9 2 2 7 L 2 9 10 7 L 7 L 7 R 7 R 7 L 7 R SW4 2 SW4 2...

Page 10: ...2 2 1 L 1 R SW4 7 L 9 2 1 R 10 10 1 10 2 11...

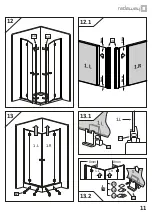
Page 11: ...13 13 1 R 1 L 1 17 1 L 1 R 17 x1 x2 x3 0mm 0mm 1 L 17 17 1 L 11 0mm 0mm 0mm 0mm 12 13 12 1 13 1 13 2 13 1 R 1 L...

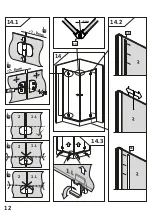
Page 12: ...7 8mm 7 8mm 12 3 2 1 L 2 1 L 2 1 L 1 L SW4 14 16 16 2 2 2 12 0mm 14 1 14 2 14 3 13...

Page 13: ...barre de seuil Installazione senza pro lo di soglia Instalaci n sin la barra de umbral 15 1 15 2 14 14 x2 14 14 14 Monta z listw progow Installa on with threshold pro le Die Montage mit Schwallleiste...

Page 14: ...3 18 1 L 2 3 18 1 R 2 14 16 18 10 L 4 10 L 10 2 10 R 4 16 5 16 2 0mm 0mm F 4 18 18 1mm F 4 14 14 18 1mm 10 L 10 2 10 R 4 4 4 2 10 L 4 16 1 16 4 16 3 1 2...

Page 15: ...a cu pro l prag Montage avec barre de seuil Installazione con pro lo di soglia Instalaci n con la barra de umbral Monta bez listwy progowej Installa on without threshold pro le Die Montage ohne Schwal...

Page 16: ...19 20 SILIKON SILIKON SILIKON SILIKON 24h SILIKON 24h SILIKON...

Page 17: ...uc on de montage N vod na in tal ciu SK GB PL D UA H RO Istruzioni di montaggio Montageanleitung Instrukcja monta u Pokyny k instalaci CZ RUS Instrucciones de ensamblaje IT FR ES AE AE IT FR ES L inst...

Page 18: ...ezeichnung f r Glas che mit der EasyClean Beschichtung Vodoodpudiv m povlakom obalen strana Bo n ukazatel strany s povrchovou pravou V zleperget r teggel bevont oldal Partea cu indicator de acoperire...

Page 19: ...Bezeichnung Ozna enie Ozna en Mark Jel l s Componenta Nr No slo po et No Nr Numar St ck Kus Db Buca KS Sztuk Pcs Sorsz m Symbole S mbolo Simbolo N N N Pzas Pcs Pz 5x40 DIN 7991 8 DIN 7981 7 8 9 L 10 1...

Page 20: ...4 1 5mm 1mm 1 2 3 1 1 14 1 2 14 OK OK...

Page 21: ...15mm 5 3 8 3 4 3 5 5 3 2 1 3 4 x3 11 4 2 1...

Page 22: ...czenie strony na o enia pow oki Side of the coa ng indicator Vodoodpudiv m povlakom obalen strana Bo n ukazatel strany s povrchovou pravou V zleperget r teggel bevont oldal Partea cu indicator de acop...

Page 23: ...SW4 6 L 1 L 7 8 1 8 2 2 7 1 7 3 7 4 8 8 8 8 SW 2 5 8 380 1 2 7 2 2 SW 2 5 7 5 2 2...

Page 24: ...2 1 L 1 L 13 0mm x1 x2 x3 2 1 L 13 1 L 13 13 1 L 2 1 L 1 L 8 2 9 1 9 10 10 1 10 2...

Page 25: ...12 3 1 2 1 L 2 1 L 2 1 L 7 8mm 7 8mm SW4 0mm 2 1 L 2 1 L 9 10 3 10 4 10 5 10 6...

Page 26: ...1 L 9 L 9 L 10 0mm 0mm 11 11 2 7 10 12 12 1 11 1 2 1 L 2...

Reviews: