background image

You have just become the owner of a RACLET trailer tent. This model has been strictly controlled 
at every stage of manufacturing. In order to ensure you full satisfaction and many pleasant 
moments of relaxation, we advise you to read carefully the following Instructions. 

BEFORE TAKING THE ROAD 

CHECK 

• 

Tyre pressure (correct pressure is indicated on the trailer body). 

• 

That wheel mounting nuts are tight (the tightening torque shall be 

verified after 25 to 40 km, after 100 km and then periodically). 


• 

That all lighting and signalling equipment functions properly. 


• 

Loading (the maximum authorized weight under load must not be 

exceeded).  See  that  load  is  properly  distributed  (a  bearing 
pressure of approximately 20 kg on auto coupling gear). 

• 

That  caravan  coupling  head  is  firmly  secured  to  the  coupling 

sphere of your auto. 

ON THE HIGHWAY 

• 

MAINTAIN  a  sufficient  DISTANCE  from  the  vehicle  in  front  of 

you. 

• 

When  OVERTAKING  do  not  forget  when  pulling  back  into  your 

lane  that  the  length  of  your  vehicle  is  increased  by  that  of  the 
caravan. 

And HAVE A GOOD TRIP!  

TO ERECT 

1 - Detach and bring trailer into position. 
2  -  Using  the  crank,  lower  steadies  making  sure  that  trailer  is 
horizontal. If necessary place extra pads under the roof rack. 
CAUTION: a crack on the cover due to a wrong wedging will not be 
accepted under warranty. 
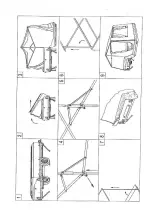
3 – Open the cover with the two handles on both sides (schema 2/3)  
4  –  Fix  the  clips  on  the  roof  rack  and  place  properly  the  canvas  in 
the aluminium sections  
5  –  Enter  the  trailer  tent,  unlock  the  sliding  parts  (black  spherical 
heads)  (shema  4)  and  force  the  roof  bars  upwards.  They  will 
automatically lock into position (shema 5). 
6  –  Close  the  door  (schema  7) and fix the Velcro around the trailer 
body (schema 8). 
7 – Position the 4 vertical legs in the angles. 

TO ERECT AWNING

STEEL AWNING FRAME 

• 

Lay out the different framework elements on the ground (see 

diagram attached). 

• 

Remove canvas from bag, spread out on ground with junction 

slide enclosures facing caravan. Attach awning ridge elements to 
main caravan ridge bar. Tie cloth retainers and adjust the tension 
of the tenting by means of sliding framework elements. Adjust the 
height of the feet. 

• 

Completely close awning and stake tending to ground. 

IMPORTANT: A protective flap is provided to shelter the zippers; 
make sure it is correctly positioned. If your caravan is equipped with 
a ceiling lining, attach it starting from the centre and stake side 
drops to the ground. 

HAVE A PLEASANT STAY!

TO DISMANTLE

• 

The caravan canvas must never be detached from the platforms 

or the framework elements. 

1 – Remove the 4 vertical legs. 
2 - Unlock the two sliding parts and bring the roof bars downwards. 
3 – Remove the velcro, the clips from the roof rack. 
4 - Close the cover and position properly the canvas inside. 
5 - Raise steadies. 
If  the  canvas  was  wet  when  folded  it  must  be  aired  and  dried  as 
soon as possible (within 24 hours at least). 

MAINTENANCE 

CHANGING A WHEEL 

• 

Lower the two stabilizer legs opposite the wheel to be changed. 

• 

Loosen wheel mounting bolts. 

• 

Lift the trailer by means of your car jack by placing it underneath 

the axle or chassis longeron. 

CAUTION: NEVER PLACE JACK UNDERNEATH FLOORING.  

• 

Before removing wheel lower the other two stabilizer legs. 

• 

Change  wheel,  replace  and  tighten  bolts;  check  tightness  after 

several kilometres. 

TRAILER BODY 

• 

In  sheet  steel  zinc-plated  by  electrolysis  and  coated  with 

polyester. It should receive the same care as your car body. 

CANVAS 

• 

Must not remain folded while wet more than 24 hours. 

• 

RACLET  cotton  cloth  is  treated  against  mildew.  Never  use 

detergents or solvents. 

• 

Never allow the canvas to come in contact with Insecticide spray. 

STORAGE 

• 

RACLET trailer tents take up little space. 

• 

If  your  trailer  must  be  stored  in  the  open,  it  is  advisable  that  all 

canvas be removed. 

Summary of Contents for Allegra

Page 1: ......

Page 2: ......

Page 3: ...03816 10 Longeron droit PL36118D 11 Traverse arri re PL45453 12 V rin ARD AVG 03491 13 Soudure support roue de secours PL27050 14 Accrochage sur traverse AR PL16138 15 Blocage sur traverse AR PL16150...

Page 4: ......

Page 5: ...0 PL17391 C 43 support attache grenouillere PL27384 B 44 cavalier plastique pour diam 20 07181 45 galerie PL45502 B 46 patin meuble noir 03267 47 plaque ertalon 03511 48 omega renfort PL27377 49 passa...

Page 6: ......

Page 7: ...rre support compas gaz PL17806 77 Compas gaz STABILUS D8 250 03552 78 But e caoutchouc h 14mm 03848 79 Poign e de sommier sangle noir PL17878 B 80 Cloison de sommier 18401 81 Sangle de plateau Lg 40 c...

Page 8: ......

Page 9: ...96 Pied clips lg 1350 l ment n 2 PL17900 T 97 Pied clips lg 1350 l ment n 1 PL17860 T 98 Tube renfort de faiti re PL17794 99 Soudure arceau PL27152 T 100 Barre penderie Alu AC374 101 Anneau bris blanc...

Page 10: ......

Page 11: ...Bouchon 105 00 25 00 eay 07167 122 Cloison MC PL27172 CV 123 Petite fa ade MC 18405 124 Clips lyre 20 25 06109 125 Embout bas de mat 18 20 06197 126 Pied r glable MC PL17040 CV 127 Collier serrage tu...

Page 12: ......

Page 13: ...V 121 Bouchon 105 00 25 00 eay 07167 122 Cloison MC PL27172 CV 123 Petite fa ade MC 18405 124 Clips lyre 20 25 06109 125 Embout bas de mat 18 20 06197 126 Pied r glable MC PL17040 CV 127 Collier serra...

Page 14: ......

Page 15: ...ENTOILAGE ALLEGRA 2008 DOUBLE TOIT AR MP6200B1AR HOUSSE MP6200A1H0 CHAMBRE MP6200B1TI FICHE CARAVANE PLIANTE...

Page 16: ......

Page 17: ...rideaux MONTAGE DE L AUVENT VERSION ARMATURE ACIER Disposer au sol les diff rents l ments de l armature d auvent suivant plan joint l armature Sortir l entoilage de son sac l tendre au sol les fermet...

Page 18: ...EEL AWNING FRAME Lay out the different framework elements on the ground see diagram attached Remove canvas from bag spread out on ground with junction slide enclosures facing caravan Attach awning rid...

Page 19: ...gangst re von au en Um den Anh nger herum befindet sich ein Klettband welches das Zelt mit dem Anh nger befestigt F gen Sie das Zelt hier ber nun an den Anh nger an 7 F r alle vier Ecken des Zeltes k...

Page 20: ...t frame meegeleverde schema Haal het tentdoek uit de tentzak spreidt het uit op de grond met de verbindingsritssluitingen naar de vouwwagen toe Maak het voortentdoek vast aan het doek van de wagentent...

Page 21: ...rmadura Sacar la Iona de su saco extenderia en el suelo con la cremallera de uni n frente al remolque Fijar la Iona del avance a la Iona del remolque m dulo de habitaciones Deslizar la armadura bajo l...

Page 22: ...ra i diversi elementi della paleria della veranda seguendo lo schema unito alla paleria Togliere il telo dalla sua sacca stenderlo a terra con le chiusure lampo di giuntura di fronte al carrello Fissa...

Page 23: ......

Page 24: ......

Page 25: ...B 0350N00 500199 tube AC ZB 1180S601TN 501515 0260SR EMBOUT 20 22 R22 500332EMB R22 tube AC 1005S601TN 501510 0720SR CLIQUET 501695CLI tube AC ZB 1180S60 501791 tube diametre 25 1180SR1TN PITON M6 150...

Page 26: ......

Page 27: ...AP 17 19 500784CAP tube diametre 22 tube AC ZB 1180N001BE 501701 1005N1TN EMBOUT AXE D41 PITON 501568EA41 P 0350N EMBOUT AXE D41 500199EA41 TUBE AC ZB 1180S601TN 501515 tube diametre 25 1180SR1TN PITO...

Page 28: ......

Page 29: ...19 1005N clip plastique 19 22 500785CP22 0660N CAP17 19 501965CAP tube AC ZB 1180N001BE 501989 tube diametre 22 1180N1TN clip 19 22 PITON 501511CP22 P 1180NBE1TN piton M6 501581P 0660N embout axe D41...

Page 30: ......

Page 31: ......

Reviews: