background image

6

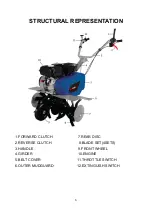
STRUCTURAL REPRESENTATION

1.FORWARD CLUTCH

7.REAR DISC

2.REVERSE CLUTCH

8.BLADE SET(4SETS)

3.HANDLE

9.FRONT WHEEL

4.GIRDER

10.ENGINE

5.BELT COVER

11.THROTTLE SWITCH

6.OUTER MUDGUARD

12.EXTINGUISH SWITCH

Summary of Contents for RAC196PTIL8T-1

Page 1: ...ORIGINAL INSTRUCTIONS INSTRUCTIONS MANUAL Read the instructions before use the tool BUILDER SAS 32 rue Aristide Berg s ZI 31270 Cugnaux France Made in PRC Gasoline Tiller RAC196PTIL8T 1...

Page 2: ...of the equipment WARNING For your safety and safety of others please pay special attention to these precautions Read the instruction manual before use Risk of projections Keep bystanders at least 15 m...

Page 3: ...working and always watch what you are doing The adjustable part of the protective device shall be adjusted to the working depth of the tool so that only that part of the working tool that cuts into t...

Page 4: ...e Before using always visually inspect to see that the tools are not worn out or damaged Replace worn out or damaged elements and bolts in sets to preserve balance 3 Operation a Do not operate the en...

Page 5: ...attery compartment and petrol storage area free of vegetative material and excessive grease e Replace worn or damaged parts for safety f If the fuel tank has to be drained this shall be done outdoors...

Page 6: ...nd may lead to death Operation on Slope 1 When tilling on slopes keep the fuel tank with less than half oil to minimize fuel spillage 2 When the tiller walks across the slope put your effort evenly wh...

Page 7: ...STRUCTURAL REPRESENTATION 1 FORWARD CLUTCH 7 REAR DISC 2 REVERSE CLUTCH 8 BLADE SET 4SETS 3 HANDLE 9 FRONT WHEEL 4 GIRDER 10 ENGINE 5 BELT COVER 11 THROTTLE SWITCH 6 OUTER MUDGUARD 12 EXTINGUISH SWITC...

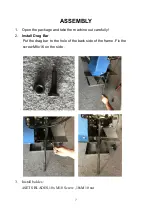
Page 8: ...en the package and take the machine out carefully 2 Install Drag Bar Put the drag bar to the hole of the back side of the frame Fix the screw M8x16 on the side 3 Install baldes 4SETS BLADES 10x M10 Sc...

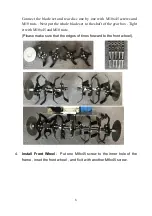
Page 9: ...put the whole blade set to the shaft of the gear box Tight it with M10x45 and M10 nuts Please make sure that the edges of tines forward to the front wheel 4 Install Front Wheel Put one M8x45 screw to...

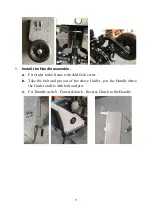
Page 10: ...ssemble a Fit Grider to the frame with 4xM8x16 screw b Take the bolt and pin out of the above Grider put the Handle above the Grider and fix with bolt and pin c Fit Throttle switch Forward clutch Reve...

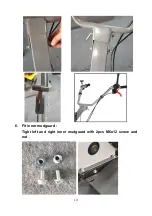
Page 11: ...10 6 Fit inner mudguard Tight left and right inner mudguard with 2pcs M6x12 screw and nut...

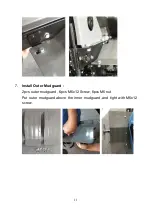
Page 12: ...11 7 Install Outer Mudguard 2pcs outer mudguard 6pcs M6x12 Screw 6pcs M6 nut Put outer mudguard above the inner mudguard and tight with M6x12 screw...

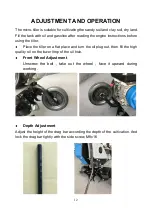
Page 13: ...before using the tiller Place the tiller on a flat place and turn the oil plug out then fill the high quality oil on the lower limp of the oil hole Front Wheel Adjustment Unscrew the bolt take out th...

Page 14: ...the extinguish switch is on the on position before starting up the engine Make sure the extinguishing switch on the off position if shutting down the engine The Throttle Adjustment Make sure the throt...

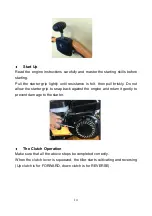
Page 15: ...felt then pull briskly Do not allow the starter grip to snap back against the engine and return it gently to prevent damage to the starter The Clutch Operation Make sure that all the above steps be co...

Page 16: ...rking width with protection discs 85cm Diameter of the blade set 30cm Rotation speed of the blade set 142tr min Start Mode Manual Launcher Safety device Mechanical clutch Transmission 1 forward speed...

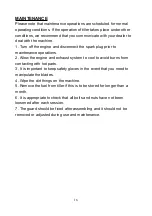
Page 17: ...rations 2 Allow the engine and exhaust system to cool to avoid burns from contacting with hot parts 3 It is important to keep safety gloves in the event that you need to manipulate the blades 4 Wipe t...

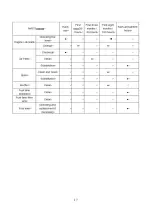
Page 18: ...17...

Page 19: ...ctive 2014 30 EU Emission directive EU 2016 1628 Noise emission Directive 2000 14 EC Annex V and Directive 2005 88 EC Also complies with European standards national standards and technical provisions...

Page 20: ...he user manual Due to our policy of continuous product improvement we reserve the right to alter or change specifications without notice Consequently the product may be different from the information...

Page 21: ...before dropping off the machine Go to the repair station with the complete machine packed accompanied by the purchase invoice and the station support sheet downloadable after the service request is co...

Page 22: ...essary for repairs and more generally the costs related to the immobilization of the product The costs of a second opinion established by a third party following an estimate by a SWAP Europe repair st...

Reviews: