background image

Once  you  have  selected  Details  from  the  drop  down  menu  the  time  and  date  will  be  shown,  however,  they 
typically cannot be seen because they are off to the right of the screen. To bring them into view you will need to 
drag the window larger by placing the mouse over the lower right corner and dragging the window larger using 
the left mouse button. 
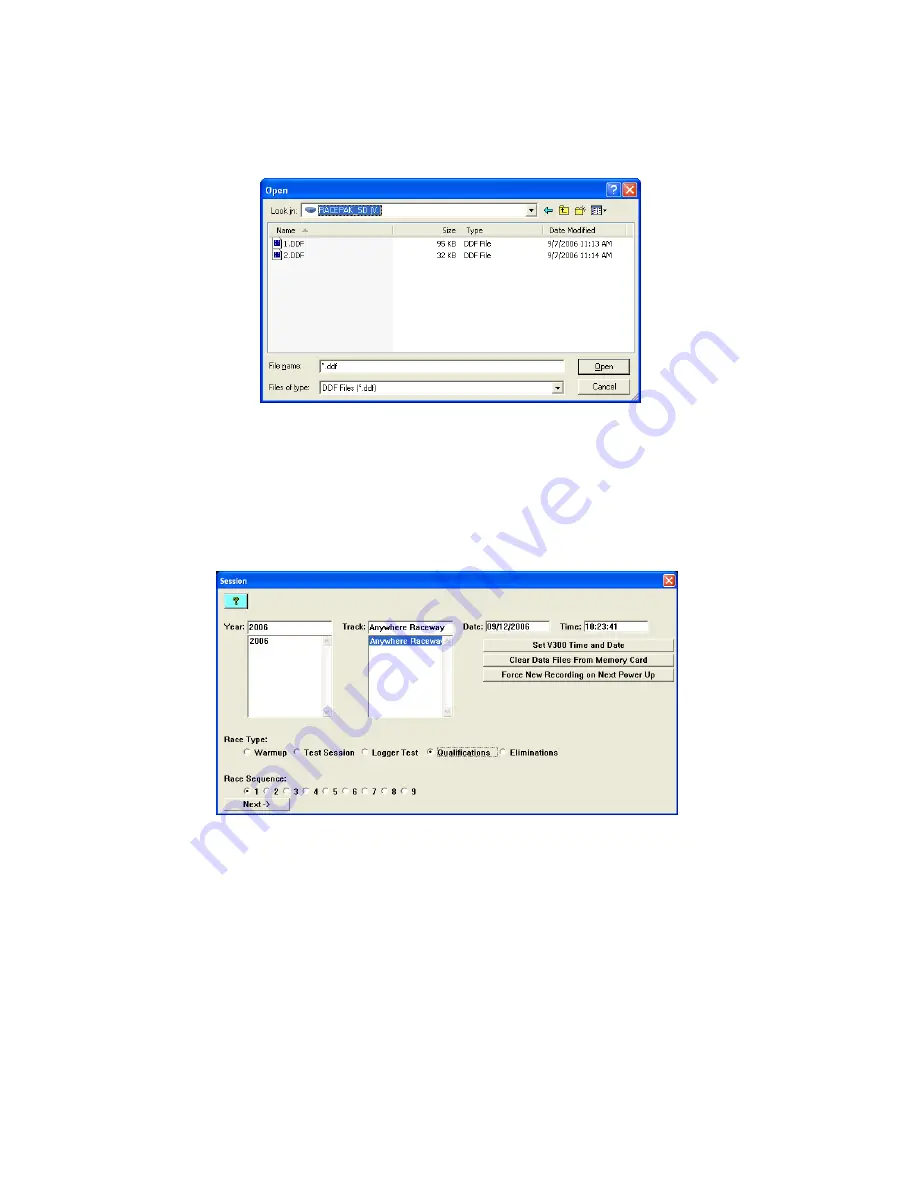


Step  5: 

After you have identified the data file you would like to upload, select the file by clicking on it with the left 

mouse button and then click on the Open button in the lower right corner of the dialog box.. 

Step  6: 

After the data has been uploaded from the memory card the Session dialog box will be displayed. This 

box will allow you to enter the session information. Enter the appropriate year and track by selecting the correct 
information from the selections list. If the desired year and/or track name is not on the corresponding selection 
list  you  can  enter the new  year  or  track  by  typing  the  name  direction into the top selection  box.  The  new  year 
and/or  track  will  be  added  to  the  selection  list.  Select  the  race  type,  and  the  race  sequence  information  by 
clicking on the desired radio button. The system will automatically enter the date and time. 


Step  7: 

Once the data file has been uploaded you may now delete the file by clicking on the Clear Data Files 

From Memory Card button. Clearing data files after uploading is not required, but it is highly  recommended that 
you do not allow too many files to build up. Storing too many files on the memory card can make it more difficult 
to  identify the proper data  file  on  future  uploads.  Eventually  the  memory  card  will  fill  to  capacity  and  the  data 
logger will no longer be able to record data.  

Summary of Contents for V300SD

Page 1: ...Pane Sizes 13 Creating And Viewing Quick Graphs 14 Security Keys Accessing 15 Security Keys Adding 16 Adding New V Net Sensors 17 USING Viewing The Run Log Pages 18 Overlaying Run Files 19 Zoom In Zoo...

Page 2: ...recorder starts logging data so plan accordingly In most cases the V300SD recorder has far more memory than is required so it is unnecessary to delay the start of your recording until the last moment...

Page 3: ...combination of the type of recorder you have V300SD and your recorder s serial number a four digit number such as 1001 The Open dialog box will appear For users with the generic V300SD select the gen...

Page 4: ...and track by selecting the correct information from the selections list If the desired year and or track name is not on the corresponding selection list you can enter the new year or track by typing t...

Page 5: ...screen and continue Step 8 Select OK or Next depending on your configuration file Additional dialog boxes may be displayed These are part of the Run Log sections that are user programmable to allow te...

Page 6: ...ng Step 11 You should now see the real time telemetry screen on your monitor To start the program click on the Start Data Acquisition icon or click on Telemetry and then Run To start the real time ses...

Page 7: ...and click on OK Your configuration file is now open Step 5 Click on Settings then select Scan COM Ports Make sure the data logger is powered on and the communication cable is connected Step 6 A Messa...

Page 8: ...e by double clicking on the time display Step 2 Once you have set the correct time and date in your PC you can start the Racepak DataLink software In the Datalink software open your car configuration...

Page 9: ...ing when performing this task Step 1 Click the Start button on the task bar at the lower left corner of your screen Step 2 Select Settings Step 3 Select Active Desktop Step 4 Click on Customize My Des...

Page 10: ...Properties box In this box you can verify the current settings and make any necessary changes Step 8 Click Save Step 9 Close the car configuration file SETTING THE START TIME The start time or zero po...

Page 11: ...locate the User Scale Begin Time s window You can change the starting time of the screen display by highlighting this window and typing in the new start time Step 3 Directly below the User Scale Begi...

Page 12: ...d vertical lines that appear when you use the averaging feature If you are unfamiliar with this feature see Using The Averaging Feature Step 3 Experimenting with different combinations is easy Click o...

Page 13: ...hange the Graph pane size by clicking on the Graph Size box in row one and typing in the new pane size example 74 Notice that as you do this the number in the Log Size box will automatically change so...

Page 14: ...Type Quickgraph Name dialog box will appear on your screen Step 4 Click on the top window of the Select Name Quickgraph Name box Step 5 Type in the name you want to assign to the selection of channel...

Page 15: ...are in the Currently Installed Serial Numbers window of the Add Security Unlock Keys box They are in the columns titled HW Type Serial Number and Unlock Key Write these numbers down exactly as they a...

Page 16: ...new security key numbers Step 2 From the main menu bar select Security and then Show Edit Security Key List The Add Security Unlock Keys dialog box will then appear Step 3 In the Add Security Unlock K...

Page 17: ...n be identified by the file tab at the top of the screen containing your configuration number and the picture of a blue wrench Step 4 Connect the computer to the onboard recorder using the serial cabl...

Page 18: ...different screen pane percentages the chances are that at least one of the Organize Panes selection will bring the log pages and their tabs back into view Step 2 If the first method does not produce...

Page 19: ...ph lines that will be compared with another file Step 3 Click on the Open File Folder icon Step 4 Proceed as you normally would to open the file you want to compare to the one that is already displaye...

Page 20: ...ur mouse This method will magnify the area within the box to full screen view in one step Step 1 With the run file displayed on your screen locate the area you want to enlarge Step 2 With your mouse m...

Page 21: ...ursor Step 1 Open a run file Step 2 Click on the channel button to display the graph line for the function you want to average for example the Engine RPM channel Step 3 Set your screen cursor to the l...

Page 22: ...f the folders you want to open until the name of the file you want to copy is visible Step 4 Highlight the file you wish to copy Step 5 Right click on the highlighted file A drop down menu selection w...

Page 23: ...t and then a period of time to search through all of your files A rotating magnifying glass icon will indicate that the search is taking place When the search is finished a list of all files matching...

Page 24: ...24 866 464 6553 1350 Pullman Drive Dock 14 El Paso Texas 79936 www racepak com 07 18 07...

Reviews: