Date: 05/01/2019
Tel: 800-677-5264 | Fax: 888-526-4329
R. Lang Company
Installation
Page 3 of 5
Step 5
Step 6
Step 7
Step 8
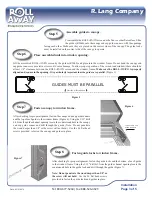
Figure 5
Assemble guides to canopy.
Preassemble the ROLL
AWAY
®
screen on the
fl
oor or other
fl
at surface. Slide
the guides (R2040) onto the canopy end cap guide runners, with the openings
Place assembled unit into window opening.
Lift the assembled ROLL
AWAY
®
screen by the guides (R2040) and place into the window frame. Do not bend the canopy end
cap guide runners or excessive stress could cause damage. To allow proper operation of the screen (and window) there should be
at least 1/8” clearance between the ROLL
AWAY
®
screen and the window frame.
Make sure the ROLL
AWAY
® is properly
aligned and square in the opening.
It is particularly important that the guides are parallel
(Figure 5).
GUIDES MUST BE PARALLEL
Fasten canopy to window frame.
facing each other. Make sure they are placed on the correct sides of the canopy. The guide locks
must be installed on the correct side of the canopy to operate.
After checking for proper alignment, fasten the canopy end cap guide runners
and the top of each guide to the window frame (Figure 6). Using the 3/32” drill
bit, from the guide channel opening locate the countersunk hole in the canopy
end cap guide runner and drill through the guide. (Note: Do not penetrate
the wood deeper than 1/8” or the screw will not hold.) Use the #6
fl
at head
screws provided to fasten the canopy and guides in place.
Figure 6
CANOPY END CAP
GUIDE RUNNER
Outside of Installation
Fasten guide locks to window frame.
Figure 7
After checking for proper alignment, fasten the guide locks and the bottom of each guide
to the window frame. Using the 3/32” drill bit, from the guide channel opening locate the
countersunk hole in the guide lock and drill through the guide (Figure 7).
Note: Do not penetrate the wood deeper than 1/8” or
the screw will not hold.
Use the #6
fl
at head screws
provided to fasten the guide locks and guides in place.


