background image

Thank you for purchasing a Quoizel product.

Need assistance with parts or assembly? Call Quoizel customer service at 1-631-273-2700

or visit us on-line at www.quoizel.com

2012 QuoizelInc.

3of4

6 CORPORATE PARKWAY
GOOSE CREEK SC 29445
www quoizel com

,

.

.

.

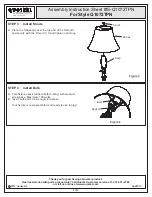
STEP 1

Install Socket Assembly

-

A. Thread the end of the Socket Assembly (A) onto the top

end of the Base (B). Hand tighten until snug.

Figure 1

Base

Socket
Assembly

STEP 2

Install the Harp

-

A. Install the Harp (E) by pressing the ends of the Harp (E)

into the Harp Clips as shown.

Base

Harp

Figure 2

Harp Clip

Assembly Instruction Sheet #IS-Q1072TPN

For Style Q1072TPN

April2012

Summary of Contents for Q1072TPN

Page 1: ... electrician if in doubt These instructions are provided for your safety It is very important you read them completely before installing the fixture We strongly recommend that a licensed professional electrician perform the installation Disconnect fixture from power source before replacing bulbs Make sure bulbs are given sufficient time to cool before removal Do not subject glass parts to any shoc...

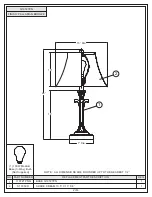
Page 2: ...ARE ROUNDED UP TO THE NEAREST 1 2 REQ 1 1 NO REPLACEMENT PART DESCRIPTION SHADE CREAM 10 5 X 15 X 8 BASE Q1072TPN PART NUMBER S1335CR 11072TPNQ FINISH PALLADIAN BRONZE 1 100W Medium Base 3 Way Bulb Not Supplied 2 2 1 15 Dia 10 14 26 7 Dia ...

Page 3: ...RKWAY GOOSE CREEK SC 29445 www quoizel com STEP 1 Install Socket Assembly A Thread the end of the Socket Assembly A onto the top end of the Base B Hand tighten until snug Figure 1 Base Socket Assembly STEP 2 Install the Harp A Install the Harp E by pressing the ends of the Harp E into the Harp Clips as shown Base Harp Figure 2 Harp Clip Assembly Instruction Sheet IS Q1072TPN For Style Q1072TPN Apr...

Page 4: ... a Quoizel product Need assistance with parts or assembly Call Quoizel customer service at 1 631 273 2700 or visit us on line at www quoizel com 2012 QuoizelInc 4of4 6 CORPORATE PARKWAY GOOSE CREEK SC 29445 www quoizel com STEP 3 Install Shade A Place the Shade D over the top end of the Harp E and secure with the Finial C Hand tighten until snug Figure 3 Harp Shade Assembly Instruction Sheet IS Q1...

Reviews: