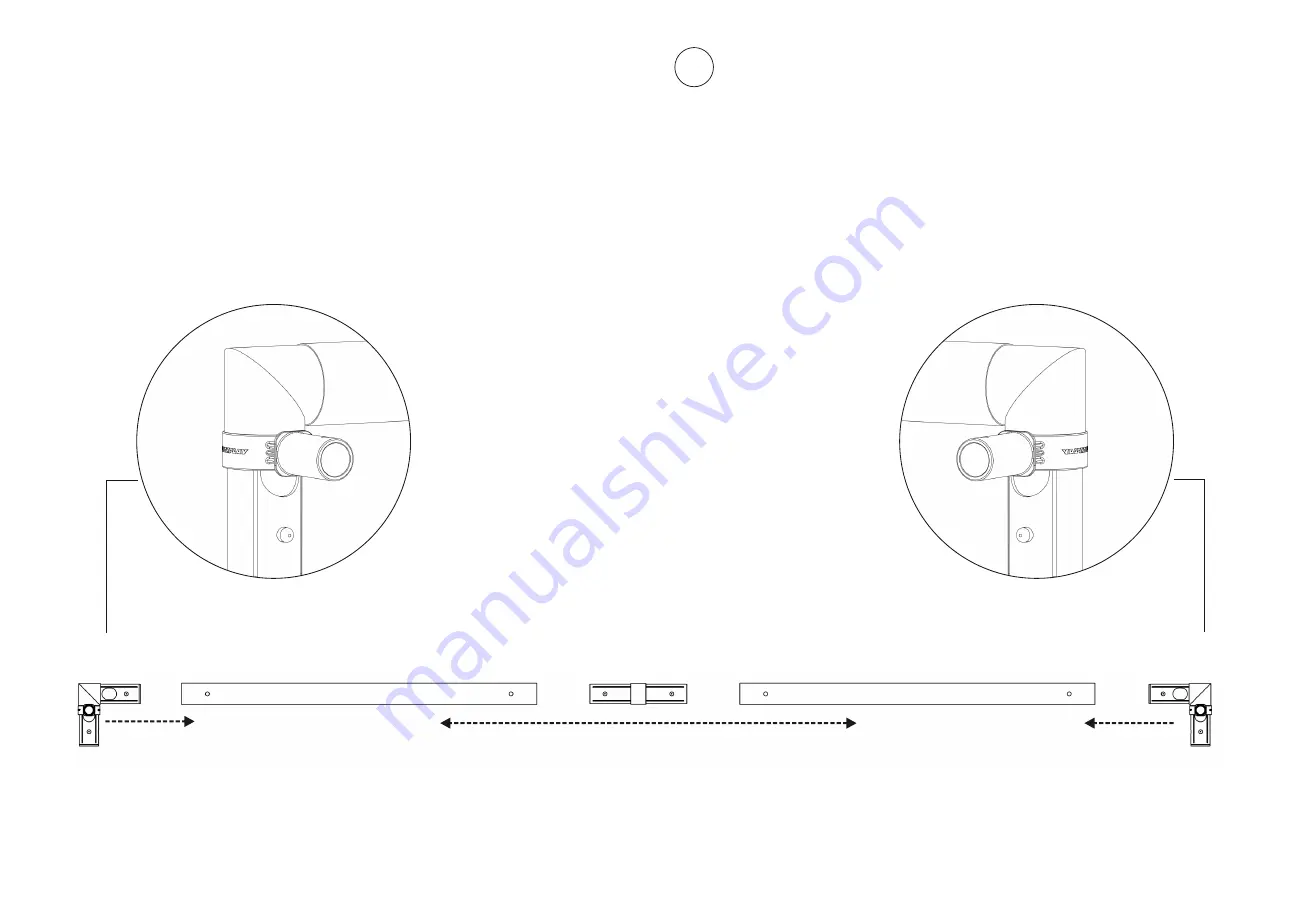
Assemble the
Attaching tubes
CROSSBAR ,
MF6-1 to MF-1,MF-2 & MF-5
connectors.
CROSSBAR
STEP C
MF6-1
MF-1
MF-2
MF-5
DETAIL VIEW
Page 1: ...ER UPVC A CA R R T E X W E H E E K N A T U S G I N N I G N G R R A O W U N D S T A K E S GROUND STAKES M4 MF 6 S1 8 PD 1 MF 1 MF6 1 UPVC TUBES CONNECTORS MF 2 MF 3 MF 4 MF 5 MF 6 MF 7 2 2 MF 1 MF 3 MF...
Page 2: ...e is fully assembled and secured to the net before use 4 Check the frame is secured to the ground before use 5 Do not climb or hang on the structure Regularly check for wear and tear Stop using if any...
Page 3: ...Insert all into connectors MF 6 parts MF 1 MF 2 MF 7 MF 2 ADD PLASTIC PUSH BUTTONS STEP B MF 6 MF 7 MF 1...
Page 4: ...Assemble the Attaching tubes CROSSBAR MF6 1 to MF 1 MF 2 MF 5 connectors CROSSBAR STEP C MF6 1 MF 1 MF 2 MF 5 MF 5 MF 5 MF 2 MF 5 MF 2 DETAIL VIEW DETAIL VIEW MF6 1 MF 2...
Page 5: ...Attach tube MF6 2 to the connectors s MF 2 POSTS TO CROSSBAR STEP D MF6 2 MF 2 MF6 2 MF 2...
Page 6: ...Assemble the BACK BASEBAR Attaching tubes MF6 1 to MF 1 MF 7 connectors BACK BASEBAR STEP E MF 1 MF 7 MF12 1 MF 7 MF 7 MF6 1 MF6 1 M F 1 2 1 MF 7 MF6 1 DETAIL VIEW DETAIL VIEW MF6 1...
Page 7: ...BASE POSTS TO BASEBAR Connect tube to the MF s MF6 3 7 connectors STEP F MF 7 MF 7 DETAIL VIEW MF6 3 MF6 3 MF 7 MF6 3 MF6 1...
Page 8: ...STEP G Attach the CROSSBAR POSTS to the BASE FRAME using the connectors MF 2 CROSSBAR TO BASE FRAME MF6 2 MF6 3 MF 2 MF6 2 MF 2 MF6 3 DETAIL VIEW MF 2 MF6 2 MF6 3...
Page 9: ...CONNECTING DIAGONAL BRACE Attach MF6 4 MF6 5 MF 3 tubes to the parts STEP H DETAIL VIEW MF6 4 MF6 5 MF 3...
Page 10: ...Connect tubes MF6 4 MF6 5 to parts MF 5 MF 7 BRACE TO GOAL FRAME STEP I MF6 4 MF6 5 MF6 4 MF6 5 MF 7 MF 7 MF 5 MF 5 DETAIL VIEW DETAIL VIEW MF 5 MF6 4 MF 7 MF6 5...
Page 11: ...ATTACH NET Wrap net around frame using the label in the TOP LEFT CORNER as a starting point Use the M4 net clips to further secure the net as shown ATTACHING NET STEP J M4...
Page 12: ...S 1 Remove back base section labelled 1 2 Click push buttons ed 2 labell 3 As you click the buttons move the base tubes 3 towards the goal labelled 1 2 2 3 3 SCAN ME TO SEE FOLDING VIDEO WHEN NOT IN U...
Page 13: ...v toode Toote disain v imaldab seda lihtsasti ja kiiresti les seada ning lahti v tta P rast kasutamist tuleb toode lahti v tta kandekotti paigutada ja hoida kuivas kohas HOIATUSED 1 Toote peab kokku p...