background image

17

IT

MANUALE D’INSTALLAZIONE ED USO 

QUICK MC²X 16k - 16k LV

 - REV001E

16k - 16k LV

7 - Procedure d’Installazione

• Per il serraggio utilizzare 

chiave dinamometrica

 stringendo le viti a croce. 

• Serrare gradatamente con andamento incrociato.
• Utilizzare opportuni sistemi antisvitamento.

ATTENZIONE: controllare, dopo circa una settimana dall’installazione il corretto serraggio delle viti/dadi.
Verificare periodicamente il corretto serraggio per compensare eventuali assestamenti.

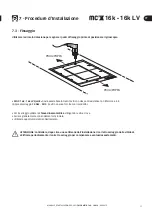
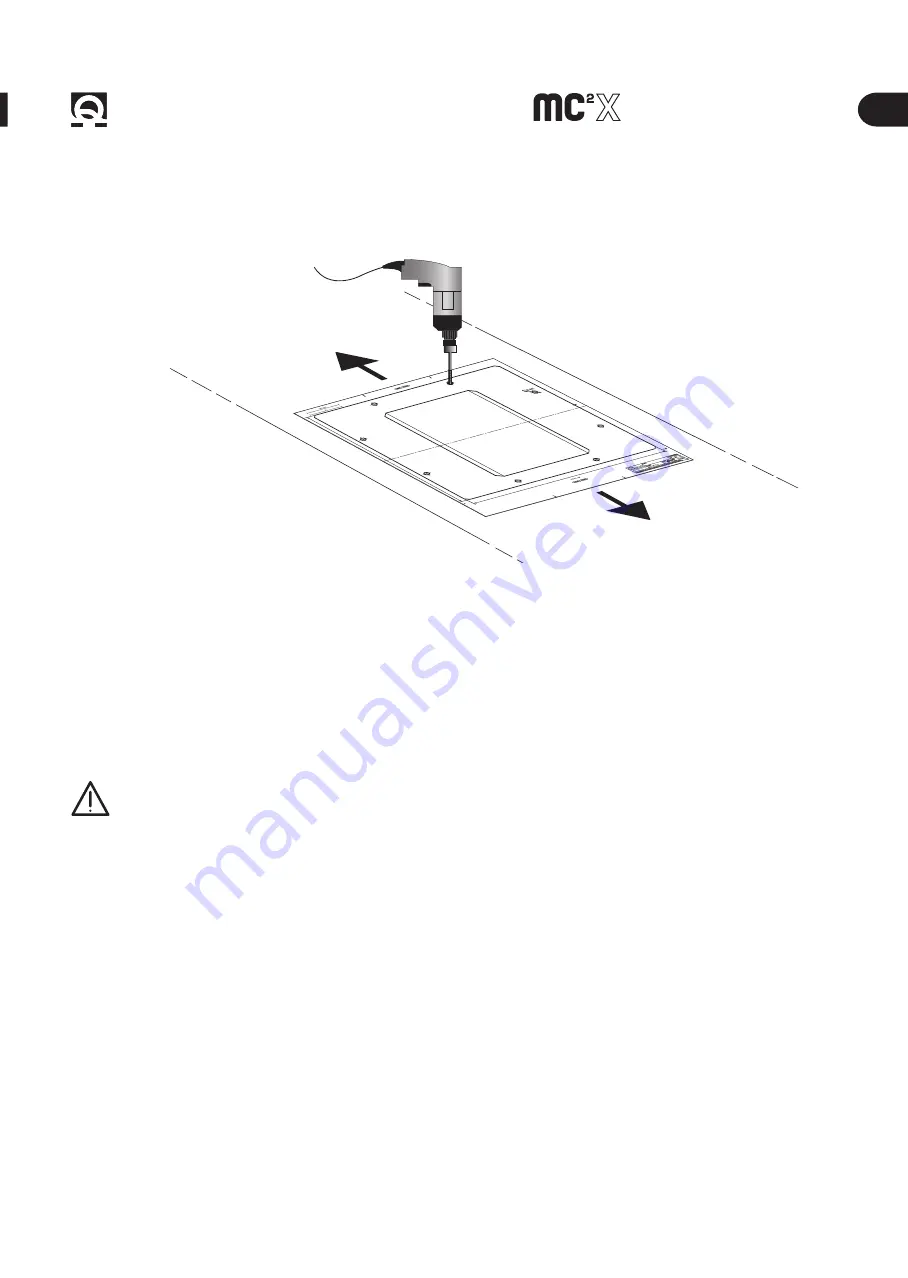
7.3 - Fissaggio

Utilizzare la dima in dotazione per segnare i punti di fissaggio prima di posizionare il giroscopio

• MC

2

X 16k - 16k LV Quick

®

 dovrà essere fissato tramite viti con classe di resistenza non inferiore a 8.8, 

Coppia di serraggio 

70 Nm - M10

  (le viti non sono fornite con il prodotto).

PRUA/POPPA

PRUA/POPPA

Summary of Contents for MC2X 16k

Page 1: ...REV 001E STABILIZZATORE GIROSCOPICO ANTIROLLIO MANUALE D INSTALLAZIONE E USO IT pag 3 ANTI ROLL GYRO STABILIZER INSTALLATION AND USE MANUAL EN page 27 16k 16k LV...

Page 2: ......

Page 3: ...are modifiche alle caratteristiche tecniche dell apparecchio e al contenuto di questo manuale senza alcun preavviso In caso di discordanze o eventuali errori tra il testo tradotto e quello originario...

Page 4: ......

Page 5: ...orto Pag 12 5 0 Istruzioni generali e precauzioni Pag 12 5 1 Rimozione della cassa Pag 12 5 2 Sollevamento dello stabilizzatore Pag 13 6 Alloggiamento Pag 14 6 0 Analisi della struttura e dell alloggi...

Page 6: ...do ma non annulla i rischi derivanti da cattive condizioni atmosferiche 1 1 Principali caratteristiche Design compatto e funzionale Elevata flessibilit d installazione Controllo dinamico del moto di p...

Page 7: ...n 1 3 Power Absorbtion 1 4 Dimensioni 1000W 2000W 3000W 4000W 5000W 6000W 7000W 0 0 8000W 10 min 50 min 40 min 60 min T 32 min 20 min 3200W 1 Informazioni sul prodotto MC X MODELLO POTENZA ASSORBITA W...

Page 8: ...BUS 12 m Connettore CAN T 5P F F F Terminatore CAN Cavo di potenza 6 m stabilizzatore driver Prolunga J1 CAN BUS 6m Prolunga J2 CAN BUS 6m Prolunga J5 CAN BUS 6m stabilizzatore driver RC COMANDO REMOT...

Page 9: ...NAMIC CONTROL MC2 X MANUALE DI INSTALLAZIONE Garanzia 2 1 Accessorio richiesto e materiale incluso nella confezione Non in dotazione con lo stabilizzatore RC Comando Remoto MC2 X touch 4 e 5 IP66 Cons...

Page 10: ...esto dispositivo non inteso da parte di persone bambini inclusi con ridotte capacit fisiche sensoriali o mentali QUICK SpA non si assume alcuna responsabilit per danni diretti o indiretti causati da u...

Page 11: ...e dall alimentazione elettrica e accertarsi che IL VOLANO SIA COMPLETAMENTE FERMO prima di ogni intervento come per esempio la pulizia o una semplice ispezione per evitare danni a persone o cose provo...

Page 12: ...uato utilizzando cinghie di sollevamento da fissare ai golfari dello stabilizzatore Durante la rimozione dall imballo o il sollevamento dello stabilizzatore bisogna operare con cautela facendo attenzi...

Page 13: ...2 Sollevamento dello stabilizzatore 3 Sollevare lo stabilizzatore usando cinghie da fissare ai golfari dello stabilizzatore Utilizzare distanziatori per funi per evitare di mettere in tensione cavi o...

Page 14: ...ilmente ai collegamenti e di non ostacolare altri apparecchi nelle vicinanze 6 0 Analisi della struttura e dell alloggiamento Prima di ogni valutazione sulla locazione ideale occorre accertare che la...

Page 15: ...gitudinale dello scafo indifferente il senso di rotazione verso prua o verso poppa Fig 2 6 3 Installazione di pi unit sulla stessa barca L installazione di pi apparecchi sulla stessa barca pu essere e...

Page 16: ...vr essere effettuata a regola d arte Se occorre rinforzare la struttura consigliato incorporare nella vetroresina delle piastre in alluminio o in ottone Carene in lega dI alluminio o in acciaio Il sup...

Page 17: ...ntrollare dopo circa una settimana dall installazione il corretto serraggio delle viti dadi Verificare periodicamente il corretto serraggio per compensare eventuali assestamenti 7 3 Fissaggio Utilizza...

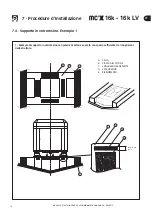
Page 18: ...Installazione 7 4 Supporto in vetroresina Esempio 1 A SELLA B PIASTRA IN OTTONE C LONGHERONE ESISTENTE D VETRORESINA E RIEMPIMENTO 1 Esempio di supporto in vetroresina con piastre di ottone su scafo...

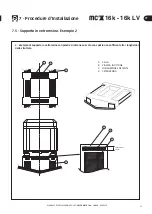
Page 19: ...dure d Installazione A SELLA B PIASTRA IN OTTONE C LONGHERONE ESISTENTE D VETRORESINA 7 5 Supporto in vetroresina Esempio 2 2 Esempio di supporto in vetroresina con piastre di ottone su scafo con spaz...

Page 20: ...ell apparecchio senza causare danni alla struttura dell imbarcazione Il driver escluso il lato da fissare deve distare almeno 5 cm da pareti o oggetti I cablaggi devono essere eseguiti secondo le indi...

Page 21: ...NTROL MC2 X Driver Spazio di 50 mm per ogni lato RC COMANDO REMOTO MC2 X 147 5 25 32 107 4 7 32 8 5 16 4 60 2 23 64 5 64 2 33 64 136 x 96 5 23 64 x 3 25 32 152 5 63 64 85 3 11 32 170 6 11 16 269 10 19...

Page 22: ...OLI FEMMINA CAVO CAN COLLEGATO A FLANGIA MOTORE CAVO 6M CAVO 6M CAVO CAN 6M CAVO DI POTENZA 6M CONNETTORE M12 3 POLI MASCHIO CAVO CAN BIANCO VERDE ROSSO CONNETTORE M12 3 POLI FEMMINA CONNETTORE M12 3...

Page 23: ...oto RC MC2 X 10 1 Avvertenze Prima di ogni intervento di manutenzione scollegare lo stabilizzatore dall alimentazione elettrica e accertarsi che IL VOLANO SIA COMPLETAMENTE FERMO La garanzia non copre...

Page 24: ...o di manutenzione lo stabilizzatore continua a funzionare Avviso manutenzione attivo Contattare il service Quick per effettuare il prima possibile la manutenzione In caso si verifichino problemi alla...

Page 25: ...RE LO STABILIZZATORE PER VERIFICARE L EVENTUALE PRESENZA DI CORROSIONE O SEGNI DI SFREGAMENTO FIGURA A ANNUALE ELETTRICO CONTROLLARE IL CORRETTO FISSAGGIO DEI CONNETTORI E L EVENTUALE PRESENZA DI OSSI...

Page 26: ...e DESCRIZIONE CODICE OSP DRIVER AC DYNAMIC CONTROL MC2X 16k FVSMCDRV0016A00 OSP DRIVER AC DYNAMIC CONTROL MC2X 16k LV FVSMCDRVLV16A00 Accessori Comando Remoto DESCRIZIONE CODICE J3 RC EXTENSION CABLE...

Page 27: ...out prior notice In case of discordance or errors in translation between the translated version and the original text in the Italian language reference will be made to the Italian text INSTALLATION AN...

Page 28: ......

Page 29: ...tion Pag 36 5 0 General instructions and precautions Pag 36 5 1 Crate removal Pag 36 5 2 Lifting the stabilizer Pag 37 6 Housing Pag 38 6 0 Structure and housing analysis Pag 38 6 1 Environmental requ...

Page 30: ...bient air temperature from 10 C to 55 C from 10 C to 55 C Weight 500 kg 1102 lb 500 kg 1102 lb 1 0 Description The MC2 X series is the result of careful research aimed at achieving highly competitive...

Page 31: ...610 24 1 64 1 3 Power Absorbtion 1 3 Power Absorbtion 1 4 Dimensions 1000W 2000W 3000W 4000W 5000W 6000W 7000W 0 0 8000W 10 min 50 min 40 min 60 min T 32 min 20 min 3200W MODEL MC X POWER ABSORBED W...

Page 32: ...n cable CAN BUS 12 m Connector cable CAN T 5P F F F CAN Terminator Power cable 6 m stabilizer driver J1 Extention CAN BUS 6 m J2 Extention CAN BUS 6 m J5 Extention CAN BUS 6 m stabilizer driver RC REM...

Page 33: ...MC2 X driver INSTALLATION AND USE MANUAL The warranty 2 1 Needed accessory and material included in its packaging Not supplied with the stabilizer RC Remote Control MC2 X touch 4 and 5 IP66 It allows...

Page 34: ...ce must not be used by people including children with reduced physical sensory or mental abilities QUICK SpA will not accept responsibility for direct or indirect damages caused by improper use of the...

Page 35: ...zer from the power supply and make sure that the flywheel has stopped completely before performing any operation such as cleaning or a simple inspection in order to prevent any damage to people or obj...

Page 36: ...using a lifting straps properly secured to the supports on the base While removing the stabilizer from its packaging or while lifting it it is necessary to work with caution paying attention to NOT ca...

Page 37: ...Transportation 5 2 Lifting the stabilizer 3 Lift the stabilizer with the straps properly secured to the supports on the base Use spacers for ropes to prevent damaging cables or connectors 4 Lift the...

Page 38: ...essary to make sure that there is enough space to remove the external cover to easily access the connections and to not obstruct other equipment nearby 6 0 Structure and housing analysis Before any as...

Page 39: ...itudinal axis the direction of rotation whether towards the bow or the stern has no influence Fig 2 6 3 Installation of multiple units on the same boat The installation of multiple stabilizers on the...

Page 40: ...mination If the support structure has to be reinforced we recommend incorporating aluminum or brass plates in the fiberglass Aluminum alloy or steel hulls The aluminum alloy or steel mounting structur...

Page 41: ...Approximately one week after installation check screws nuts for proper tightening Periodically check the tightening of the screws for potential settling adjustments 7 3 Securing Use the template supp...

Page 42: ...stallation procedures 7 4 Fiberglass Support Example 1 A SADDLE B BRASS PLATE C EXISTING STRINGERS D FIBERGLASS E FILLING 1 Example of fiberglass support structure with brass plates on a hull with eno...

Page 43: ...Installation procedures A SADDLE B BRASS PLATE C EXISTING STRINGER D FIBERGLASS 7 5 Fiberglass Support Example 2 2 Example of fiberglass support with brass plates on hull with insufficient space in b...

Page 44: ...its weight without causing structural damage to the boat The driver excluding the side to be fixed must be placed at least 5 cm 2 in away from walls or objects Wiring must be performed following the i...

Page 45: ...ONTROL MC2 X 147 5 25 32 107 4 7 32 8 5 16 4 60 2 23 64 5 64 2 33 64 136 x 96 5 23 64 x 3 25 32 Dimensions in mm inch Not supplied AC DYNAMIC CONTROL MC2 X Driver 50 mm 2 in space on each side 152 5 6...

Page 46: ...TO MOTOR FLANGE CABLE 6M CABLE 6M CAN CABLE 6M POWER CABLE 6M M12 CONNECTOR 3 MALE POLES CABLE CAN WHITE GREEN RED CONNECTOR M12 3 POLE FEMALE MOTOR CONNECTORS F IP67 CONNECTOR M12 3 MALE POLES MOTOR...

Page 47: ...efer to the MC2 X RC Remote Control Panel user s manual 10 1 Warnings Before any maintenance operation disconnect the power supply and make sure that the FLYWHEEL HAS COMPLETELY STOPPED The warranty d...

Page 48: ...abilizer will continue to operate Active maintenance notification Contact the Quick service to perform maintenance as soon as possible In the event of problems with the machine due to lack of maintena...

Page 49: ...ECTRICAL CHECK THE CONNECTORS FOR CORRECT FIXING AND THE PRESENCE OF OXIDE ANNUAL HYDRAULIC REMOVE THE TOP COVER AND CHECK FOR OIL LEAKS FIGURE B ANNUAL FIXING CHECK THAT THE SCREWS FIXING THE STABILI...

Page 50: ...DESCRIPTION CODE OSP DRIVER AC DYNAMIC CONTROL MC2X 16K FVSMCDRV0016A00 OSP DRIVER AC DYNAMIC CONTROL MC2X 16K LV FVSMCDRVLV16A00 Remote Control Accessories DESCRIPTION CODE J3 RC EXTENSION CABLE CAN...

Page 51: ......

Page 52: ...44 415061 Fax 39 0544 415047 www quickitaly com quick quickitaly com REV 001E STABILIZZATORE GIROSCOPICO ANTIROLLIO ANTI ROLL GYRO STABILIZERS MANUALE D INSTALLAZIONE ED USO INSTALLATION AND USE MANUA...

Reviews:

Related manuals for MC2X 16k