background image

Instrukcja obsługi

26

PL

Instalacja karty microSD

1.  Należy umieścić kartę microSD w slocie microSD urzą-

dzenia, który znajduje się na panelu bocznym. Należy 

zwrócić uwagę na poprawną instalację karty. 

2.  Aby wyjąć kartę, należy ją delikatnie nacisnąć. Karta 

wysunie się ze slotu, po czym należy ją wyjąć.

Uwagi:
•  Nie należy umieszczać ani wyjmować karty ze slotu uży-

wając siły.

•  Jeśli urządzenie nie jest używane, należy usunąć kartę 

microSD ze slotu, aby zapobiec jej uszkodzeniu.

•  Karta microSD umieszczona w slocie urządzenia będzie 

traktowana jako miejsce zapisu plików. Zalecane jest jej 

sformatowanie przed użyciem.

Wyjście AV/HDMI

Należy połączyć jeden koniec kabla AV/HDMI do odpowied-
niego portu urządzenia, następnie połączyć drugi koniec z 
wejściem AV/HDMI telewizora.

OBSŁUGA
Włączanie

Należy nacisnąć przycisk zasilania, aby włączyć urządzenie. 

Należy ponownie nacisnąć i przytrzymać przycisk zasilania, 
aby wyłączyć urządzenie.

Summary of Contents for KOM0916

Page 1: ...CAR DVR KOM0916 Instrukcja obsługi Owner s manual Manual de utilizare Bedienungsanleitung DE EN PL RO ...

Page 2: ......

Page 3: ...g oder Wärmequellen aussetzen Halten Sie die Kamera fern von Kindern Verwenden Sie nur autorisiertes Zubehör Das Gerät nicht zerlegen ändern oder versuchen die ses zu reparieren Bei Beschädigung wenden Sie sich an einen autorisierten Kundendienst für Überprüfung Reparatur IMMER vor der Reinigung das Gerät vom Versorgungsnetz trennen Reinigen Sie das Gerät nur mit einem weichen leicht fe uchten Tuc...

Page 4: ...Ü 2 Mini USB Steckplatz 10 Taste OK 3 Halterungsbefestigung 11 Taste Modus 4 HDMI Anschluss 12 Taste Rechts 5 Mikro SD Kartensteckplatz 13 Taste Zurücksetzen 6 Integriertes Mikrofon 14 Lautsprecher 7 Taste Ein Aus 15 Linsen 8 Taste Links 1 2 3 4 5 6 7 8 9 10 11 12 13 14 15 ...

Page 5: ... Sie den Saugnapf um die Halterung an der Windschut zscheibe zu befestigen 3 Drücken Sie den Sperrhebel aufwärts und regeln die Kame raposition für beste Aufnahme 4 Stecken Sie ein Ende des Auto Ladegerätes in den Mini USB Steckplatz am Gerät und das andere Ende in den Steckplatz für den Zigarettenanzünder Hinweis Legen Sie das Kabel in eine Position die Sie nicht beim fahren stört ...

Page 6: ...tfernen Sie die Mi kro SD Karte aus dem Steckplatz um eine Beschädigung zu verhindern Wenn Sie die Mikro SD Karte in den entsprechenden Steckplatz einfügen und das Gerät einschalten wird die Karte als voreingestellter Speicher eingestellt Bitte for matieren Sie diese zuerst AV HDMI Ausgang Verbinden Sie ein Ende des AV HDMI Kabels mit dem zugehörigen Anschluss am Gerät verbinden Sie das andere Kab...

Page 7: ...hme Im Aufnahmemodus drücken Sie die Taste Links um manuell die aktuelle Datei zu sperren Diese wird auf der Mikro SD Karte gespeichert und kann nicht gelöscht wer den bis Sie nicht die Sperre aufheben Kameramodus Zuerst DVR einschalten Drücken Sie die Taste MODUS um in den Kameramodus zu gelangen Drücken Sie die Taste OK um ein Bild zu machen Dateien ansehen löschen und schützen Wiedergabemodus D...

Page 8: ...ützen um die ausgewählte Datei zu sperren Gesperrte Dateien können nicht gelöscht werden bis die Sperre nicht aufgehoben wird G Sensor Wenn der G Sensor aktiv ist wird der DVR das aktuelle Video schützen und sperren sobald der G Sensor von einen Zusammenstoss oder Schock durch einen Verkehrsunfall ausgelöst wurde Um die Empfindlichkeit des G Sensors einzustellen drücken Sie die Taste MENÜ und wähl...

Page 9: ...den Sie den DVR mit dem PC über das USB Kabel Ihr Computer meldet Neues Gerät gefunden Wählen Sie eine der unteren zwei Optionen Storage Speicher In diesem Modus kann der Benutzer durch die Dateien blättern Camera Kamera Driver wird automatisch installiert wenn das Gerät zum ersten Mal an den PC Angeschlos sen wird Nach der Installation kann dieses als PC Kame ra benutzt werden USB Aufladung 1 Ben...

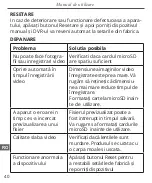
Page 10: ...Benutzung des Gerätes auftreten drücken Sie die Taste Reset Zurücksetzen und schalten dann das Gerät manuell ein und der DVR wird automatisch die Werkseinstellungen wiederherstellen FEHLERBEHEBUNG Problem Mögliche Lösung Kann keine Bilder machen oder Videos aufnehmen Überprüfen Sie ob die SD Karte genügend freien Speicher hat Automatischer Video stopp während der Aufnahme Die Größe des Videos ist ...

Page 11: ...e die Taste Reset um die Werks Einstellungen wieder herzustellen und Gerät wieder einschalten TECHNISCHE DATEN LCD 3 HD Chipset GPCY1248 Unterstützte Betriebssysteme Windows XP Windows 7 Bildauflösung 12M 4032x3024 Px 10M 3648x2736 Px 8M 3264x2448 Px 5M 2592x1944 Px 3M 2048x1536 Px 2MHD 1920x1080 Px 1 3M 1280x960 Px Bildformat JPEG Videoauflösung 1080 FHD 25 fps 1920x1080 Px 720P 30 fps 1280x720 P...

Page 12: ...eses Gerät bitte getrennt von anderen Abfällen um der Umwelt bzw der menschilchen Gesundheit nicht durch unkontrollierte Müllbeseitigung zu schaden Recyceln Sie das Gerät um die nachhaltige Wiederverwertung von stofflichen Ressourcen zu fördern Private Nutzer sollten den Händler bei dem das Produkt gekauft wurde oder die zuständigen Behörden kontaktieren um in Erfahrung zu bringen wie sie das Gerä...

Page 13: ... sunlight and sources of heat Keep the device beyond children s reach Use only authorized accessories Do not attempt to repair this device yourself In case of damage contact with an authorized service point for check up repair ALWAYS disconnect this device from power supply mains before cleaning Clean this device with soft slightly damp cloth Do not use any abrasives or chemical agents to clean th...

Page 14: ...port 9 MENU button 2 mini USB port 10 OK button 3 Bracket port 11 Mode button 4 HDMI port 12 Right button 5 microSD card slot 13 Reset button 6 Built in microphone 14 Speaker 7 Power button 15 Lens 8 Left button 1 2 3 4 5 6 7 8 9 10 11 12 13 14 15 ...

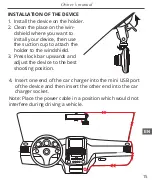
Page 15: ...en use the suction cup to attach the holder to the windshield 3 Press lock bar upwards and adjust the device to the best shooting position 4 Insert one end of the car charger into the mini USB port of the device and then insert the other end into the car charger socket Note Place the power cable in a position which would not interfere during driving a vehicle ...

Page 16: ... the microSD card from the slot to prevent it from damage When you insert the microSD card into the corre sponding slot and turn on the device it will set the card as a preset storage device Please format it firstly AV HDMI output Connect one end of AV HDMI cable to the corresponding port on the device connect the other end to the TV AV HDMI input to browse files OPERATION Turning on off Press Pow...

Page 17: ...it Camera mode Firstly turn on the DVR Then press MODE button to enter photo taking mode Press OK button to take a photo Files preview delete and protect Preview mode Press Mode button twice to enter preview mode Press Left Right button to choose the file then press OK button to play it Delete function In preview mode select the file and press MENU button to enter submenu then press Delete to dele...

Page 18: ...any external shocks to your car have been detected DVR will turn off automatically after 25 seconds of recording To set the sensitivity to trigger Parking monitor press Menu button twice enter Parking mode then select be tween options High Medium Low and press OK button to confirm your choice Default setting is Off When the fun ction is turned on P icon will be displayed on the screen Note This fu...

Page 19: ...in battery is used only for delayed turning off and saving the files It is not recommended to be used for recording 2 Connecting 12 V car charger After vehicle start DVR starts recording automatically It saves the file and turns off automatically 15 seconds after the vehicle is shut down Note Only car charge source with 5 V output can be used Reset If abnormal condition occurs to the device during...

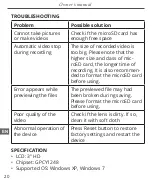
Page 20: ... longer time of recording It is also recommen ded to format the microSD card before using Error appears while previewing the files The previewed file may had been broken during saving Please format the microSD card before using Poor quality of the video Check if the lens is dirty If so clean it with soft cloth Abnormal operation of the device Press Reset button to restore factory settings and rest...

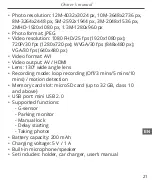
Page 21: ...x480 px VGA 30 fps 640x480 px Video format AVI Video output AV HDMI Lens 130º wide angle lens Recording mode loop recording Off 3 mins 5 mins 10 mins motion detection Memory card slot microSD card up to 32 GB class 10 and above USB port mini USB 2 0 Supported functions G sensor Parking monitor Manual lock Delay starting Taking photos Battery capacity 200 mAh Charging voltage 5 V 1 A Built in micro...

Page 22: ...the sustainable reuse of material resources Household users should contact either the retailer where they purchased this product or their local government office for details of where and how they can take this item for environmentally safe recycling Business users should contact their supplier and check the terms and conditions of the purchase contract This product should not be mixed with other c...

Page 23: ...onić przed bezpośrednim nasłonecznieniem oraz źródłami ciepła Urządzenie należy przechowywać w miejscu niedostęp nym dla dzieci Nie należy używać nieoryginalnych akcesoriów Zabrania się własnoręcznej naprawy sprzętu W wypadku uszkodzenia należy skontaktować się z autoryzowanym punktem serwisowym w celu sprawdzenia naprawy Należy ZAWSZE odłączyć urządzenie od źródła zasilania przed czyszczeniem Urz...

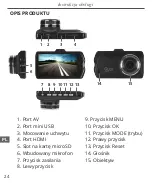
Page 24: ...U 2 Port mini USB 10 Przycisk OK 3 Mocowanie uchwytu 11 Przycisk MODE trybu 4 Port HDMI 12 Prawy przycisk 5 Slot na kartę microSD 13 Przycisk Reset 6 Wbudowany mikrofon 14 Głośnik 7 Przycisk zasilania 15 Obiektyw 8 Lewy przycisk 1 2 3 4 5 6 7 8 9 10 11 12 13 14 15 ...

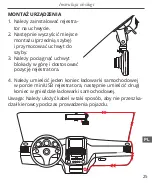
Page 25: ...ymocować uchwyt do szyby 3 Należy pociągnąć uchwyt blokady w górę i dostosować pozycję rejestratora 4 Należy umieścić jeden koniec ładowarki samochodowej w porcie miniUSB rejestratora następnie umieścić drugi koniec w gnieździe ładowarki samochodowej Uwaga Należy ułożyć kabel w taki sposób aby nie przeszka dzał kierowcy podczas prowadzenia pojazdu ...

Page 26: ...ając siły Jeśli urządzenie nie jest używane należy usunąć kartę microSD ze slotu aby zapobiec jej uszkodzeniu Karta microSD umieszczona w slocie urządzenia będzie traktowana jako miejsce zapisu plików Zalecane jest jej sformatowanie przed użyciem Wyjście AV HDMI Należy połączyć jeden koniec kabla AV HDMI do odpowied niego portu urządzenia następnie połączyć drugi koniec z wejściem AV HDMI telewizo...

Page 27: ...agrywanie awaryjne W trybie nagrywania należy nacisnąć lewy przycisk aby ręcznie zablokować bieżący plik Zostanie on zapisany na karcie microSD Możliwość jego usunięcia będzie niedostęp na do momentu odblokowania pliku Tryb aparatu Należ włączyć urządzenie Następnie nacisnąć przycisk MODE Trybu aby przejść do trybu zdjęć Należy nacisnąć przycisk OK aby zrobić zdjęcie Przeglądanie usuwanie i ochron...

Page 28: ...łego zdarzenia lub wstrząsu spowodowanego kolizją drogową rejestrator zabezpieczy aktualnie nagrywany film Aby ustawić czułość G Sensora należy nacisnąć przycisk MENU i wejść w tryb G Sensor Możliwe opcje do wyboru to Wył Wysoka Średnia Niska Domyślnie ustawione na poziom średni Monitorowanie parkingu Przy włączonym trybie parkowania rejestrator automa tycznie włączy się i rozpocznie nagrywanie je...

Page 29: ...m połączeniu z komputerem ste rowniki zostaną automatycznie zainstalowane Po instalacji rejestrator może być używany jako kamera internetowa Ładowanie USB 1 Wbudowana bateria Należy podłączyć rejestrator do gniazda ładowarki samo chodowej lub do kompatybilnego portu USB komputera Uwaga Wbudowana bateria służy jedynie do opóźnionego wyłączania i zapisywania plików Nie należy używać jej do nagrywani...

Page 30: ...ić zdjęć lub nagrać wideo Należy sprawdzić czy karta microSD ma wystarczającą ilość wolnego miejsca Automatyczne za trzymanie nagrania podczas nagrywania Rozmiar nagrywanego wideo jest zbyt duży Należy zauważyć że im większy rozmiar i klasa karty microSD tym dłuższy czas nagrywania Przed użyciem zalecane jest przeprowadzenie formatowania karty microSD Błąd podczas przeglą dania plików Przeglądany ...

Page 31: ...my operacyjne Windows XP Windows 7 Rozdzielczość zdjęć 12M 4032x3024 px 10M 3648x2736 px 8M 3264x2448 px 5M 2592x1944 px 3M 2048x1536 px 2MHD 1920x1080 px 1 3M 1280x960 px Format zdjęć JPEG Rozdzielczość wideo 1080 FHD 25 fps 1920x1080 px 720P 30 fps 1280x720 px WVGA 30 fps 848x480 px VGA 30 fps 640x480 px Format wideo AVI Wyjście wideo AV HDMI Obiektyw szerokokątny 130º Tryb nagrywania nagrywanie...

Page 32: ...enie produktu od innego typu odpadów oraz odpowiedzialny recykling w celu promowania ponownego użycia zasobów materialnych jako stałej praktyki W celu uzyskania informacji na temat miejsca i sposobu bezpiecznego dla środowiska recyklingu tego produktu użytkownicy w gospodarstwach domowych powinni skontaktować się z punktem sprzedaży detalicznej w którym dokonali zakupu produktu lub z organem władz...

Page 33: ...ţi numai accesoriile furnizate sau recomandate de producătorul dispozitivului In cazul în care aparatul prezinta o funcționare defectuo asă sau prezinta anomalii in functionare opriti aparatul si contactati imediat un centru de service autorizat Deconectati aparatul de la retea atunci cand nu l folositi sau inainte de a l curata Curăţaţi aparatul cu o cârpă moale umezita usor Nu fo losiţi agenţi d...

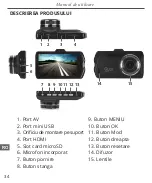
Page 34: ...Buton MENIU 2 Port mini USB 10 Buton OK 3 Orificiu de montare pe suport 11 Buton Mod 4 Port HDMI 12 Buton dreapta 5 Slot card microSD 13 Buton resetare 6 Microfon incorporat 14 Difuzor 7 Buton pornire 15 Lentile 8 Buton stanga 1 2 3 4 5 6 7 8 9 10 11 12 13 14 15 ...

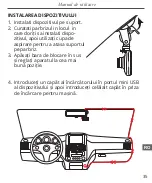
Page 35: ...doriți sa instalati dispo zitivul apoi utilizați cupa de aspirare pentru a atasa suportul pe parbriz 3 Apăsați bara de blocare în sus și reglați aparatul la cea mai bună poziție 4 Introduceți un capăt al încărcătorului în portul mini USB al dispozitivului și apoi introduceți celălalt capăt în priza de încărcare pentru mașină ...

Page 36: ...core spunzator și porniți dispozitivul acesta va seta cardul ca dispozitiv de stocare prestabilit Va rugam sa formatati cardul inainte de prima utilizare Iesire AV HDMI Conectați un capat al cablului AV HDMI la portul core spunzător al dispozitivului conectați celălalt capăt la intra rea televizorului AV HDMI FUNCTIONARE Pornire Oprire Apasati butonul de pornire de pe dispozitiv Apasati si tineti ...

Page 37: ...era Porniti DVR ul Apoi apasati butonul MOD pentru a intra in modul de fotografiere Apasati butonul OK pentru a efectua o fotografie Previzualizare fisiere stergere si protejare Modul de previzualizare Apăsați butonul Mod de două ori pentru a intra în modul de previzualizare Apăsați butonul din stanga dreapta pentru a alege fișierul apoi apăsați butonul OK pentru al reda Functia de stergere În mod...

Page 38: ...itatea Senzorul G apăsați butonul MENIU și intrati în modul G Senzor Opțiunile disponibile sunt Dezactivare inalta mediu joasa Setarea implicită este Mediu Modul de parcare Cand modul de parcare este activat DVR ul va porni pentru a începe înregistrarea în mod automat în cazul în care au fost detectate socuri externe la masina DVR ul se va opri automat după 25 de secunde de înregistrare Pentru a s...

Page 39: ...at în mod automat atunci când este conectat la PC pentru prima dată După instala re acesta poate fi utilizat ca un aparat de fotografiat Incarcare USB 1 Aparatul utilizeaza o baterie reincarcabila de litiu ion Încărcați bateria încorporată prin conectarea la un încărcător de mașină sau la portul USB la PC Nota Bateria incorporata ar trebui folosita numai pentru pornirea intarziata sau salvarea fis...

Page 40: ...iunea imaginilor video înregistrate este prea mare Vă rugăm să rețineți că dimensiu nea mai mare reduce timpul de înregistrare Formatați cartela microSD inain te de utilizare A aparut o eroare in timp ce s a incercat previzualizarea unui fisier Fisierul previzualizat poate a fost intrerupt in timpul salvarii Va rugam sa formatați cardurile microSD inainte de utilizare Calitate slaba video Verifica...

Page 41: ... 30 fps 848x480 px VGA 30 fps 640x480 px Format video AVI Iesire video AV HDMI Lentile unghi vizualizare 130º Mod de inregistrare inregistrare bucla Oprire 3 minu te 5 minute 10 minute detector miscare Slot pentru card de memorie card microSD pana la 32 GB clasa 10 Port USB mini USB 2 0 Functii suportate Senzor G Monitorizare parcare Blocare manuala Pornire cu intarziere Realizarea de fotografii C...

Page 42: ... a promova refolosirea resurselor materiale Utilizatorii casnici sunt rugati să ia legatura fie cu distribuitorul de la care au achizitionat acest produs fie cu autoritatile locale pentru a primi informatii cu privire la locul si modul in care pot depozita acest produs in vederea reciclarii sale ecologice Utilizatorii institutionali sunt rugati să ia legatura cu furnizorul și să verifice condițiil...

Page 43: ......

Page 44: ...www quer pl ...

Reviews: