background image

11

Chapter 3

Menu Function

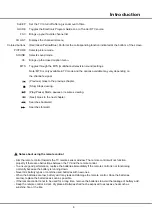
You can press the       button to enter the Settings Menu.
The Settings Menu consists of the following settings:
• Picture
• Sound
• Channel
• Smart TV
• Network
• System
• Support
In each menu, you can:

‡3UHVVWKHŸźŻŹEXWWRQVWRVHOHFWDQLWHPRUWR

  adjust the value.
• Press the OK button to enter the submenu.
• Press the       button to return to previous menu or exit 
  the menu.
• Press the EXIT button to exit the menu.

Picture

Sound

Picture preset

Adjusts the picture setting that best suits your viewing

environment.

Backlight

Adjusts the backlight levels of the picture.

Brightness

Adjusts the brightness of the picture.

Contrast

Adjusts the difference between the light and dark areas of 

the picture.

Saturation

Adjusts the richness of color.

Tint

Adjusts the balance between the red and green levels.

Sharpness

Adjusts the crispness of the edges in the picture.

Sound preset

Selects a preset audio option optimized for different

sounding conditions.

Balance

Adjusts the amount of audio sent to the left and right 

speakers.

Auto volume control

Selects On to reduce the annoying blasts in volume 

during commercial breaks and also amplifies softer 

sounds in program material. Eliminates the need to 

constantly adjust the volume.

SPDIF type

This option is used to control the type of audio 

stream sent to the Digital Audio Output (SPDIF) 

socket.

SPDIF delay

This option is used to synchronize the sound with the

picture.

TV placement

Selects Desk top or Wall mount mode.

Advanced settings

Selects more sound advanced settings.

Channel List

Shows all the searched channel in a list.

Color Temperature

Adjusts the color temperature of the picture. 

Auto format

Enables/disables the aspect ratio selection automatically.

Screen mode

Selects the picture size.

Overscan

Selects On or Off to turn on/off this option.

ECO settings

Configures engergy saving options.

Micro Dimming

Selects On or Off to turn on/off micro dimming.

Advanced Settings

Selects more picture advanced settings.

Picture reset

Restores the current picture settings to default.
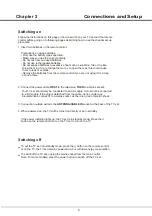
Channel scan

Allows you to scan for all available analog and digital 

channels. 
Follow the steps below to do automatic search.

Channel

- Select Tuner mode (Antenna or Cable)
- Select Automatic search and press OK to enter. 
  Select the channel type (Digital & Analog, Digital or 
  Analog), then press OK to start the automatic search
  process. The search may take a few minutes. During 
  the process, you can press OK to abort halfway.


Note: When Sound preset is set to different mode, 

five Sound options (100 Hz, 500 Hz, 1.5 KHz, 5 KHz, 

and 10 KHz) will be adjusted, which enable you to adjust 

the frequency levels desired. You can also set the 

options to your desired levels.

Summary of Contents for Q32HST1M

Page 1: ...the Antenna mode at the factory so that you can receive the over the air broadcast signal If you want to receive the Cable TV signal through the antenna cable input terminal this menu option must be...

Page 2: ...5 55 3 4 4 06 05 9104 50 9 44 7 5 46 4 46 4 3 03 5...

Page 3: ...2...

Page 4: ...d Plug Power Cord and Signal Cable Use Environment Cleaning Remote Control Functions Buttons on the TV Switching the TV on and off Sockets Switching on Switching off Network Connection Attention and F...

Page 5: ...set under the following conditions If the set will not be used for a long period of time If the power cord or the power outlet plug is damaged Follow the instructions to install and adjust the produc...

Page 6: ...utton Goes to the YouTube homepage VOLUME UP DOWN Increases or decreases the TV s volume MUTE Turns the volume off or on HOME Goes to the homepage CHANNEL UP DOWN Scans up or down through the current...

Page 7: ...d Searches forward SLEEP GUIDE FAV CH LIST Colored buttons PICTURE SOUND CC MTS Aim the remote control towards the TV remote sensor window The remote control will not function properly if there are ob...

Page 8: ...7 Power...

Page 9: ...DIGITAL This output can be used to connect a compatible digital audio receiver Sockets USB sockets input USB Note The location and names of the sockets on the TV may vary according to TV model and som...

Page 10: ...al to the ANTENNA CABLE IN socket at the back of the TV set 4 When powered on the TV will be turned on directly or be in standby If the power indicator lights up the TV set is in standby mode Press th...

Page 11: ...e network please refer to your ISP Connecting to a wired network To connect to a wired network 1 Ensure you have An Ethernet cable long enough to reach your TV A router or modem with an available Ethe...

Page 12: ...option is used to control the type of audio stream sent to the Digital Audio Output SPDIF socket SPDIF delay This option is used to synchronize the sound with the picture TV placement Selects Desk to...

Page 13: ...be in standby mode at the same time Input Settings User can select the device name of the input source here easy to identify the source Location Selects the location mode depending on your viewing en...

Page 14: ...you to download and install the latest software version from the Internet Make sure to set up a wired or ZLUHOHVV QHWZRUN FRQQHFWLRQ ILUVW 3UHVV 2 WR HQWHU Follow the on screen instructions to continu...

Page 15: ...ng data avoid damaging the system or the device 3 Pay attention to the power supply of the device when you are using a mobile hard disk or a digital camera If the power supply is not sufficient or not...

Page 16: ...k the picture may be marred by dots When the signal is extremely weak it may be necessary to install a special antenna to improve the reception 1 Adjust the position and orientation of the indoor outd...

Page 17: ...unting Hole Pattern 7KLV 4XDVDU 79 LV FRPSDWLEOH ZLWK D PP PP PRXQWLQJ KROH SDWWHUQ SFV RI W SH 0 VFUHZV DUH UHTXLUHG IRU LQVWDOOLQJ WKH ZDOO PRXQW EUDFNHW WR RXU 4XDVDU 79 R QRW XVH VFUHZV WKDW DUH O...

Page 18: ...ches Q32HST1M Specifications 1 50 W 17 ATSC Digital system and NTSC Analog NTSC M system AV Digital Audio Optical Cable 1 135 Other Information 2 110 240 V 50 60 Hz 5 W x 2 1366 x 768 Analog Audio Lin...

Page 19: ...S U P P O R T P A R A P R E G U N T A S O A P O Y O T C N I C O P l e a s e c a l l F a v o r d e l l a m a r a l 1 8 0 0 2 9 5 7 9 6 6 Este producto puede exponerlo a productos qu micas incluido plo...

Reviews: