Quantum Scalar i40/i80: Tape Drive Installation
6-68139-01 Rev A
September
2014
2
Installing a Tape Drive
• Keep static-sensitive parts in their original shipping containers until ready
for installation. Look for the ESD sticker to identify static-sensitive parts.
• Avoid touching connectors and other components.
Note:
Dry climates and cold-weather heating environments have lower
relative humidity and are more likely to produce static electricity.
Installing a Tape Drive
Tape Drive Slot Location
Considerations
Tape drives can only fit in certain slots, as shown in
Figure 1
. Slots are numbered
starting from the bottom and moving up.
• Scalar i40: Half-height tape drives can be installed in slots 1 and 2. A full-
height tape drive can be installed in slot 1.
• Scalar i80: Half-height tape drives can be installed in slots 1, 2, 3, 4, and 5.
Full-height tape drives can be installed in slots 1, 3, and 5. The extra space
where slot 6 would be cannot hold a half-height tape drive, but will
accommodate a full-height tape drive installed in slot 5.
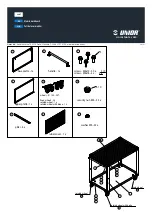
Figure 1 Acceptable
Installation Locations for Full-
Height Tape Drives
If possible, it is recommended to start installing the tape drives at the bottom
slot and work up, without leaving spaces between.
Note:
If you need to remove one or more filler plates, unscrew the two
thumbscrews securing the filler plate to the back of the library. Holding
the thumbscrews, pull the filler plate gently out of the library. Save the
filler plate in case you need to use it in the future.
Scalar i40
Scalar i80