background image

Quantum DXi6802 and DXi690x: Rack Mount Rails Replacement
6-68446-01
April 2016

16

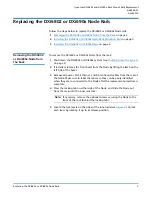
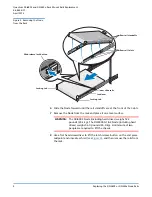
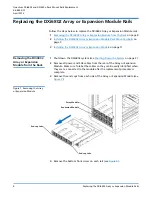
Replacing the DXi690x Array or Expansion Module Rails

Installing the DXi690x 

Array or Expansion 

Module

To install the Array Module or Expansion Module:

1

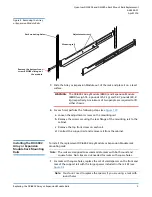
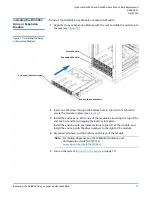
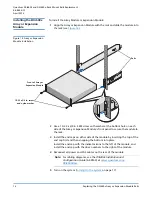
Align the Array or Expansion Module with the rails and slide the module into 

the rack (see 

Figure 14

).

Figure 14  Array or Expansion 
Module Installation

2

Use a 10-32 x 3/4 in. SEM screw with washer at the bottom hole on each 

side of the Array or Expansion Module’s front panel to secure the module to 

the rack.

3

Install the end caps on either side of the module by inserting the top of the 

end cap first and then snapping the bottom into place.
Install the end cap with the indicator icons to the left of the module, and 

install the end cap with the drive numbers to the right of the module.

4

Reconnect all power and SAS cables on the rear of the module.

Note:

For cabling diagrams, see the 

DXi690x Installation and 

Configuration Guide

 (6-68160) at  

www.quantum.com/

DXi6900docs

.

5

Turn on the system (

Turning On the System

 on page 17).

Front of Array or 

Expansion Module

10-32 x 3/4 in. screw 

and nylon washer

Rails

Summary of Contents for DXi690 Series

Page 1: ...Rails Replacement Follow the steps in this document to replace the rack mount rails in the DXi6802 or DXi690x 1 Shutting Down the System on page 2 2 Replacing the rack mount rails Replacing the DXi68...

Page 2: ...Node will completely shut down Note If you need help accessing remote management see the DXi6000 User s Guide 6 67199 at www quantum com DXi6800docs or the DXi690x User s Guide 6 68159 at www quantum...

Page 3: ...2 or DXi690x system see Shutting Down the System on page 2 2 If installed remove the front bezel from the Node by lifting the latch on the left side of the bezel 3 Remove all power SAS Ethernet and Fi...

Page 4: ...level surface WARNING The DXi6802 Node including hard drives weighs 53 3 pounds 24 2 kg The DXi6900 G1 G2 Node including hard drives weighs 53 0 pounds 24 0 kg A minimum of two people are required to...

Page 5: ...ils To install the replacement DXi6802 or DXi690x Node rack mounting rails 1 If present remove the orange plastic clip from each mounting rail so that the rail can be extended The rails are marked rig...

Page 6: ...d of the rail until it fully seats on the vertical rack flange and the latch clicks into place Repeat these actions to position and seat the front end piece on the vertical rack flange Installing the...

Page 7: ...both rails and slide the system into the rack 6 Reconnect all power SAS Ethernet and Fibre Channel cables on the rear of the Node Note For cabling diagrams see the DXi6800 Installation and Configurati...

Page 8: ...2 Array or Expansion Module on page 11 Removing the DXi6802 Array or Expansion Module from the Rack 1 Shut down the DXi6802 system see Shutting Down the System on page 2 2 Remove all power and SAS cab...

Page 9: ...rear flange of the mounting rail to the cabinet c Remove the top front screw on each rail d Contract the support rail and remove rail from the cabinet Installing the DXi6802 Array or Expansion Module...

Page 10: ...Only insert the top screw on the front of the rail at this time Do not insert the bottom screw yet 5 Insert two M5 screws through the rear of the cabinet and screw into the captured nuts in the rear...

Page 11: ...nt of each rail to secure the module in place see Figure 9 3 Install the end caps on either side of the module by inserting the top of the end cap first and then snapping the bottom into place Install...

Page 12: ...odule from the Rack on page 12 2 Installing the DXi690x Array or Expansion Module Rack Mounting Rails on page 15 3 Installing the DXi690x Array or Expansion Module on page 16 Removing the DXi690x Arra...

Page 13: ...e out of the rack and place it on a level surface WARNING The DXi690x Array Module and Expansion Module including hard drives weigh 59 0 pounds 26 8 kg and 57 0 pounds 25 9 kg respectively A minimum o...

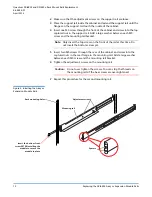
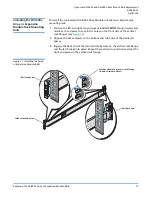
Page 14: ...ement 6 68446 01 April 2016 14 Replacing the DXi690x Array or Expansion Module Rails Figure 12 Removing the Array or Expansion Module Rails Rail front end Rail back end Latches click into place in rac...

Page 15: ...rd and orient each end piece to seat in the holes on the front side of the vertical rack flanges see Figure 13 2 Align each back end piece in the bottom and top holes of the desired U spaces 3 Engage...

Page 16: ...Array or Expansion Module s front panel to secure the module to the rack 3 Install the end caps on either side of the module by inserting the top of the end cap first and then snapping the bottom int...

Page 17: ...itches on the back of each Array Module RBOD see Figure 16 Wait until the seven segment display on the rear of the module displays 99 approximately 3 minutes Figure 16 Turning On the Array Modules RBO...

Page 18: ...Quantum DXi6802 and DXi690x Rack Mount Rails Replacement 6 68446 01 April 2016 18 Turning On the System...

Reviews: