background image

Chapter 2 


22 

PPC-1850/2150 Series User’s Manual 


VESA Mounting 

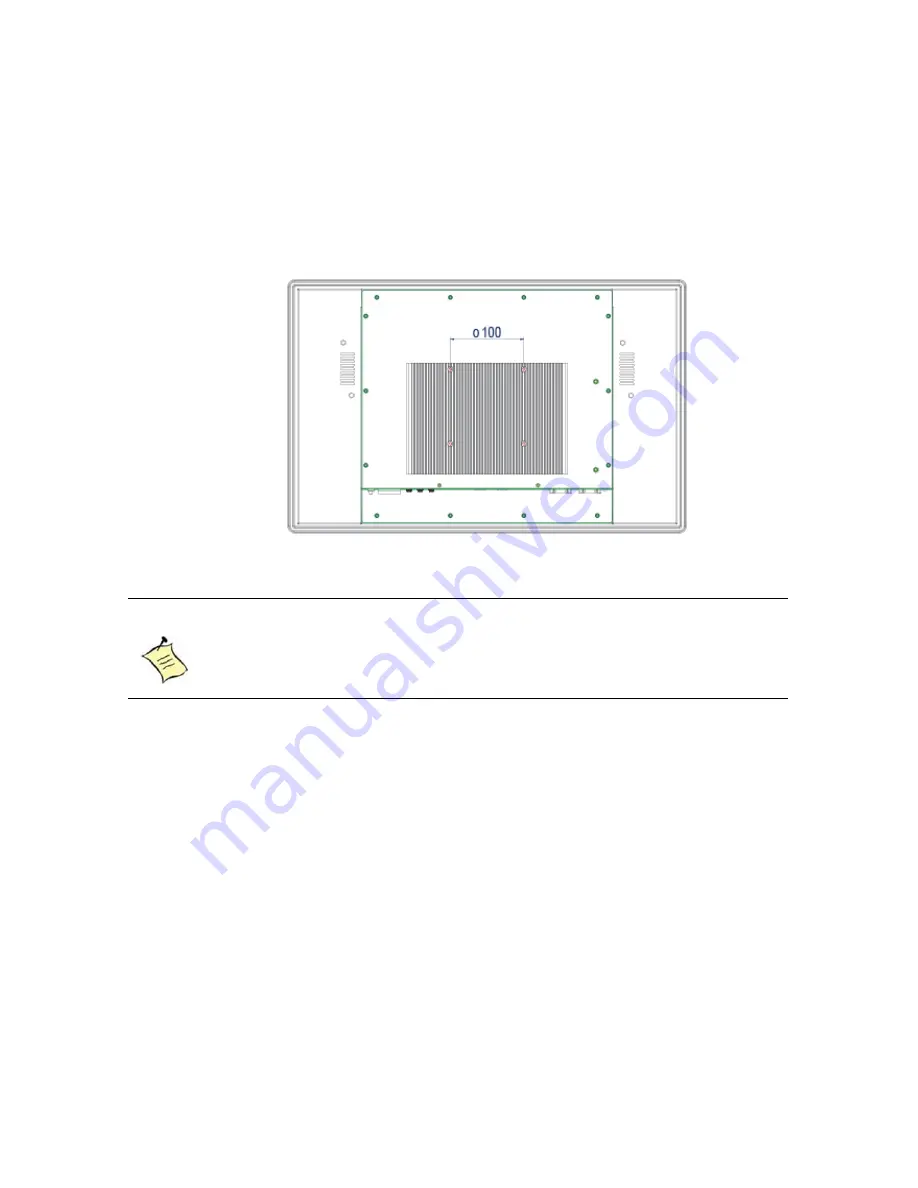
The product comes with VESA FDMI 100 standard mounting holes as shown below. 
Use 4 screws with the appropriate length for your mounting bracket. 


Figure 9 VESA Mounting Hole Locations


NOTE  

To fasten the metal shelf, your monitor must comply with VESA100 
standard. The VESA mounting kit is optional. 


Summary of Contents for PPC-1850 Series

Page 1: ...I PPC 1850 2150 Series User s Manual PPC 1850 2150 Series 18 5 21 5 Widescreen Multi touch Flat Panel PC with Intel Skylake Kaby Lake U Series Processors User s Guide...

Page 2: ...e This Guide 8 Unpacking 8 Regulatory Compliance Statements 8 Maintaining Your Computer 9 Chapter 1 Introduction 12 Overview 12 Product Specifications 13 System tour 15 Mechanical Dimensions 17 Chapte...

Page 3: ...ting 24 Figure 13 PPC 2150 Series Panel Mounting 24 Table 1 PPC 1850 2150 Series productspecification 14 Table 2 PPC 2150 Series BIOS Main Menu 26 Table 3 Advanced Menu 27 Table 4 Advanced Menu Displa...

Page 4: ...r s Manual Table 16 Advanced Menu Intel I210 Gigabit Network Connection 38 Table 17 Advanced Menu Intel Ethernet Connection I219 LM 39 Table 18 Power Configuration 40 Table 19 Boot Menu 41 Table 20 Se...

Page 5: ...arm Use extreme caution when installing or removing components Refer to the installation instructions in this user s guide for precautions and procedures If you have any questions please contact our P...

Page 6: ...ate To help avoid possible damage to system boards wait five seconds after turning off the computer before removing a component removing a system board or disconnecting a peripheral device from the co...

Page 7: ...is will discharge any static electricity that may have built up in your body When transporting a sensitive component first place it in an antistatic container or packaging Handle all sensitive compone...

Page 8: ...A devices FCC Compliance Statement This equipment has been tested and found to comply with limits for a Class Adigital device pursuant to Part 15 of the FCC rules These limits are designed to provide...

Page 9: ...mpromised Consideration should be given to the maximum rated ambient temperature Overheating can cause a variety of problems including premature aging and failure of chips or mechanical failure of dev...

Page 10: ...ty specifications Altitude Operating a system at a high altitude low pressure reduces the efficiency of the cooling fans to cool the system This can cause electrical problems related to arcing and cor...

Page 11: ...a fairly constant level and therefore can handle brownouts Because of this added protection line conditioners costmore than surge protectors However line conditioners cannot protect against a complet...

Page 12: ...provide comfortable viewing experience and allow multi window display without toggling Checklist PPC 1850 2150 Series Power Adapter Power Cord Driver CD Quick installation Guide Optional VESA Mounting...

Page 13: ...faces 2x Speaker out 3W 1x Line in on rear 1x Line out on rear 1x Mic in on rear Ethernet 2x GbE LAN RJ 45 on rear 1x Intel I219 LM 1x Intel I210 AT USB 4x USB3 0 Type Aon rear Serial Ports 2x RS 232...

Page 14: ...ction Glass Surface Ultra narrow Aluminum Front Bezel Metal Chassi s Aluminum Heat Sink Dimensions W x H x D 483 x 304 x 57 mm 19 02 x 11 97 x 2 24 542 6 x 339 2 x 59 8 mm 21 36 x 13 35 x 2 35 Weight...

Page 15: ...power switch allows powering ON and OFF the system Ethernet The eight pin RJ 45 LAN port supports a standard Ethernet cable for connection to a local network USB The USB Universal Serial Bus port is c...

Page 16: ...source Line Out Green The stereo headphone jack is used to connect the system s audio outsignal to amplified speakers or headphones MIC IN Pink The microphone jack is designed to connect the micropho...

Page 17: ...PPC 1850 2150 Series User s Manual Mechanical Dimensions 483 x 304 x 57 mm W x H x D Figure 2 PPC 1850 Series Mechanical Dimensions 542 6 x 339 2 x 59 8 mm W x H x D Figure 3 PPC 2150 Series Mechanica...

Page 18: ...ter 2 18 PPC 1850 2150 Series User s Manual Chapter 2 Getting Started Setting up your PC Connecting the monitor Connect the HDMI DP cable from your display to the HDMI DP port Figure 4 HDMI DP DP HDMI...

Page 19: ...mouse with your computer Figure 5 Connect USB mouse keyboard NOTE Using a third party USB mouse or keyboard may require software drivers Check the manufacturer s website for the latestsoftware drivers...

Page 20: ...efinitions COM1 COM2 RS 232 422 485 Port DB 9 Pin RS 232 RS 422 Half Duplex RS 485 Full Duplex RS 485 1 DCD TX DATA TX 2 RXD RX N A RX 3 TXD TX DATA TX 4 DTR RX N A RX 5 GND GND GND GND 6 DSR N A N A...

Page 21: ...tem 1 Connect the power adapter cable to the Phoenix connector DC IN of the PPC 1850 2150 Series 2 Connect the power cable to the power adapter 3 Connect the power cable to a power outlet 4 Press the...

Page 22: ...es with VESA FDMI 100 standard mounting holes as shown below Use 4 screws with the appropriate length for your mounting bracket Figure 9 VESA Mounting Hole Locations NOTE To fasten the metal shelf you...

Page 23: ...ed and comes with brackets and screws for this purpose The required cutout for panel mounting and maximum panel thickness is shown below Figure 10 PPC 1850 Series Panel Mount Cut out hole and maximum...

Page 24: ...sert a Panel Mount Bracket into each Bracket Opening Step 3 Secure Chassis to Panel by tightening the screws Figure 12 PPC 1850 Series Panel Mounting Step 1 Remove 9 Bracket Opening Covers from Bracke...

Page 25: ...t please contact us AMI s ROM BIOS provides a built in Setup program which allows the user to modify the basic system configuration and hardware parameters The modified data will be stored in a batter...

Page 26: ...SETUP UTILITY M a i n A d v a n c e d P o w e r B o o t S e c u r i t y S a ve E xi t Product Information Select Screen Select Item Enter Sel ect Change Opt F1 General H elp F2 Previous Val ues F3 Opt...

Page 27: ...sabled Audio Controller Enabled DisplayC onfiguration Super IO Configuration CPU Chipset C onfiguration SATA Configuration USB Configurati on AMT Configuration Trusted Computing Network Stack DIO Conf...

Page 28: ...LVDS Panel Type 1920x1080 2CH LVDS Panel Color Depth 24Bit PWM Backlight Control ByExternal LVDS Backlight Control PWM 190 Version 2 18 1263 Copyright C 2017 American Megatrends Inc Primary Display O...

Page 29: ...M a i n A d v a n c e d P o w e r B o o t S e c u r i t y S a ve E xi t Serial Port 1 Configuration Select Screen Select Item Enter Sel ect Change Opt F1 General H elp F2 Previous Val ues F3 Optimize...

Page 30: ...efaults F4 Save Exit ESC Exit Serial Port Enabled Device Settings IO 2F8h IRQ 3 Change Setti ngs Auto Serial Port 2 Type RS232 Version 2 18 1263 Copyright C 2017 American Megatrends Inc Serial Port Op...

Page 31: ...d Defaults F4 Save Exit ESC Exit EIST Enabled Turbo Mode Enabled Hyper threading Enabled VT d Enabled Active Processor Cor es All Intel VMX Virtualizati on Technolog y Enabled Intel Trusted Execution...

Page 32: ...ized Defaults F4 Save Exit ESC Exit SATA Controller s Enabled SATA Mode Selection AHCI Serial ATA Port 1 Empty Port 1 Enabled Serial ATA Port 2 Empty Port 2 Enabled M 2 SATA Port 1 M 2 SATA M3B 32 0GB...

Page 33: ...Sel ect Change Opt F1 General H elp F2 Previous Val ues F3 Optimized Defaults F4 Save Exit ESC Exit USB Devices 1 Keyboard 1 Mouse 1 Point LegacyUSB Support Enabled XHCI Hand off Enabled USB Mass Stor...

Page 34: ...rsion 2 18 1263 Copyright C 2017 American Megatrends Inc AMT BIOS Features Options Disabled Enabled Unconfigure ME Options Disabled Enabled Table 12 Advanced Menu Trusted Computing BIOS SETUP UTILITY...

Page 35: ...d v a n c e d P o w e r B o o t S e c u r i t y S a ve E xi t Network Stack Disabled Select Screen Select Item Enter Sel ect Change Opt F1 General H elp F2 Previous Val ues F3 Optimized Defaults F4 Sa...

Page 36: ...Sel ect Change Opt F1 General H elp F2 Previous Val ues F3 Optimized Defaults F4 Save Exit ESC Exit User Configuration Disabled DI_1 1 DI_2 1 DI_3 1 DI_4 1 DO_1 0 DO_2 0 DO_3 0 DO_4 0 Version 2 18 126...

Page 37: ...i t PC Health Status Select Screen Select Item Enter Sel ect Change Opt F1 General H elp F2 Previous Val ues F3 Optimized Defaults F4 Save Exit ESC Exit CPU Temperature 46 C Memor yTemperature 46 C Sy...

Page 38: ...F4 Save Exit ESC Exit Blink LED 0 UEFI Driver Intel PRO 1000 7 4 25 PCI E Adapter PBA 200500 000 Device Name Intel I210 Gigabit Networ kConnection Chip Type Intel i 210 PCI Device ID 1533 PCI Address...

Page 39: ...F3 Optimized Defaults F4 Save Exit ESC Exit NIC Configuration Blink LEDs 0 PORT CONFIGURATION INFORMATION UEFI Driver Intel Gigabit 0 0 16 Adapter PBA FFFFFF OFF Chip Type Intel PCH SPT PCI Device ID...

Page 40: ...led Resume Event Control Resume By LAN D evice Disabled Resume By PCI E Device Disabled Resume By Ring Device Disabled Resume By RTC Alarm Disabled WatchD og Timer Configuration Version 2 18 1263 Copy...

Page 41: ...ous Val ues F3 Optimized Defaults F4 Save Exit ESC Exit Full Screen LOGO Display Disabled Setup Pr ompt Timeout 1 Bootup NumLock State On CSM Support Enabled Boot Option Filter UEFI and Legacy Boot Op...

Page 42: ...r when entering Setup If ON LY the User s password is set then this is a power on password and must be entered to boot or enter Setup In Setup the User will have Admi nistrator rights The password l e...

Page 43: ...o o t S e c u r i t y S a v e E x i t Save C hanges and R eset Discard Changes and Reset Save Opti ons Save C hanges Discard Changes Restore Defaults Select Screen Select Item Enter Sel ect Change Opt...

Page 44: ...he BIOS asks for a confirmation before exiting Discard Changes Discards changes done so far to any of the setup values This option allows you to discard the selections you made and restore the previou...

Page 45: ...ll an operating system and the necessary drivers to operate it After you have finished assembling your system and connected the appropriate power source power it up using the power supply and install...

Reviews: