background image

Chapter 3 

29 

OPC-1850 User’s Manual 


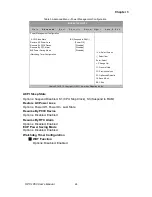
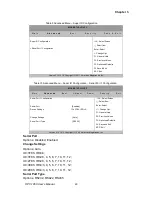
Table 9 Advanced Menu – Super IO Configuration


BIOS SETUP UTILITY 

M a i n


A d v a n c e d

       B o o t        S e c u r i t y         S a v e   &   E x i t 


Super IO Configuration   

   
  >Serial Port 1 Configuration   


 Select Screen 

↑↓ Select Item


Enter: Select   

+- Change Opt.   

F1: General Help 

F2: Previous Values   

F3: Optimized Defaults   

F4 Save & Exit   

ESC Exit 

Version 2.14.1219. Copyright (C) 2011, American Megatrends, Inc. 


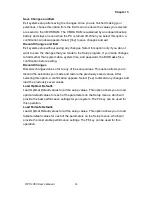
Table 10 Advanced Menu – Super IO Configuration – Serial Port 1 Configuration 

BIOS SETUP UTILITY 

M a i n


A d v a n c e d

      B o o t           C h i p s e t      P o w e r           S e c u r i t y           E x i t 

  Serial Port 1 Configuration   


  Serial Port                                   [Enabled]  

  Device Settings                              IO=3F8h ; IRQ=4;   


  Change Settings                              [Auto]  

  Serial Port 1 Type                             [RS232]  




: Select Screen 

↑↓

: Select Item 

Enter: Select   

+/-: Change Opt.   

F1: General Help   

F2: Previous Values   

F3: Optimized Defaults   

F4: Save and Exit   

ESC: Exit   

Version 2.14.1219. Copyright (C) 2011 American Megatrends, Inc.   

Serial Port   

Options: Disabled, Enabled   

Change Settings   

Options: Auto,   

IO=3F8h; IRQ=4;   

IO=3F8h; IRQ=3, 4, 5, 6, 7, 10, 11, 12;   

IO=2F8h; IRQ=3, 4, 5, 6, 7, 10, 11, 12;   

IO=3E8h; IRQ=3, 4, 5, 6, 7, 10, 11, 12;   

IO=2E8h; IRQ=3, 4, 5, 6, 7, 10, 11, 12;   

Serial Port Type   

Options: RS232, RS422, RS485


Summary of Contents for OPC-1850

Page 1: ...I OPC 1850 User s Manual OPC 1850 Fanless Open Frame Panel PC with Dual Core Intel Atom Processor D2550 User s Guide ...

Page 2: ...ts of others Quanmax is a registered trademark of Quanmax All trademarks registered trademarks and trade names used in this user s guide are the property of their respective owners All rights reserved This user s guide contains information proprietary to Quanmax Customers may reprint and use this user s guide in other publications Customers may alter this user s guide and publish it only after the...

Page 3: ... How to Use This Guide 8 Unpacking 8 Regulatory Compliance Statements 8 Warranty Policy 9 Maintaining Your Computer 10 Chapter 1 Introduction 13 Overview 13 Product Specifications 14 System tour 15 Mechanical Dimensions 17 Chapter 2 Getting Started 18 Setting up your PC 18 Chapter 3 AMI BIOS Setup 22 Overview 22 Main Menu 23 Advanced Menu 24 Boot Menu 31 Security Menu 32 Save Exit Menu 32 Chapter ...

Page 4: ...n Menu 23 Table 3 Advanced Menu 24 Table 4 Advanced Menu Display Configuration 25 Table 5 Advanced Menu Power Management Configuration 26 Table 6 Advanced Menu CPU Advanced Configuration 27 Table 7 Advanced Menu SATA Configuration 28 Table 8 Advanced Menu USB Configuration 28 Table 9 Advanced Menu Super IO Configuration 29 Table 10 Advanced Menu Super IO Configuration Serial Port 1 Configuration 2...

Page 5: ...lation instructions in this user s guide for precautions and procedures If you have any questions please contact Quanmax Post Sales Technical Support Access can only be gained by service persons or by users who have been instructed about the reasons for the restrictions applied to the location and about any precautions that shall be taken and access is through the use of a tool or lock and key or ...

Page 6: ... to avoid bending any connector pins Also before connecting a cable make sure both connectors are correctly oriented and aligned CAUTION Do not attempt to service the system yourself except as explained in this user s guide Follow installation and troubleshooting instructions closely Preventing Electrostatic Discharge Static electricity can harm system boards Perform service at an ESD workstation ...

Page 7: ...dle or store system boards near strong electrostatic electromagnetic magnetic or radioactive fields Instructions for Lithium Battery WARNING Danger of explosion when battery is replaced with incorrect type Only replace with the same or equivalent type recommended by the manufacturer Do not dispose of lithium batteries in domestic waste Dispose of the battery according to the local regulations deal...

Page 8: ...amage If there is damage notify Quanmax customer service immediately Refer to Warranty Policy for the return procedure Regulatory Compliance Statements This section provides the FCC compliance statement for Class A devices FCC Compliance Statement This equipment has been tested and found to comply with limits for a Class A digital device pursuant to Part 15 of the FCC rules These limits are design...

Page 9: ...d Warranty Quanmax Inc s detailed Limited Warranty policy can be found under Support at www quanmax com Please consult your distributor for warranty verification The limited warranty is void if the product has been subjected to alteration neglect misuse or abuse if any repairs have been attempted by anyone other than Quanmax or its authorized agent or if the failure is caused by accident acts of G...

Page 10: ... in compliance with this Limited Warranty Return Policy will not be accepted by Quanmax Limitation of Liability In no event shall Quanmax be liable for any defect in hardware software loss or inadequacy of data of any kind or for any direct indirect incidental or consequential damages in connection with or arising out of the performance or use of any product furnished hereunder Quanmax s liability...

Page 11: ...are power loss power spikes and power surges caused by electrical storms which interrupt system operation and or damage system components To protect your system always properly ground power cables and one of the following devices Surge Protector Surge protectors are available in a variety of types and usually provide a level of protection proportional with the cost of the device Surge protectors p...

Page 12: ...nding on the UPS system UPS systems range in price from a few hundred dollars to several thousand dollars with the more expensive unit s allowing you to run larger systems for a longer period of time when AC power is lost UPS systems that provide only 5 minutes of battery power let you conduct an orderly shutdown of the system but are not intended to provide continued operation Surge protectors sh...

Page 13: ...e slot 4x USB 2 0 1x COM port The OPC series provide a compact high performance human machine interface with optimal shock vibration and temperature resistance for tough industrial demands Checklist OPC 1850 Power Adapter Power Cord Driver CD Quick installation Guide Wireless LAN optional Features 18 5 LCD Display with 1366x768 resolution Intel Atom Processor D2550 Intel NM10 Express chipset Intel...

Page 14: ...HDMI 1x Display Port 1x VGA LAN 2x Gigabit Ethernet Realtek RTL8111E PXE WOL supported Audio Realtek ALC662 HD Codec w 2W Audio Amplifier Mic In Line In Line Out Supported Storage 1x 2 5 SATA HDD or SSD space USB 4x USB 2 0 COM 1x COM port with RS 232 422 485 selection supported Expansion slot 1x Mini PCIe slot SIM Card socket supported Hardware Monitor Operating voltage CPU temperature Watchdog T...

Page 15: ...disk drives USB allows many devices to run simultaneously on a single computer with some peripheral acting as additional plug in sites or hubs Ethernet The eight pin RJ 45 LAN port supports a standard Ethernet cable for connection to a local network DC Jack The supplied power adapter converts AC power to DC for use with this jack Power supplied through this jack supplies power to the PC To prevent...

Page 16: ...Sub 9 pin connector for RS 232 422 485 connection Line Out The stereo headphone jack is used to connect the system s audio out signal to amplified speakers or headphones MIC IN The microphone jack is designed to connect the microphone used for video conferencing voice narrations or simple audio recordings Line IN The Line in jack is designed to take input from a higher powered sound source Power B...

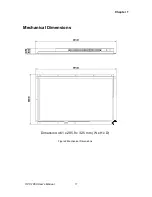
Page 17: ...Chapter 1 17 OPC 1850 User s Manual Mechanical Dimensions Dimension 461 x 285 8 x 32 5 mm W x H x D Figure 2 Mechanical Dimensions ...

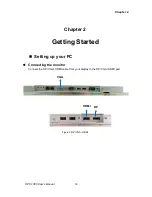
Page 18: ...pter 2 18 OPC 1850 User s Manual Chapter 2 Getting Started Setting up your PC Connecting the monitor Connect the DP VGA HDMI cable from your display to the DP VGA HDMI port Figure 3 DP VGA HDMI VGA DP HDMI ...

Page 19: ...r computer Figure 4 Connecting USB mouse keyboard NOTE Using a third party USB mouse or keyboard may require software drivers Check the manufacturer s website for the latest software drivers Connecting to a network device Connect one end of a network cable to the LAN port on the system rear panel and the other end to a hub or switch Figure 5 RJ45 connector USB USB RJ45 ...

Page 20: ... pin definition COM RS 232 422 485 Port DB 9 Pin RS 232 RS 422 Half Duplex RS 485 Full Duplex RS 485 1 DCD TX DATA TX 2 RXD RX NA RX 3 TXD TX DATA TX 4 DTR RX NA RX 5 GND GND GND GND 6 DSR NA NA NA 7 RTS NA NA NA 8 CTS NA NA NA 9 RI NA NA NA Figure 6 COM port COM ...

Page 21: ... system 1 Connect the power adapter cable to the DC jack DC IN of the OPC 1850 2 Connect the power cable to the power adapter 3 Connect the power cable to a power outlet 4 Press the power button to turn on the system Figure 7 Turning on the system Power Button ...

Page 22: ...ase contact Quanmax AMI s ROM BIOS provides a built in Setup program which allows the user to modify the basic system configuration and hardware parameters The modified data will be stored in a battery backed CMOS so that data will be retained even when the power is turned off In general the information saved in the CMOS RAM will not need to be changed unless there is a configuration change in the...

Page 23: ...gate between menu screens Table 2 BIOS Main Menu BIOS SETUP UTILITY M a i n A d v a n c e d B o o t S e c u r i t y S a v e E x i t Product Information Select Screen Select Item Enter Select Change Opt F1 General Help F2 Previous Values F3 Optimized Defaults F4 Save Exit ESC Exit Product Name OPC 1850 BIOS Version 0 07 BIOS Build Date 02 10 2012 CPU Information Intel Atom CPU D2550 1 86GHz Microco...

Page 24: ... LAN1 Boot Disabled Onboard LAN2 Controller Enabled Onboard LAN2 Boot Disabled Audio Controller Enabled Display Configuration Power Management Configuration CPU Advanced Configuration SATA Configuration USB Configuration Super IO Configuration H W Monitor Version 2 14 1219 Copyright C 2011 American Megatrends Inc Onboard LAN 1 Controller Options Disabled Enabled Onboard LAN 1 Boot Options Disabled...

Page 25: ...ious Values F3 Optimized Defaults F4 Save Exit ESC Exit Fixed Graphics Memory Size 128 MB IGFX Boot Type VBIOS Default Active LFP Int LVDS LCD Panel Color 24 Bit LCD Panel Type 1366X768 24Bit 1CH LVDS Backlight Control Voltage 2 5V Version 2 14 1219 Copyright C 2011 American Megatrends Inc Fixed Graphics Memory Size Options 128MB 256MB IGFX Boot Type Options VBIOS Default CRT DP HDMI LVDS Backligh...

Page 26: ...3 Suspend to RAM Restore AC Power Loss Power Off Resume By PCIE Device Disabled Resume By RTC Alarm Disabled EUP Power Saving Mode Disabled Watchdog Timer Configuration Version 2 14 1219 Copyright C 2011 American Megatrends Inc ACPI Sleep State Options Suspend Disabled S1 CPU Stop Clock S3 Suspend to RAM Restore AC Power Loss Options Power Off Power On Last State Resume By PCIE Device Options Disa...

Page 27: ...tem Enter Select Change Opt F1 General Help F2 Previous Values F3 Optimized Defaults F4 Save Exit ESC Exit Hyper Treading Enabled Execute Disable Bit Enabled Limit CPUID Maximum Disabled EIST Enabled Version 2 14 1219 Copyright C 2011 American Megatrends Inc Hyper Treading Options Disabled Enabled Execute Disable Bit Options Disabled Enabled Limit CPUID Maximum Options Disabled Enabled EIST Option...

Page 28: ...re SATA as Options IDE AHCI Table 8 Advanced Menu USB Configuration BIOS SETUP UTILITY M a i n A d v a n c e d B o o t S e c u r i t y S a v e E x i t USB Configuration Select Screen Select Item Enter Select Change Opt F1 General Help F2 Previous Values F3 Optimized Defaults F4 Save Exit ESC Exit USB Devices 1 Drive 1 Keyboard 1 Mouse Legacy USB Support Enabled EHCI Hand off Disabled Mass Storage ...

Page 29: ...iguration BIOS SETUP UTILITY M a i n Ad v a n c e d B o o t C h i ps e t P o w e r S e c u r i t y E x i t Serial Port 1 Configuration Serial Port Enabled Device Settings IO 3F8h IRQ 4 Change Settings Auto Serial Port 1 Type RS232 Select Screen Select Item Enter Select Change Opt F1 General Help F2 Previous Values F3 Optimized Defaults F4 Save and Exit ESC Exit Version 2 14 1219 Copyright C 2011 A...

Page 30: ... Select Change Opt F1 General Help F2 Previous Values F3 Optimized Defaults F4 Save Exit ESC Exit CPU Warning Temperature Disabled CPU Temperature 41 C SYS Temperature 36 C 3 3V 3 344 V VCORE 1 192 V VGFX 1 008 V 1 05V 1 064 V 1 5V 1 517V 5VDUAL 5 120V VIN 12 144 V 3 3VSB 3 360 V Version 2 14 1219 Copyright C 2011 American Megatrends Inc CPU Warning Temperature Options Disabled 80 ºC 85 ºC 90 ºC 9...

Page 31: ...isplay Disabled Setup Prompt Timeout 1 Bootup NumLock State On Boot Option Priorities Boot Option 1 UEFI SanDisk Boot Option 2 SATA PM TOSHIBA Hard Drive BBS Priorities Version 2 14 1219 Copyright C 2011 American Megatrends Inc Full Screen LOGO Display Options Disabled Enabled Bootup Numlock State Options On Off Boot Option 1 Options UEFI SATA PM Disabled Boot Option 2 Options UEFI SATA PM Disable...

Page 32: ... the following range Minimum Length Maximum length Administrator Password User Password Select Screen Select Item Enter Select Change Opt F1 General Help F2 Previous Values F3 Optimized Defaults F4 Save Exit ESC Exit Version 2 14 1219 Copyright C 2011 American Megatrends Inc Save Exit Menu Table 14 Save Exit Menu BIOS SETUP UTILITY M a i n A d v a n c e d B o o t S e c u r i t y S a v e E x i t Sa...

Page 33: ...OS asks for a confirmation before exiting Discard Changes Discards changes done so far to any of the setup values This option allows you to discard the selections you made and restore the previously saved values After selecting this option a confirmation appears Select Yes to discard any changes and load the previously saved values Load Optimal Defaults Load Optimal Default values for all the setu...

Page 34: ...m and the necessary drivers to operate it After you have finished assembling your system and connected the appropriate power source power it up using the power supply and install the desired operating system You can download the drivers for the OPC 1850 from the Quanmax website at www quanmax com and install as instructed there For other operating systems please contact Quanmax ...

Reviews: