

SAFETY PRECAUTIONS
Friendly to the environment this product does not use any chemicals or pesticides, is quiet running and efficient.
OPERATING INSTRUCTIONS
For optimum operation avoid setting up the unit near any other strong light source or draughty
area.
Connect the plug to a suitable electrical socket.
Switch the unit on.
MAINTENANCE
Always disconnect the unit from the power source before cleaning or emptying the trap.
The insect trap can be removed, emptied and washed with water.
Always use the proper parts supplied with the unit.
The UV lamp has approximately a six month life, after which time it may need to be replaced. To
replace the bulb:
※
Unscrew the four screws holding the basket underneath the unit and gently remove. Please note that this
section is connect to the fan – care must be taken not to break the wires.
※
Unscrew the single screw in the clamp holding the bulb in place.
※
Remove the used bulb and replace with new bulb.
※
Re-screw the clamp in place.
※
Replace the basket and re-screw the four holding screws into place.
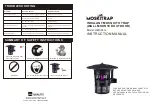
HOW IT WORKS
This Mosquito trap uses a UV Lamp, which can produce 360-400nm light to attract insects. The mosquito or insect
is attracted to the light and enters the unit. The fan then sucks the mosquito/insect down into the trap when they
quickly expire by a “drying out” method.
Rated voltage:220-240V~ Rated power:15W
Rated frequency:50/60Hz Power factor:0.55
2
Tube type:56V/7W Effective area:300M
Pothook
Fan
UV lamp
Base
Air
inlet
Rain cover
TiO on the face of inside
2
Funnel holder
Mosquito storage box
Wall mounted
※
Prepare the tools such as electrical drill, Philip's head screw, marker etc.
※
Point out the location for installation, make sure there is electrical socket available around. Put the fixture
parts to the wall, use marker to mark down the 4 holes which need to be drill.
※
Drill the hole about 35mm in depth, and then put setscrew into the holes.
※
Reference the above diagram, screw to fix the appliance on the wall.
※
Make sure the appliance is well fixed.
※
Plug in and the appliance will start running.
68mm
2
9
m
m
USE
METHOD
PLEASE READ THE FOLLOWING SAFETY INSTRUCTIONS CAREFULLY TO AVOID THE RISK OF ELECTRIC
SHOCK, SHORT CIRCUIT, FIRE HAZARD AND DAMAGE TO THE UNIT
1.Keep out of reach of children. Children or any person with visual, mental or physical impairment should only
use this unit under the supervision of an adult responsible for their safety.
2.Do not tamper, modify or attempt to repair the plug, cord or unit. Repairs should only be carried out by a
qualified electrician or service technician.
3.Ensure that the unit is plugged into an electrical outlet of the correct voltage. The unit voltage is 220-240V~
50/60Hz
4
.
Avoid prolonged eye contact with the light.
5
.
Keep away from children. Children should be closely supervised if they are in the vicinity of the appliance when
it is operating.
6
.
Do not insert fingers or foreign objects into the appliance at any time.
7
.
Always disconnect from the electrical supply before emptying the insect container or cleaning the unit with a
soft dry cloth.
8
.
Keep away from all sources of moisture. Do not operate the unit near any water source.Do not expose the unit
to moisture or liquid at any time.
9.If the external flexible cable or cord of this luminaire is damaged, it shall be exclusively replaced by the manufacturer
or his service agent or a similar qualified person in order to avoid a hazard.
10.
This appliances not intended for use by persons(including children) with reduce physical,sensory
or mental capabilities,of lack of experience and knowledge,unless they have beengiven supervision
or instruction concerning use of the appliance by a person responsible for their safety.
Photo
sensor


