


Instruction Manual
Important
- Please read these instructions fully before starting assembly
These instructions contain important information that will help you get the best from
your mower, ensuring it is assembled correctly and safely.
If you need help or have damaged or missing parts, call the Customer Helpline
on
0845 077 8888
.
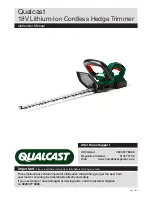
Qualcast
18V Lithium-Ion Cordless Hedge Trimmer
Aug 2012
UK/Ireland
0845 077 8888
Republic of Ireland
0124 77708
Web www.homebasespares.co.uk
After Sales Support