background image

ORIGINAL INSTRUCTIONS

250W

Electric Grass Trimmer

HELPLINE NO 03448010979

other material and the line will become 
jammed as a result. To clear the jam, follow 
the steps listed below. 
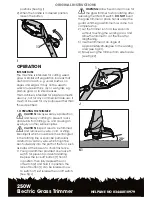
1)  Unplug the trimmer.
2)  Press the release tabs (c) on the spool 

head, as shown in Fig P and remove the 
spool head by pulling it straight off.

3)  Remove the spool of nylon line out of the 

spool head and clear any broken line or 
cutting debris from the spool area. (If you 
plan to replace the spool, this is the place 
to do so, otherwise, move on.) (See Fig Q)

5

a

b

4

6

13

1

2

20

o

x

line 

wrap 

ring

c

eyelet

push

pull

A

B

C1

C2

D

E

F

G

H

I

J

K1

K2

L

M

N

O

P

Q

R

S

T

Q

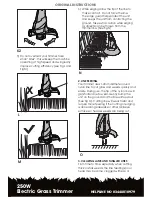
4)  Unwrap about one foot (30cm) of line 

to ensure that it’s undamaged. If it is OK 
rewind it and insert the line end through 
the eyelet in the spool head as show in Fig 
R, Insert the other line through the other 
eyelet. Ensure the springs are in place 
under the spool. Pull the line through the 
hole to maintain tension while placing the 
spool down into the spool head as show in 
Fig R.

5)  Press the spool down GENTLY until you feel 

it drop into place. Take care to keep the 
lines from becoming trapped under the 
spool.

6)  Snap the spool head cover back on and 

at the same time pull lines and be sure 
that they are released from spool rail 
notches. If not, the function of bumping- 
feed can not operate. Hold the tool in the 
trimming position and turn the tool on. In 
few sends or less, you’ll hear the nylon line 
being cut to proper length. If not, bump 
the feed head gently on the ground to 
initiate a fresh length of line.

5

a

b

4

6

13

1

2

20

o

x

line 

wrap 

ring

c

eyelet

push

pull

A

B

C1

C2

D

E

F

G

H

I

J

K1

K2

L

M

N

O

P

Q

R

S

T

Q

4. SPOOL OR LINE REPLACEMENT

(Use 1.4mm diameter round line only) 

1)  Reform steps 3.1 and 3.2 above.
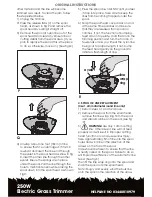
2)  Remove the spool from the spool head, 

remove the line wrap ring from the spool 

and discard all line on the spool.(see fig 

.R)

3) 

WARNING!

 Use only 1.4mm cutting 

line. Other sizes of line will not feed 

properly and will result in improper cutting 
head function or can cause serious injury.  
Take approximately 5m of line into the spool 
holes and wind line in the direction of the 
arrows on the top of the spool.
Care should be taken to ensure that the line 
is neatly coiled on the spool. Failure to do so 

will impair the efficiency of the automatic line 

feed. (See Fig S)

Then fit the line wrap ring onto the spool and 

snap the spool onto the spool head.
Note: Snugly and evenly wind the bulk line 
onto the spool in the direction of the arrow 

Summary of Contents for 1718638

Page 1: ...OPERATING INSTRUCTIONS 250W Electric Grass Trimmer HELPLINE NO 03448010979...

Page 2: ...ne with damaged guards or without the guards in place g Keep hands and feet away from the cutting means at all times and especially when switching on the motor h Take care against injury from any devi...

Page 3: ...ns plug if the cord is damaged or entangled Do not expose to moisture This product has been marked with a symbol relating to removing electric and electronic waste This means that this product shall n...

Page 4: ...ORIGINAL INSTRUCTIONS 250W Electric Grass Trimmer HELPLINE NO 03448010979 11 12 1 4 3 6 5 2 10 8 9 7...

Page 5: ...03448010979 1 LOCK OFF BUTTON 2 ON OFF SWITCH 3 AUXILIARY HANDLE 4 UPPER TUBE 5 LOCKING KNOB SEE FIG C2 6 LOWER TUBE 7 MOTOR HOUSING 8 FEED BUMP HEAD 9 CUTTING LINE 10 SAFETY GUARD 11 CABLE STRAIN REL...

Page 6: ...1 Position motor head axle as shown in fig D with screw fixing hole at the top centre remove pre fitted screw a 2 Position guard with inner side ie moulding facing you as shown in fig E 3 Lower the gu...

Page 7: ...d at the handle b 13 1 2 push pull F G H I 4 ADJUSTING THE CUTTING LINE Check the length of the nylon cutting line pull line to inner edge of the guard if the line is very short i e more than 50mm awa...

Page 8: ...ring like objects which could become entangled in the rotating line or spool Be particularly careful to avoid any wire which might be bent outwardly into the path of the tool such as barbs at the base...

Page 9: ...ile edging as objects can be thrown from the trimmer line See fig N c M N O P 2 LINE FEEDING Your trimmer uses 1 4mm diameter round nylon line to cut grass and weeds quickly and easily During use the...

Page 10: ...e spool 6 Snap the spool head cover back on and at the same time pull lines and be sure that they are released from spool rail notches If not the function of bumping feed can not operate Hold the tool...

Page 11: ...al lubrication or maintenance There are no user serviceable parts in your grass trimmer Never use water or chemical cleaners to clean your grass trimmer Wipe clean with a dry cloth Always store your g...

Page 12: ...ns on how the tool is used How the tool is used and the materials being cut or drilled The tool being in good condition and well maintained The use the correct accessory for the tool and ensuring it i...

Page 13: ...d where appropriate If the tool is to be used regularly then invest in anti vibration accessories Avoid using tools in temperatures of 100 C or less Plan your work schedule to spread any high vibratio...

Page 14: ...4 Fuse faulty 1 1 Check power 1 2 Check other socket replace 1 3 Check cord replace 1 4 Replace fuse Grass trimmer operates intermittently 2 1 Extension cord damaged 2 2 Internal wiring damaged 2 1 C...

Page 15: ...ions below IMPORTANT The wires in the mains lead are colored in accordance with the following code BLUE NEUTRAL Brown Live As the colors of the wires in the mains lead of this appliance may not corres...

Page 16: ......

Reviews: