background image

6

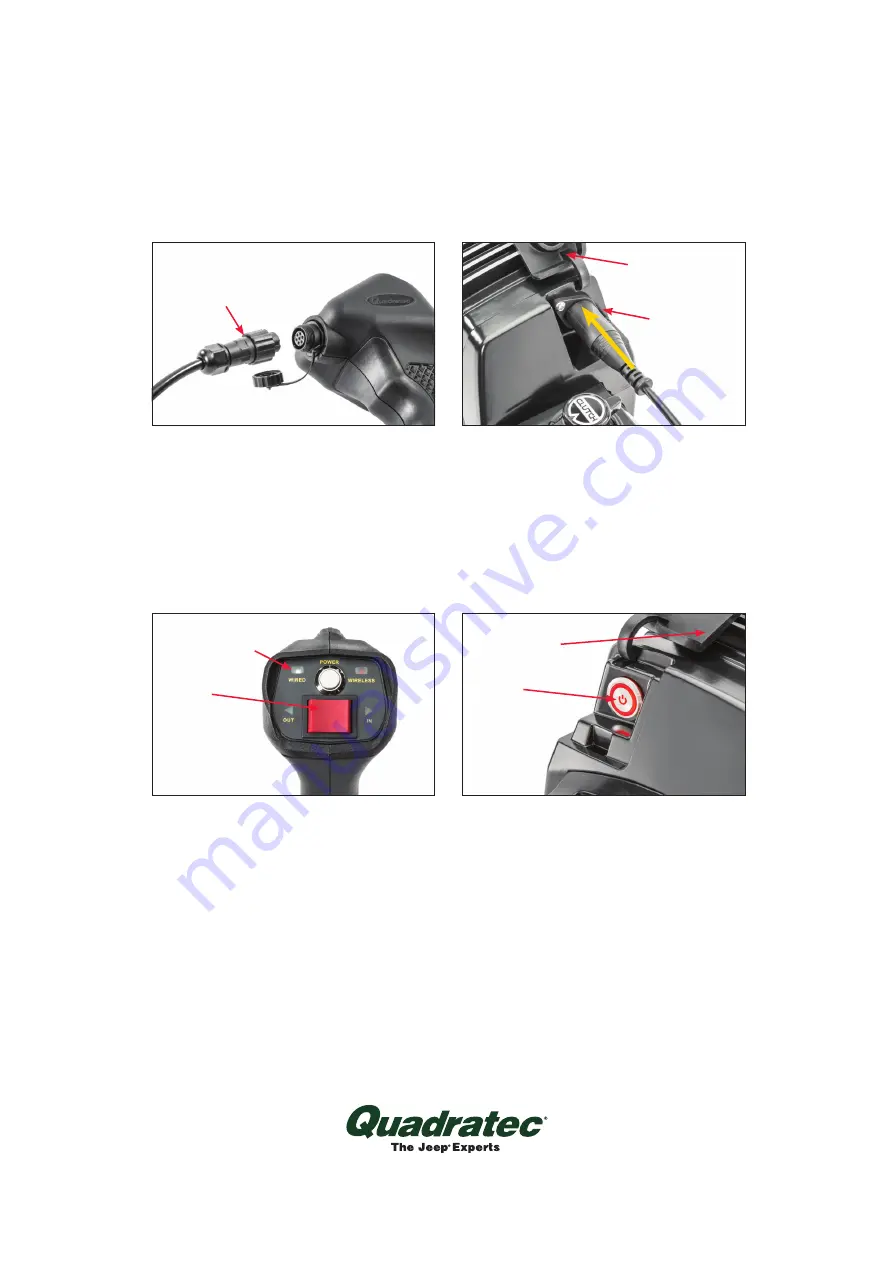
For Wired Operation: 

There is no need to turn on the winch 
with the Power Button (the button must 
be out for wired operation). Unscrew the 
remote plug cap. Plug the 12’ long remote 
cord into the handheld remote controller. 
Make sure that you align the cord with 
the three indexing notches in the remote 
handle. Thread the securing collar onto

the remote handle to ensure a proper  
connection. Next, loosen the Rubber
Plug Cover on the right hand side of the 
winch. Plug the “D” shaped end of the 
Remote Cord into the corresponding 
receptacle on the right hand side of the 
winch. Be sure that the plug is fully 
engaged onto the winch as shown. 

Your winch will automatically power up 
and be fully functional once the controller 
is connected to the winch. The amber 
LED Winch Drum light will illuminate 
along with the blue “wired” indicator 
light on the remote. With the winch 
in Free Spool, test both the OUT and 
IN functions of the winch using the red 
rocker switch on the remote with a short 
press of the switch. The winch will stay 
powered up as long as the remote is 
plugged in. The winch will automatically 
power down as soon as the cord is 
unplugged.

In the event of an emergency, the winch 
Power Button can be pressed to stop 
winch rotation. It will stay depressed and 
the drum light will blink indicating that 
the winch is in safe mode and will not 
rotate. Press the Power Button again to 
restart, wired operations (it will remain 
out).

For Wireless Operation:  

First, loosen the rubber Power Button 
Cover on the left-hand side of the winch 
to expose the Power Button.  Press 
the Power Button and it will begin to 
blink.  While the Winch Power Button 

Remote Controller Setup

Remote 

Handle

Plug cap

Securing Collar

Cord

Rubber remote 

plug cover

Red 

Rocker 

Switch

Rubber Power 

Button Cover

Winch Power 

Button

WIRED
 MODE

"D" Shaped 

Remote Plug 

End

Blue "Wired" 

Indicator Light

WIRELESS
 MODE

Summary of Contents for Q-Performance Stealth Series

Page 1: ...31 92122 4041 REQUIRED TOOLS Safety Glasses Safety Gloves Torque Wrench 13 MM Wrench 15 MM Socket 16 MM Wrench 2 5 MM Hex Allen Key 4 MM Hex Allen Key 1 Phillips Head Screwdriver READ ALL SAFETY MESSA...

Page 2: ...HAZARDOUS SITUATION WHICH IF NOT AVOIDED COULD RESULT IN MINOR OR MODERATE INJURY YOU CAN BE MODERATELY HURT AND ALSO MAY SUFFER PROPERTY DAMAGE IF YOU DO NOT FOLLOW INSTRUCTIONS CAREFUL ATTENTION IS...

Page 3: ...N Motor Solenoid Ground Wires FIRE ELECTRICAL SPARK CHEMICAL BURN HAZARDS CONNECTING WINCH TO BATTERY AND WINCH OPERATION MAY CAUSE ELECTRICAL ARCS NEVER INSTALL OR USE WINCH WHERE GASOLINE LEAKS VAPO...

Page 4: ...mm allen key at the drum and remove the line Thread the winch line through the fairlead and re attach the line to the winch drum You now need to pre stretch winch line to ensure even stretching To str...

Page 5: ...perly Your winch should add greater utility and enjoyment to your off road adventures Keep in mind however the weight of your vehicle and the forces required to move it create certain hazards Self rec...

Page 6: ...on the remote With the winch in Free Spool test both the OUT and IN functions of the winch using the red rocker switch on the remote with a short press of the switch The winch will stay powered up as...

Page 7: ...lf is designed to automatically stop receiving commands after 10 minutes of inactivity The winch amber drum light will blink continuously until the winch is turned off The winch will not receive comma...

Page 8: ...three 1 size Phillips head screws that attach the winch controller halves Remote Controller Battery Replacement Carefully remove the old CR123A or CR123 Lithium battery and replace with new Gently ali...

Page 9: ...g Clutch allows operator to manually engage or disengage the spooling drum from the gearset using the clutch lever Winch Clutch Operation Details NEVER ENGAGE OR DISENGAGE CLUTCH IF THE WINCH IS UNDER...

Page 10: ...2 5 mm Allen wrench back out the set screw until the Clutch Handle lifts off but do not remove the handle at this time Rotate the clutch selector to the ENGAGED position You may remove the Clutch Hand...

Page 11: ...th a Battery Friendly low current draw that will get the most winching time from your battery s available charge state A fully charged battery and good connections are essential to the proper operatio...

Page 12: ...67mm x 212mm 3 8 x 82 21 x 6 375 x 10 533 4 mm x 162 mm x 254 mm 85 0 lbs 38 55 kgs 10 x 4 5 254mm x 114 3mm Rated Line Pull Single Line Gear Reduction Ratio Motor Series Wound Drum Size Steel Winch C...

Page 13: ...ounding of thermo relay wire Be sure connections are clean and tight Worn or damaged motor brushes Replace winch motor Vehicle not running Start vehicle keep running during winching Winch Lacks Power...

Page 14: ...ith 650 cold cranking amp rating or greater Battery terminals are corroded Clean battery terminals Solenoids inside the control pack is stuck or damaged Replace Solenoid Module Vehicle not running Sta...

Page 15: ...d Remove and inspect gear carrier assembly Inspect output gear intermediate gear input gear sun gear ring and gear ring output Remove burns with file Winch is not mounted correctly or square on the wi...

Page 16: ...installation damage alteration modification failure to maintain or attempted repair or service by anyone not authorized by Quadratec b normal wear tear cosmetic damage or damage from moisture or wate...

Reviews: