background image

R

Page 18

  September 1, 2008

Isle Royale Wood Stove

250-5763C

BURNING PROCESS

In recent years there has been an increasing concern about 

air quality.  Much of the blame for poor air quality has been 

placed on the burning of wood for home heating. In order 

to improve the situation, we at Quadra-Fire have developed 

cleaner-burning wood stoves that surpass the requirements 

for emissions established by our governing agencies.  These 

wood stoves, like any other appliances, must be properly 

operated in order to insure that they perform the way they 

are designed to perform.  Improper operation can turn most 

any wood stove into a smoldering environmental hazard.

KINDLING or 1st STAGE

It helps to know a little about the actual process of burning in 

order to understand what goes on inside a stove.  The first 

stage of burning is called the kindling stage.  In this stage, the 

wood is heated to a temperature high enough to evaporate 

the moisture which is present in all wood.  The wood will 

reach the boiling point of water (212°F / 100C) and will not 

get any hotter until the water is evaporated.  This process 

takes heat from the coals and tends to cool the stove.  
Fire requires three things to burn: fuel, air and heat.  So, 

if  heat  is  robbed  from  the  stove  during  the  drying  stage, 

the new load of wood has reduced the chances for a good 

clean burn.  For this reason, it is always best to burn dry, 

seasoned firewood.  When the wood isn’t dry, you must open 

the air controls and burn the stove at a high burn setting for 

a longer time to start it burning. The heat generated from the 

fire should be warming your home and establishing the flue 

draft, not evaporating the moisture out of wet, unseasoned 

wood, resulting in wasted heat.

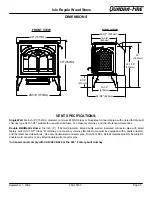
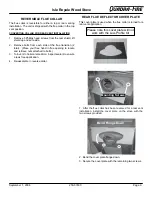
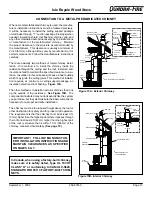
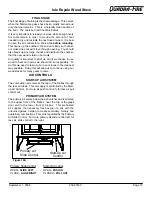
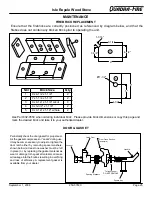
The air control to the right of the stove is called the Start-Up 

Air Control; it is used during the kindling stage of burning.  

It must be closed (pulled out) after the first 5 to 15 minutes. 

Figure 18A

.

2nd STAGE

The next stage of burning, the secondary stage, is the period 

when the wood gives off flammable gases which burn above 

the fuel with bright flames.  During this stage of burning it is 

very important that the flames be maintained and not allowed 

to go out.  This will ensure the cleanest possible fire.  If you 

are  adjusting  your  stove  for  a  low  burn  rate,  you  should 

close down the air to the point where you can still maintain 

some flame.  If the flames tend to go out, the stove is set 

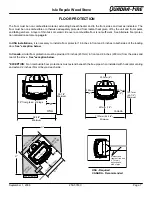
too low for your burning conditions.  The air control slide in 

the center of the stove, beneath the ashcatcher, is the one 

used to adjust the stove for burn rates.  This is called the 

Primary Air Slide Control

.

OPERATING INSTRUCTIONS

IMPORTANT - PLEASE READ BEFORE USING STOVE

Do not over-fire.
Over-firing  may  ignite  creosote  or  will  damage 

the stove and chimney.
To prevent over-firing your stove, DO NOT:
•  Use flammable liquids

•  Overload with wood

•  Burn trash or large amounts of scrap lumber

•  Permit too much air to the fire

WARNING

Fire Risk

Symptoms  of  over-firing  may  include  one  or  more  of  the 

following:
  •  Chimney connector or appliance glowing
  •  Roaring, rumbling noises
  •  Loud cracking or banging sounds
  •  Metal warping
  •  Chimney fire

1. Symptoms of Over-Firing

2. What To Do if Your Stove is Over-Firing

  •  Immediately close the door and air controls to reduce 

air supply to the fire.

  •  If you suspect a chimney fire, call the fire department 

and evacuate your house.

  •  Contact  your  local  chimney  professional  and  have 

your stove and stove pipe inspected for any damage.

  •  Do not use your stove until the chimney professional 

informs you it is safe to do so.

Hearth & Home Technologies WILL NOT warranty stoves 

that exhibit evidence of over-firing.  Evidence of over-firing 

includes, but is not limited to:
  •  Warped air tube
  •  Deteriorated refractory brick retainers
  •  Deteriorated baffle and other interior components

OVER-FIRING YOUR APPLIANCE

Summary of Contents for Isle Royale 823-0170

Page 1: ...ANTY 4 Cool ashes should be disposed of carefully using a metal container 5 Do not burn wet or green wood Store wood in a dry location 6 DO NOT BURN GARBAGE OR FLAMMABLE FLUIDS SUCH AS GASOLINE NAPHTH...

Page 2: ...DEZLESENFANTSETLESV TEMENTSLOINDEL ESPACED SIGN DEL INSTALLATION LECONTACTPEUTCAUSERDESBR LURES LA PEAU GARDEZLESMEUBLESETLESMAT RIAUXCOMBUSTIBLESLOINDEL ESPACED SIGN DEL APPAREIL VOIRL TIQUETTEETLESI...

Page 3: ...ss care replacement 24 Plated Surfaces 24 Brick replacement 25 Door gasket 25 Service Maintenance Log 26 Exploded views 27 Service Part Accessories 28 Warranty 30 31 Contact Information 32 TABLE OF CO...

Page 4: ...to the chimney see page 11 It must be 6 inch 152mm minimum diameter 24 MSG black or blued steel or an approved air insulated double wall venting pipe THIMBLE A manufactured or site constructed device...

Page 5: ...103 HT suitable for use with solid fuels or a masonry chimney and the referenced clearances Double Wall Mobile Home Six inch 6 152mm diameter listed double wall air insulated connector pipe with liste...

Page 6: ...DOUBLE WALL PIPE IN A MASONRY FIREPLACE OR THROUGH THE WALL Six inch 6 152mm diameter listed double wall air insulated connector pipe with UL 103HT listed factory built Class A chimney or a masonry c...

Page 7: ...he loading door See exception below In Canada similar floor protection must be provided 18 inches 457mm in front and 8 inches 203mm from the sides and rear of the stove See exception below EXCEPTION N...

Page 8: ...thickness Converting R to k Divide the inches of thickness by R k inches of thickness R Calculatons Example Floor protection requires k value of 0 84 and 3 4 inch thick Alternative material has a k v...

Page 9: ...hand in flue opening to locate and retrieve nuts attached to bolts 3 Turn vent to horizontal position Inspect sealant to ensure a leak free application 4 Re assemble in reverse order Mounting Screws B...

Page 10: ...two and thus change the amount of draft in the entire system A source of air oxygen is necessary in order for combustion to take place The combustion air enters the firebox below the ash catcher and...

Page 11: ...re Protection Association NFPA Standard 211 It must have at least a 5 8 inch 16mm fire clay liner or a listed chimney liner system See Figure 11B Make sure there are no cracks loose mortar or other si...

Page 12: ...nd combustible wall and 2 the 1 inch 25mm air space around the chimney connector as it passes through the chimney section to the chimney The location of the opening through the wall to the chimney mus...

Page 13: ...gainst the chimney Install the trim collar on the outside of the opening Check to ensure there is a 1 inch 25mm air space between the connector and the chimney section During installation ensure that...

Page 14: ...should fit tightly and be sealed with high temperature furnace cement unless the kit s instructions state otherwise Figure 14A The tight fitting installation aids the proper draw of the chimney Figure...

Page 15: ...you purchase but they demonstrate the basic components necessary for a proper and safe installation The chimney must be the required height above the roof or other obstruction for safety and for prop...

Page 16: ...ected to a 6 inch 152mm factory built chimney conforming to CAN ULC 629M STANDARD FOR FACTORY BUILT CHIMNEYS Floor protection referenced on page 7 must be followed 8 Use silicone to create an effectiv...

Page 17: ...tall the optional blower and the outside air kit complete installation of the outside air kit first 1 Remove 3 Phillips head screws from rear of unit 2 Using the Phillips head screws attach blower to...

Page 18: ...the kindling stage of burning It must be closed pulled out after the first 5 to 15 minutes Figure 18A 2nd STAGE The next stage of burning the secondary stage is the period when the wood gives off flam...

Page 19: ...d do so responsibly To do this we need to learn to burn our stoves in the cleanest way possible Doing this will allow us to continue using our wood stoves for many years to come START UP AIR SYSTEM Th...

Page 20: ...iciency with the lowest emissions follow these operating procedures 1 Regardless of desired heat output when loading stove burn your Quadra Fire with both air controls wide open for 5 to 15 minutes 2...

Page 21: ...ight or rekindle stove with kerosene gasoline or charcoal lighter fluid the results can be fatal 6 Once the kindling is burning quickly add several full length logs 3 inches 76mm or 4 inches 102mm in...

Page 22: ...ve blower off until your stove is hot and a good coalbed is established The blower may be turned on approximately 30 minutes after a good coalbed is established 2 High burn setting The blower may be l...

Page 23: ...chimney in use A chim ney sweep can perform this service It is also recommended that before each heating season the entire system be profes sionally inspected cleaned and repaired if necessary Prior t...

Page 24: ...This air flow washes the glass helping to keep smoke from adher ing to its surface When operated at a low burn rate less air will be flowing over the glass and the smokey relatively cool condition of...

Page 25: ...ailable from your dealer MAINTENANCE Ensure that the firebricks are correctly positioned as referenced by diagram below and that the firebox does not contain any broken brick prior to operating the un...

Page 26: ...R Page 26 September 1 2008 Isle Royale Wood Stove 250 5763C Service Maintenance Log Date of Service Performed By Description of Service...

Page 27: ...Page 27 Isle Royale Wood Stove R September 1 2008 250 5763C 12 8 2 10 7 6 11 3 4 5 13 1 9 14 Exploded Views 18 19 20 16 15 17 Part number list on following page...

Page 28: ...atch 32084 Component Pack Matte Black Includes Owner s Manual Griddle Handle Fiber Handle Warranty Card Touch up Paint MBK 434 5160 PMH 434 5220 Control System Control Rod 31940 Door Hinge Left 434 04...

Page 29: ...e Pin Nickel Button Head Rivet 433 1590 15 Hinge Pin Gold Button Head Rivet Qty 1 72171 Horizontal Flue Kit 834 3790 Knob Air Control 32284 19 Latch Cam Key 430 1151 Leg Matte Black 26404MBK Leg Porce...

Page 30: ...at Exchanger 90 Days X X X X X X All Replacement Parts See Conditions Exclusions and limitations 9 01 08 CONDITIONS EXCLUSIONS LIMITATION OF LIABILITY This warranty applies to the original owner and i...

Page 31: ...the appliance has been over fired or operated in atmospheres contaminated by chlorine fluo rine or other damaging chemicals the appliance is subject to prolonged periods of dampness or condensation o...

Page 32: ...0481 6237588 6296474 6374822 6413079 6439226 6484712 6543698 6550687 6601579 6672860 6688302B2 6715724B2 6729551 6736133 6748940 6748942 D320652 D445174 D462436 Canada 1297749 2195264 2225408 or other...

Reviews: