4
1
3
2
a
2
b
Getting to know your Mailing System
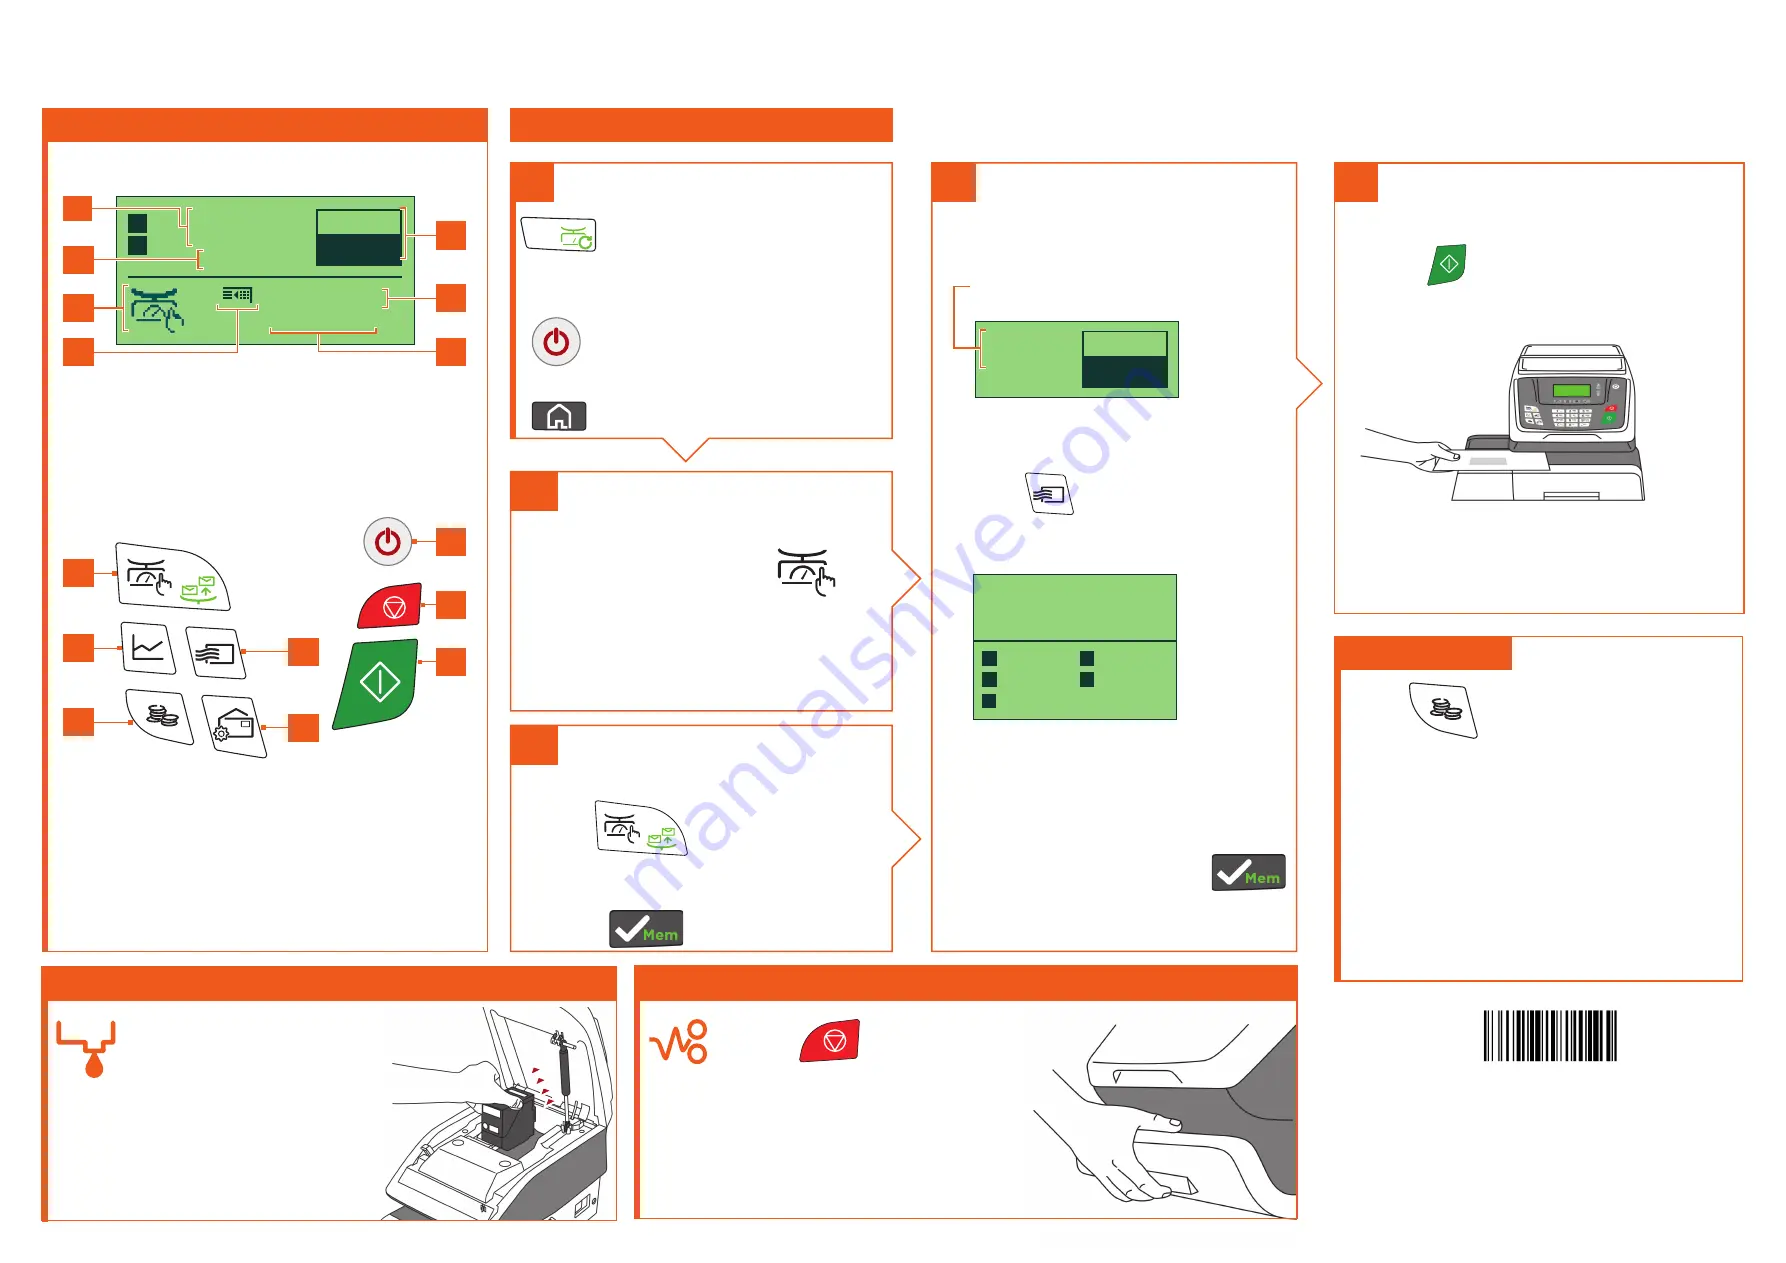
Screen Information
A1
Rate and services
A2
Date printed
A3
Weighing type
A4
Imprint position offset
A5
Postage and weight
A6
Job memory (can contain rate, stamp settings and account)
A7
Current account
Shortcut keys
B1
Short press :
Manual weight entry screen
Long press :
Differential weighing modes
B2
Job memories (rate, stamp settings and account)
B3
Credit management
B4
Rate and services selection
B5
Type of imprint and imprint settings
B6
Short press :
Sleep/wake (amber/green)
Long press :
Soft off
B7
Stops printing
B8
Starts printing
iX-3 Series
Quick Start Guide
When all steps are completed
print the stamp :
1.
Press
to start the motors of
your mailing system.
2.
When the rollers start, insert the
mail into the mailing system from the
left hand side.
1.
On the new ink
cartridge, remove the
protective strips from
the printing heads.
2.
Lift mailing system
cover and follow
instructions printed on
sticker inside.
Changing the ink cartridge
1.
Press
on the key pad
to stop the motor.
2.
Under the base, lift up the
release handle and, using
your other hand, remove
stuck envelope.
If Jamming occurs
To reset the mailing system press :
to return to the home screen.
Select a rate (and services) :
2.
Use the keypad to choose a rate,
service option or advanced rate.
Currently selected rate and
services are indicated at the
top of the screen.
00.00
Can Letter
No options
08/01/2021
0 g
Change/add services:
1.
Press
The Rate selection screen
is displayed.
00.00
Can Letter
No options
0 g
1
Canada
2
Options
4
USA
5
Int’l
7
Weight
3.
When done, briefly press
to confirm your selection and
return to the home screen.
Adding credit
Press
choose
‘Credit’
and follow
the instructions on screen.
Note:
in order to add credit to the
mailing system there must be funds
available in your postage account.
For more specific information on
your mailing system, please visit
www.myquadient.ca
and log in to
your account.
To order consumables for your mailing system please call your dealer
or visit
www.quadient.ca
For more information about your mailing system and to access a range of support and
features, log into your personalised account at
www.myquadient.ca
or register today.
A0140412/A - 01/03/2021
1/2
00.00
T
S
Mem: None
Acct:00000
Can Letter
No options
08/01/2021
0 g
To access your full user guide,
please visit:
To weigh an item...
Put the mail on the platform:
1.
Check that the A3 icon is
2.
Put the envelope on the weighing
platform
or, if you know the weight...
Key the weight in manually:
1.
Press
2.
Enter the weight and briefly
press
C
Short Press :
to clear the
information on the screen
Long Press :
access zero
weighing platform function
Short Press :
to wake the mailing
system up with default settings
Long Press :
soft off state
Quick steps to metering your mail
A1
A2
A3
A4
B6
B7
B8
A7
A6
A5
B4
B5
B1
B2
B3


