background image

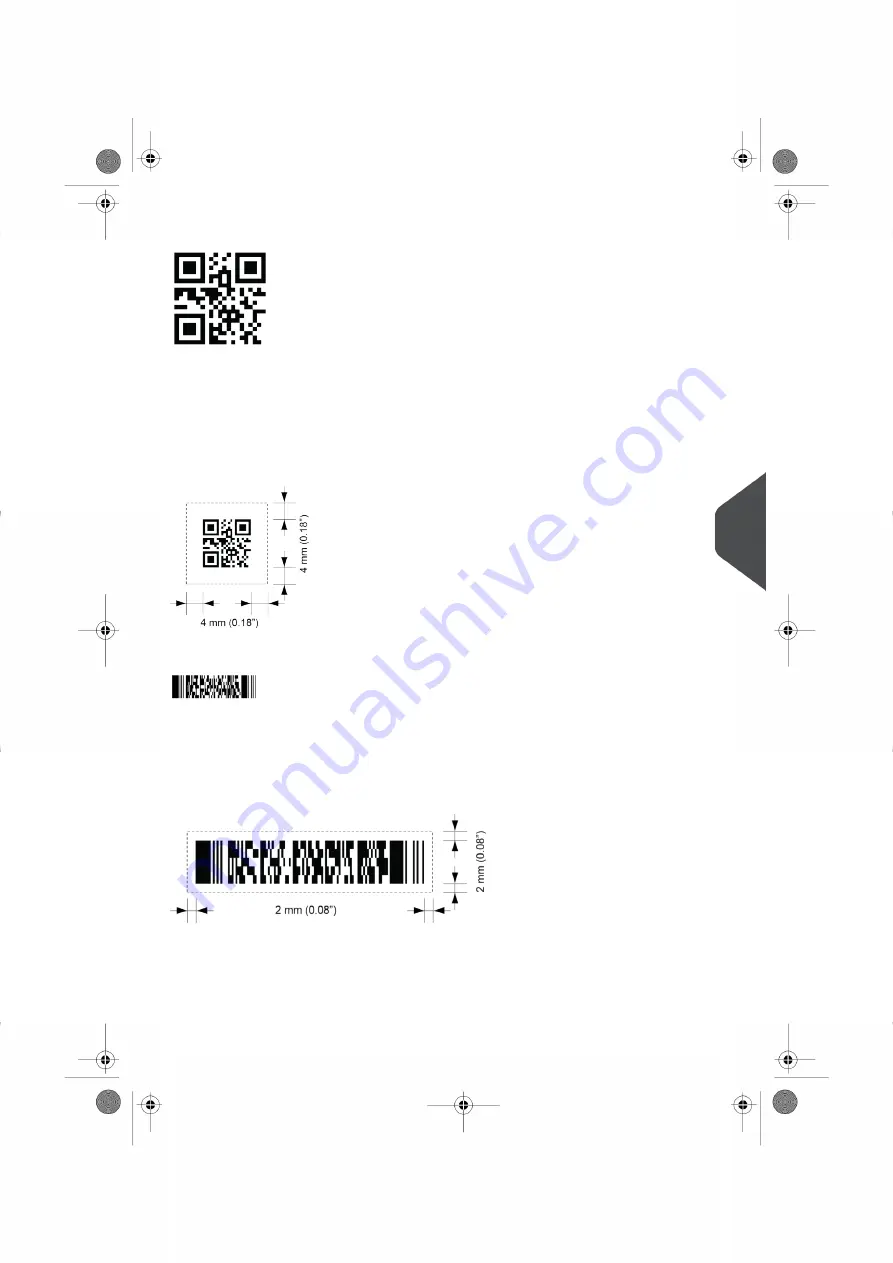
QR

- Minimum cell size 0,30mm (0.012”)
- Maximum cell size 0,50mm (0.020”)
- Label size 30mm (1.18”) square max
- Preferred print quality 600dpi
- Print drift from page to page +/- 2mm (0.08") max
- Colour background: White
- QR can be read in all directions
- Minimum white space 4mm (0.20”), all around.

PDF 417

- Bar width 0,35 mm (0.014”) min
- Smallest element size 0,5 mm (0.020") max
- Preferred print quality 600dpi
- Print drift from page to page +/- 2mm max
- Colour background: White
- Minimum white space 2mm (0.08”), all around.

Printing contrast
The label must be strongly printed in black on white background for maximum contrast.
Other light backgrounds may be acceptable, subject to test.

8

English

103

| Page 103 | Nov-25-2020 04:16 | Reading

Summary of Contents for DS-85i

Page 1: ...erating Controls 9 Control Panel 10 How to Operate the Touch Screen 11 Use a Web Browser 12 What is a Job 13 Job List 14 Job Overview 15 High Capacity Document Feeder HCDF 18 MaxiFeeder 19 VersaFeeder 20 Installation of the Side Exit 20 Catch Tray for Side Exit 21 Installation of the High Capacity Vertical Stacker HCVS 1 22 Automated Insertion Management System AIMS 23 Shut Down the System 23 Work...

Page 2: ...ure 50 Copy a Job 51 Delete a Job 51 Rename a Job 52 Lock a Job 52 Loading the System 54 5 Document Orientation 54 Document Feed Trays 55 Load Envelopes 69 Filling the Sealing Liquid Reservoir 70 Settings menu 72 6 Open the Settings Menu 72 The Settings Menu Supervisor 73 Supervisor Settings Menu 74 Connect the System to the Internet 94 7 Options for Connection 94 Set up a Wired Connection 94 Set ...

Page 3: ...ing Cloth 121 Calibrate Photocells 122 Fault Finding 124 10 Messages 124 Clearing stoppages 127 Operator Troubleshooting 134 Troubleshooting Table 135 Specifications 140 11 Technical Specifications 140 Hopper and Feeder Capacity 141 Configuration Dimensions 141 Document and Insert Specifications 142 Envelope and Document Set Specifications 142 maxiFeeder Specifications 144 High Capacity Vertical S...

Page 4: ... Page 4 TOC Nov 25 2020 04 16 ...

Page 5: ... authorized distributor for availability of this document About this manual Disclaimer This Guide is published without any warranty Improvements and changes to the online Guide necessitated by typographical errors inaccuracies of current information or improvements to programs and or equipment may be made at any time and without notice Such changes will however be incorporated into new editions of...

Page 6: ...cessing your mail SUPERVISOR Indicates that you have to use the supervisor menu to perform the procedure Languages In the EU the user guide must be available in the national language s of the country where the system is delivered Therefore if the User Guide is not available in your country s language s contact your authorized distributor Software The software used for the reading option is based i...

Page 7: ...Guide user instructions describing how to use the system FAQ s option when the system is connected to the internet frequently asked questions are answered here option What can I do here a list with relevant help topics related to the current screen Remote assistance option online remote assistance for helpdesk guidance Call the phone number that is displayed and follow the instructions of the supp...

Page 8: ...de active you can use the Minimize button When you click the active Help button the User Guide is restored 3 To search for topics enter a keyword in the Searchbar and press the Search button To navigate through the User Guide Tap to select Swipe up down to scroll Double tap to zoom Pinch in out to zoom in out See also How to operate the touchscreen 4 Page 4 Nov 25 2020 04 16 How this Help Works 2 ...

Page 9: ...cted to the internet Online Remote Assistance is a tool for help desk guidance The Remote Assistance screen can be entered by tapping on the Remote Assistance button in the Help menu Add the support key supplied by the support assistant and follow the instructions as indicated by the support assistant 2 English 5 Page 5 Nov 25 2020 04 16 How this Help Works ...

Page 10: ...erface The settings of the system type of documents type of envelopes and the type of fold are recorded in so called jobs These jobs can be created by the operator Operator and supervisor You can use the system as operator and as supervisor The supervisor has access to more settings than the operator You can switch from operator to supervisor in every screen When you switch to supervisor you see i...

Page 11: ...System Overview 3 English 7 Page 7 Nov 25 2020 04 16 Meet your Document System ...

Page 12: ... collated and aligned in the collating area Divert area 3 The Divert area automatically throws out incorrect sets of documents In this way the system does not need to stop Correct sets will be transported to the Folder unit Folder unit 4 The Folder unit folds the documents The following fold types are possible see Terminology No fold V fold C fold Z fold Double V fold Inserter 5 After the document...

Page 13: ...or sorting and stacking of documents into the catch tray as well as transporting to a franking mailing machine Envelope Hopper 9 Envelopes that are placed on a stack by the user are fed one by one into the system by the envelope hopper Operating Controls 3 English 9 Page 9 Nov 25 2020 04 16 Meet your Document System ...

Page 14: ...A High Capacity Vertical Stacker B loc cover C unlocking lever for loc D power inlet RS232 connector USB modem E hand grip vertical transport cover F document feed tray G collator arm H Divert area I Folder unit J Display operator panel K handle for manual transport of the envel ope Control Panel On Off B The touch sensitive button in the upper right corner of the display switches the system on or...

Page 15: ...on your screen Never use large amounts of water harsh chemicals abrasive cloths or paper towels to clean the display How to Operate the Touch Screen You can operate the touch screen like a tablet Tap touch and release the screen with your finger Swipe touch the screen hold it and move your finger s left right up or down Tap and hold touch the screen with your finger and hold it for two seconds Pin...

Page 16: ...en to open the Web browser 1 2 You can tap or swipe to navigate through web sites Use the keyboard to type in the navigation bar of the browser or within web sites If you work with a special keyboard for your language you can switch the keyboard back to the English version to type e g a web address see Localisation on page 80 3 Tap the Minimize button to keep the Web Browser active 12 Page 12 Nov ...

Page 17: ... type size Sealing on off Which document feeders should be used how many documents should be fed from each feeder and document height for each feeder Feeder linking on off If BREs or insert cards should be included Address position Fold settings Double feed control settings Reading settings option Exit select settings Stop counter also known as Batch counter defining the number of mail sets that t...

Page 18: ...nu contains the settings menu see Settings menu operator When you are logged in as supervisor the settings menu is extended with advanced settings see Settings menu supervisor on page 74 If you want more information on a job select the job With the Job list button you get back to the home menu See also Working with Jobs on page 24 14 Page 14 Nov 25 2020 04 16 Meet your Document System 3 English ...

Page 19: ...of envelopes that have been processed with this job In this screen you can change the following settings Counter settings see Change the counter settings Job settings see Editing a job Move documents between feeders see Change to an other feeder tray Link feeders see Link feeder trays Start the job or run a test run see Performing a test run If you tap the i button a summary of all information of ...

Page 20: ...ess LAN not connec ted Network connection via Wi Fi is not connected or out of range Wireless LAN connected no internet Network connection via Wi Fi is available network is not connected to internet Check with your network ad ministrator Envelope sealing off Envelopes will not be sealed The symbol shows the cor rect envelope orientation When sealing is off the flap of the envelope is closed but no...

Page 21: ... shows what kind of exit setting has been set Start button Tapping this button runs the job 1x button After tapping this button the system will create an ex ample mail set Stop button Button to stop the system The current mail set will be completed and the system stops being empty and ready for a new set Job list button After tapping this button the job list screen will be shown Save button Save t...

Page 22: ...actory The High Capacity Document Feeder has a capacity for up to 725 sheets The normal document feeder tray has a capacity of 325 sheets For more information on the operation of the HCDF refer to the topic on loading documents for the HCDF on page 65 18 Page 18 Nov 25 2020 04 16 Meet your Document System 3 English ...

Page 23: ...ut also standard documents up to 356 mm 14 length can be processed with it For more information on the operation of the maxiFeeder refer to the topic on loading documents for the maxiFeeder on page 59 A license is required if you want to use the maxiFeeder for documents larger than 156 mm 6 14 3 English 19 Page 19 Nov 25 2020 04 16 Meet your Document System ...

Page 24: ...nstream the feeder module documents feeded by the versaFeeder will not be folded When the versaFeeder is added to the configuration this is shown in the screens at the operator panel For more information on the operation of the versaFeeder refer to the topic on loading documents for the versaFeeder Installation of the Side Exit 20 Page 20 Nov 25 2020 04 16 Meet your Document System 3 English ...

Page 25: ...th the system The side exit can also be used with a catch tray to achieve vertical stacking The catch tray is delivered with the side exit Catch Tray for Side Exit For stacking envelopes leaving from the side exit a catch tray can be mounted You can select the catch tray in the Output settings tab of the job definition see Exit settings 3 English 21 Page 21 Nov 25 2020 04 16 Meet your Document Sys...

Page 26: ...llows on your system Move the stacker as indicated by the arrow 1 2 Lift the stacker with the suspension hooks over the two rods upper and lower and lower it 3 Connect the connector 4 Adjust the side guides with wheel A until a margin of 3 to 5 mm is left between the envelopes and the side guides 5 For small envelopes it can be necessary to remove the extensions B from the envelope support 22 Page...

Page 27: ...ent System it can also report on the performance of the system or systems processing the documents Contact your local distributor to find out if this feature is available for your organization Shut Down the System Press the On Off button to shut down the system 1 In case the system is unresponsive or fails to switch off press and hold the touch sensitive power button for 10 seconds to switch off t...

Page 28: ... automatic feature is described in About Automatic jobs on page 26 Manual job various settings not available in an Automatic job can be set in a manual job This includes the use of daily mail Working with manual jobs is described in Create a manual job on page 27 Use an Existing Job If you want to use an existing job Open the job list 1 2 Tap the icon of the job you want to use 3 Load the feeders ...

Page 29: ...o start the job 9 Press the Stop button to finish the job 10 Tap Job list to return to the job list Create a New Job To create a new job From the Job list menu tap New job 1 2 Choose Automatic or Manual to create a new job 3 If you choose Automatic follow the description as can be found in Create an Automatic job 4 If you choose manual follow the description as can be found in Create a Manual job ...

Page 30: ...ith Automatic job processing Linked feeders the option where if one feeder is empty the system automatically continues using another feeder Multiple sheet feeding picking more than one sheet from a certain feeder Daily mail Reading functionality No envelopes use envelopes yes no Exit select If you want to use any of these features you have to use Manual jobs to process the mail set Create an Autom...

Page 31: ... Create a Manual Job Introduction Creating jobs manually is easy the user interface guides you through the job definition with clear steps These steps are Define the mail set envelope type main document and optional enclosures Define how to fold the document set Define the exit of the system that should be used for this job Create a Manual Job To create a job manually 1 From the Job list menu tap ...

Page 32: ... envelope to set the use of envelopes to off if you want to Create a job without the use of envelopes 3 Tap Sealing to switch it on or off By default the envelopes will be sealed 4 Confirm the envelope settings with OK Continue with the main document settings 28 Page 28 Nov 25 2020 04 16 Working with Jobs 4 English ...

Page 33: ...n or tap Advanced to set the DFC Settings 5 Confirm the document settings with OK Continue with the enclosure settings Switch DFC on or off for feeders For every feeder you can switch the double feed control DFC on or off To change the DFC settings Tap the job that you want the change the DFC settings for 1 2 Tap Edit 3 Tap the document that you want to change the DFC for 4 English 29 Page 29 Nov ...

Page 34: ...uble sheets will be diverted 7 Confirm the settings with OK and continue with the document settings Enclosure 1 Tap Add enclosure 2 Select a predefined document or create a custom document as your enclosure If you want to remove an enclosure from the job or change the order of the enclosures see Delete or move an enclosure 3 Change the Number for more than one document from a feeder 30 Page 30 Nov...

Page 35: ...old type is highlighted However you can select other fold types and change their settings Tap a fold type 1 2 If necessary tap Settings to change the fold settings 3 Tap If you want to revert to the machine recommended fold type switch Use recommended fold to On Continue with the exit settings see Exit settings 4 English 31 Page 31 Nov 25 2020 04 16 Working with Jobs ...

Page 36: ... The Job settings part of the Advanced settings menu covers settings that improve the processing of jobs Flap closer offset to improve the sealing of specific envelopes you can delay or advance the moment of sealing You enter the number of pulses A minus value means the sealing is advanced a plus value means the sealing is delayed You can enter a number between 20 and 20 System output mode 1 mode ...

Page 37: ...transport of documents fed by the various feeders the documents are partially overlapping each other This to make sure that the documents are properly aligned in the collator area The default value is 50 mm 2 0 inch The document offset can be varied between 20 mm 0 8 inch and 250 mm 9 8 inch BRE offset in the case of offset is yes the last document that was added to the set is shifted from the res...

Page 38: ...velope height The whole BRE offset is based on friction between documents within a set Therefore it is necessary to make use of these conditions to reduce the risk of bad transporting folding and inserting It is possible to use the BRE offset for a BRE and an enclosure card in one set The extra condition is that this enclosure is equal to or smaller than the set address fold and should be placed d...

Page 39: ...s processing You can set from 5 through 9999 The system will continue processing mail sets until the job counter reaches the stop counter value The system stops and can be restarted When the processing of mail sets has been interrupted the system shows how many mail sets have been completed This is shown at completed so far Job total counter total number of mail sets that have been processed using...

Page 40: ...he system To clear the system from documents remove the documents from the feeder trays and tap Start from the warning message the remaining documents will be processed to clear the system 4 Tap the reset button for the Job total counter to set it to zero If you set the Job total counter to zero the number history of this job will be lost 5 Tap OK to go back to the job overview screen and tap Star...

Page 41: ...e Link feeder trays Change the counter settings see Change the counter settings When you are ready with these settings proceed as follows Load the documents as indicated on the Job info screen For more information regarding how to load documents refer to Document Orientation on page 54 1 2 Tap 1x to create a test mail set see Test mail set 3 If desired you can save the job see Save a job 4 Tap Sta...

Page 42: ... Check the fold settings for one set See Fold settings When you tap the 1x button you can choose between test mail sets Selected exit creates one mail set that leaves the system at the defined exit Use this option to test the complete process Envelope stop position separates one envelope and transports the envelope to the envelope stop position Use this option to verify and adjust the envelope sto...

Page 43: ...oblems or when changing the envelope type To verify the insert position Choose a job and tap 1x envelope only 1 2 Lift the unlocking lever A of the upper unit and pull up the upper unit 3 Follow the instructions on screen 4 English 39 Page 39 Nov 25 2020 04 16 Working with Jobs ...

Page 44: ...adjusting the insert position Adjust the Envelope Insert Fingers To verify that the position of the fingers is correct Choose a job and tab 1x envelope only 1 2 Tap the Envelope stop position button 3 Lift the unlocking lever A of the upper unit and pull up the upper unit 40 Page 40 Nov 25 2020 04 16 Working with Jobs 4 English ...

Page 45: ...tighten the knurled knob The fingers can be moved sideways to the desired position 4 Place the outer fingers about 5 to 10 mm 0 2 to 0 4 inch from the edges of the envelope Check the position of the insert fingers when changing to a different type of envelope 5 Tap the envelope button on the touch screen to fetch another envelope 6 Make sure that the finger position is correct If not repeat the st...

Page 46: ...nvelope window change the address position as follows Choose a job and tap 1x 1 2 Tap Mail set not OK if asked if the mail set is correct 3 Tap Address position not correct 4 Change the address position slide the position indicator to the correct position 5 Tap the green button to create another example mail set or tap OK to confirm the settings 42 Page 42 Nov 25 2020 04 16 Working with Jobs 4 Eng...

Page 47: ...ration gap 3 Place a document on the feeder tray and slide it into the system until it can go no further 4 Turn knob A clockwise to get resistance 5 Move the document to and fro The separation is adjusted correctly when a slight resistance is felt on the document Turn knob A counter clockwise again if the resistance was set too high 4 English 43 Page 43 Nov 25 2020 04 16 Working with Jobs ...

Page 48: ...b list menu tap New job 1 2 Add the BRE as a custom enclosure 3 Follow the job creation process see Create a manual job on page 27 Process Mail Sets with Daily Mail To process mail sets with Daily Mail Create a Manual job and select DailyMail for your Main document 1 2 Complete the job settings 3 Tap start to start the job A daily mail switch notification and instruction appears on the screen 44 P...

Page 49: ...ibed in the selected job 8 Place the next document or document set in the feeder tray The system will keep running to process the inserted document or document set 9 When finished with Daily Mail tap stop to stop the job 10 Set the Daily Mail handle B to the AUTO position to disable the Daily Mail and enable the automatic document separation Create a Job with Custom Envelopes Makes sure that your ...

Page 50: ...Settings to complete the job and tap Save to save the job Follow the instructions as described in Create test mail set Create a Job with Custom Documents Makes sure that your custom documents fit within the specifications see Document Specifications on page 142 Create a Manual job and select a custom document as your main document or enclosure 1 2 Tap Custom to create a custom document 46 Page 46 ...

Page 51: ...eder Tray You cannot change the order of the documents in the mail set by changing feeders If you want to change the order of the mail set see Delete or move an enclosure If you want to move the main document or enclosures to another feeder tray Select a job from the Job list 1 2 Tap the document that you want to move to another feeder tray All available feeder trays are marked with a dotted box 4...

Page 52: ...job from the Job list 1 2 Tap the feeder tray that you want to link to another feeder tray The link symbol appears 3 Tap the link symbol The figure shows an example of linked feeders 4 Tap Save to save the link to the job When you want to un link the feeders tap the feeder trays and tap the un link symbol Edit a Job To edit an existing job From the Job list menu select a job you want to edit 1 48 ...

Page 53: ... that the Insert Position and Address Position are correct see Verifying the Insert Position and Adjusting the Address Position Save a Job When you have created a new job or edited a job save the job as follows After you have completed the job definition tap Save 1 2 Enter the job name 3 If necessary add a description to the job The description is visible in the job list 4 English 49 Page 49 Nov 2...

Page 54: ...the enclosure you want to move or delete Now drag the enclosure to an other position Or tap the waste bin to delete the enclosure from your mail set 4 Tap the arrow buttons to pass the other job definition steps and close the job editor 5 Tap Save to save the changes 6 Tap 1x to make sure that the Insert Position and Address Position are correct see Verifying the Insert Position and Adjusting the ...

Page 55: ...ob Tap and hold the job in the Job list menu 1 2 Tab Copy 3 Enter the name of the new job and tab OK Delete a Job To delete an existing job Tap and hold the job in the Job list menu 1 2 Tap Delete 4 English 51 Page 51 Nov 25 2020 04 16 Working with Jobs ...

Page 56: ...and hold the job in the Job list menu 1 2 Tab Rename 3 Enter the name of the new job and tab OK Lock a Job To lock an existing job Log on as supervisor 1 2 Tap and hold the job in the Job list menu 52 Page 52 Nov 25 2020 04 16 Working with Jobs 4 English ...

Page 57: ... lock in the job list If the supervisor is logged on the lock is open If the operator is logged on the lock is closed The operator cannot edit delete or rename the job when the job is locked 4 English 53 Page 53 Nov 25 2020 04 16 Working with Jobs ...

Page 58: ...nto the feeders The table shows the meaning of the symbols Address carrier face up and leading top address Address carrier face up and leading bottom address Address carrier face down and trailing top address Enclosure face up Enclosure face down 54 Page 54 Nov 25 2020 04 16 Loading the System 5 English ...

Page 59: ...ace the document feeder trays in position Hold the document feeder tray slightly inclined as shown in the figure 1 2 Place the front end of the document feeder tray underneath the two black rollers 5 English 55 Page 55 Nov 25 2020 04 16 Loading the System ...

Page 60: ...eeder tray towards the machine and move the hooks over the mounting points on both sides 5 Let the document feeder tray rest on the machine Adjust the Side Guides To adjust the side guides it is best to remove the document feeder tray from the feeder as follows Push handle A downwards 1 56 Page 56 Nov 25 2020 04 16 Loading the System 5 English ...

Page 61: ...cuments between the side guides 6 Grab the side guides in the middle and push them towards the documents The space between the side guides and the documents should be such that the documents have just enough play to move freely 7 Re tighten knob B 8 Remove the stack of documents 9 Replace the document feeder tray see Installing the Document Feeder Trays on page 55 5 English 57 Page 57 Nov 25 2020 ...

Page 62: ... Open the left hand side guide A by turning it downwards 1 The feed rollers will automatically be lifted 2 Place a stack of documents between the side guides 3 Turn the left side guide upwards again 58 Page 58 Nov 25 2020 04 16 Loading the System 5 English ...

Page 63: ...re are no manual adjustments needed Feeders 3st can be special feeders The document separation for special feeders must be adjusted manually While special feeder trays fit in all positions adjusting the separation is only possible when they are fitted on position 1 and 2 To adjust the separation of special feeders follow the instructions as described in Adjust the Separation of Special Feeders on ...

Page 64: ...ap down and leading top side pointing to system 1 2 Adjust the side guides by turning the thumb wheel A such that the documents BREs just fit and can move without resistance Too much play causes skewing Adjust the maxiFeeder Document Separation 60 Page 60 Nov 25 2020 04 16 Loading the System 5 English ...

Page 65: ...ont 3 Push knob D forward until it clicks 4 Place a document BRE on the feeder tray and slide it in the system till the leading edge is not visible anymore Turn knob D counterclockwise if the separation is set to narrow 5 Push the document BRE between the rollers 6 Turn knob D clockwise to get more resistance and counterclockwise if the separation is set to narrow The separation is adjusted correc...

Page 66: ...ted up automatically when the system starts processing until documents BREs are underneath the rubber paper pullers In case of long documents use the feeding plate extension B to support the documents Instead also an optional A4 11 paper guide can be used to support long documents Ask your local distributor for more information about this optional paper guide 62 Page 62 Nov 25 2020 04 16 Loading t...

Page 67: ... and B 1 2 Shift the feeding plate assembly C to the rear position 3 Loosen the stack of documents and place them in the feeder tray BREs with flap down and leading top side pointing to system 5 English 63 Page 63 Nov 25 2020 04 16 Loading the System ...

Page 68: ...is located underneath the feeder tray half a turn 2 Put a small stack of documents between the side guides 3 Rotate wheel E The space between the side guides and the documents should be such that the documents have just enough play to move freely 64 Page 64 Nov 25 2020 04 16 Loading the System 5 English ...

Page 69: ... down lever A The feeder rollers C move up to filling level 2 Place a stack of documents between the side guides max 725 sheets 80 g m See Document Orientation how to place the documents in the feeder tray 3 Release lever A 5 English 65 Page 65 Nov 25 2020 04 16 Loading the System ...

Page 70: ...versaFeeder Adjust the Side Guides The side guides can be adjusted as follows Place a stack of documents into the feeder tray 1 66 Page 66 Nov 25 2020 04 16 Loading the System 5 English ...

Page 71: ...Document Separation Check before the adjustment that the release handle D for the separation unit is in the closed down position The document separation can be adjusted as follows 1 Turn the separation adjustment wheel A counter clockwise until a document can be moved backwards and forwards without resistance 5 English 67 Page 67 Nov 25 2020 04 16 Loading the System ...

Page 72: ... to obtain correct operation For poor feeding turn the separation adjustment wheel counter clockwise Feeder Tray Capacity To avoid irregular feeding there are three levels for the maximum heights of the feeder tray capacity The symbols for these three levels are printed on the right hand side guide of the feeder tray The level indication is a guideline Maximum feeder tray capacity of booklets with...

Page 73: ...ssed It can be used for envelopes with a height up to 110 mm 4 33 Load Envelopes Before you load the envelopes make sure the envelope separation and side guides are correctly set Proceed as follows Rotate thumb wheel D to move the side guides C apart 1 2 Pull down small lever B to set the separation 3 Insert one envelope up to the stoppers The position of the envelope is flap down and trailing bot...

Page 74: ...n the side guides is too large the envelopes will twist sidewards when transported into the machine 7 Shift the envelope support in or out The top side of the envelope must touch the dotted line on the support 8 Turn the envelope support to distribute the weight of the envelopes evenly on both sides Filling the Sealing Liquid Reservoir When you want to seal envelopes the sealing liquid reservoir m...

Page 75: ...ont cover A Before you start the job wait approximately 5 minutes for the brushes to moisten If the liquid reservoir is almost empty the touchscreen shows a message to warn you that you should refill the reservoir 5 English 71 Page 71 Nov 25 2020 04 16 Loading the System ...

Page 76: ...ings and to set the localisation If you want to view or edit any of the Operator Settings Go to the Job list and tap the side menu on the left side and select Settings 1 2 Tap Localisation if you want to change the document standard weight standard or the language 72 Page 72 Nov 25 2020 04 16 Settings menu 6 English ...

Page 77: ...mation on Open source licenses see License information The Settings Menu Supervisor Supervisor Settings are all settings that can be found under the Settings Menu when logged in as supervisor pin code 2546 The following flowchart shows which subjects are available via the Supervisor settings menu It is possible to view or edit any of the Supervisor Settings 6 English 73 Page 73 Nov 25 2020 04 16 S...

Page 78: ...visor Settings Menu Open the Settings Menu Supervisor If you want to view or edit any of the Supervisor Settings Login as Supervisor with pin code 2546 1 74 Page 74 Nov 25 2020 04 16 Settings menu 6 English ...

Page 79: ...settings for the system System Info The System info part of the Configuration menu shows the following information Flex certificate this option is used for reading Counter since last visit the counter value since the last service visit Last error description The last error and error description generated by the system 6 English 75 Page 75 Nov 25 2020 04 16 Settings menu ...

Page 80: ...Software Overview The Software overview part of the Configuration menu shows the versions of the software that is present in the total system 76 Page 76 Nov 25 2020 04 16 Settings menu 6 English ...

Page 81: ...gether with the identification number of the machine enable the relevant options The enabled and available software options are displayed in this screen Contact your dealer for information about these license codes The system supports the following licensed options Remote assistance Online help Advanced Basic reading OMR 1 track BCR 1D 2D Flex reading MaxiFeeder 6 English 77 Page 77 Nov 25 2020 04...

Page 82: ... will give a popup which license s almost expire s This will be shown once a week within the last month of the license An example of such a message is shown below As such message is just meant as notification just tap OK and the message will disappear Licenses either permanent or temporary will be installed automatically When a temporary license has expired contact your dealer or sales representat...

Page 83: ...e license code 1 2 Tap Add The system verifies the license key If the license key has been verified successfully the option is added to the system and can be used Settings Settings The Settings menu contains the configuration settings for the system 6 English 79 Page 79 Nov 25 2020 04 16 Settings menu ...

Page 84: ...standard or the language When you need a keyboard to enter e g a job name you get a special keyboard in case of Russian Czech and Katakana But the keyboard has always a button to switch back to the English keyboard 80 Page 80 Nov 25 2020 04 16 Settings menu 6 English ...

Page 85: ...oose between three format to show the date dd mm yyyy mm dd yyyy or yyyy mm dd Time format you can choose between a 12 hours notation or a 24 hours notation When the system is connected to the internet the time is synchronized automatically Make sure to setup the time zone correctly 6 English 81 Page 81 Nov 25 2020 04 16 Settings menu ...

Page 86: ... track when selecting a another job from the job list or when starting a new automatic job The screen shows three options Always Ask Never It makes a difference if you switch from a job to another existing job from the job list or if you start creating a new automatic job 82 Page 82 Nov 25 2020 04 16 Settings menu 6 English ...

Page 87: ...nvelopes present in the system to the exit For safety a maximum number of envelopes is processed This maximum is set to 3 b When the user cancels the dialog with the X the system returns to the Idle screen without clearing or producing c After clearing the system returns to the idle screen 2 The user chooses to continue without clearing a The system starts producing with the envelopes loaded in th...

Page 88: ...user selects Ask or Never after tapping 1x the system shows a popup asking to clear the envelopes or continue without clearing The following two options are possible 1 The user chooses to clear the envelope a The system starts transporting envelopes present in the system to the exit For safety a maximum number of envelopes is processed This maximum is set to 3 b When the user cancels the dialog wi...

Page 89: ...ocuses on high speed Use Mode 1 with a paper thickness of 65 g m2 or less a document length of 12 inch 305 mm or higher and for situations where Mode 2 is not functioning properly In all other cases use Mode 2 BRE with window if the BRE has a window set this setting to yes Only available with Mode 2 Document offset A in the figure the extend to which documents are not overlapping in the vertical t...

Page 90: ...f a BRE is longer than the set fold but shorter than the envelope height this BRE can get folded A in the figure Under certain conditions see below you can prevent the BRE from being folded In the case of offset yes the BRE is held back during a certain distance B in the figure This means that the trailing edge of the BRE leaves the collator last The document is not folded During the insertion int...

Page 91: ...tween documents within a set Therefore it is necessary to make use of these conditions to reduce the risk of bad transporting folding and inserting It is possible to use the BRE offset for a BRE and an enclosure card in one set The extra condition is that this enclosure is equal to or smaller than the set address fold and should be placed direct underneath the BRE in the set Connectivity For more ...

Page 92: ...basic diagnostics functions available for a supervisor System Test Use the System test to check if all motors clutches and sensors are correctly connected The test briefly activates the actuators and clutches and measures the current To run a system test In the Settings menu tap the Diagnostics tab 1 2 Tap System test 88 Page 88 Nov 25 2020 04 16 Settings menu 6 English ...

Page 93: ...ust is built up at the sensors a warning message will be displayed To check the conditions of the photocells or to calibrate them follow the instructions as described in Calibrate photocells Reading Reading The reading menu contains the configuration items for the reading functions Because reading is optional this menu is only available when there is at least one reading license present For more i...

Page 94: ...is on the screen shows information on what the system does when it reads a mark or no mark BCR 1D Configuration Sheet The Reading BCR 1D configuration sheet allows you to read a configuration sheet The result is visible in this screen but also in the BCR 1D code definition screen See Reading a configuration sheet 90 Page 90 Nov 25 2020 04 16 Settings menu 6 English ...

Page 95: ...ows which codes are enabled and how they work BCR 2D Configuration Sheet The Reading BCR 2D configuration sheet allows you to read a configuration sheet The result is visible in this screen but also in the BCR 2D code definition screen See Reading a configuration sheet 6 English 91 Page 91 Nov 25 2020 04 16 Settings menu ...

Page 96: ...e that the system read The figure shows an example of the image of an OMR code You can use this image to see if the read code fits within the reading window When you click on the Information button of an image of OMR code the screen shows a graphical representation of the marks read from the last OMR document oscilloscope function It shows the time dependant OMR output voltage 92 Page 92 Nov 25 20...

Page 97: ...view the Job history 1 2 Tap on the Today pull down button if you want to view the jobs that are run Today Last week or All The history is displayed on the touch screen With Save to USB you save the history in CSV format to a USB drive 6 English 93 Page 93 Nov 25 2020 04 16 Settings menu ...

Page 98: ...address Manual Configuration Wireless connection Search for SSID Manually configure SSID In all cases you can use proxy for the connection Log on as Supervisor to complete this procedure Set up a Wired Connection Set up a wired connection as follows Connect the system to a LAN with a network cable The figure shows the LAN connector B 1 94 Page 94 Nov 25 2020 04 16 Connect the System to the Interne...

Page 99: ...2 Open the supervisor settings menu 3 Tap the Settings tab Connectivity 4 Tap LAN settings 7 English 95 Page 95 Nov 25 2020 04 16 Connect the System to the Internet ...

Page 100: ...tically to the LAN If No set up a connection manually Enter the necessary details to setup a manual connection Set up a Wireless Connection Set up a wireless connection as follows Open the supervisor settings menu 1 2 Tap the Settings tab Connectivity 3 Tap LAN settings 96 Page 96 Nov 25 2020 04 16 Connect the System to the Internet 7 English ...

Page 101: ...less network If you want to search for a network tap Choose network 6 When you have entered the network details or selected a network from the search tap Connect to connect to the network When the system connected successfully to the network the screen shows Connected 7 English 97 Page 97 Nov 25 2020 04 16 Connect the System to the Internet ...

Page 102: ...he IP addresses that are defined at the LAN settings If the result is Not OK make sure that the settings are correctly defined AIMS settings When operating with AIMS Verification the server address and port can be configured and the connection to the AIMS server can be tested Contact your local distributor for more information about the AIMS option 98 Page 98 Nov 25 2020 04 16 Connect the System t...

Page 103: ...re missing The envelopes are transported to the side exit or to the stacker The sheets with the printed code are placed in a feeder Depending on the programmed code the other feeders can be used as selective feeders to add enclosures In case of a Z fold the address has to be printed on the last page of the set With the other fold types the first sheet of a set always contains the address A full le...

Page 104: ... will bleed through For matrix printers near letter quality NLQ printed characters are preferred to obtain maximum blackness double strike For more information on how to print a reading code on your document contact your service organization BCR Code Description Bar codes are used for mail sets that are processed in Document Systems The bar codes tell the system if The document set is complete The...

Page 105: ...y sensitive to speed variations Minimum line thickness of a bar 0 20 mm 0 008 Maximum line thickness of a bar smallest element 0 50 mm 0 02 The thickness ratio of thick bars versus thin bars 2 2 Preferred print quality 600dpi Minimum width of the barcode 5 mm 0 2 Maximum qty of characters 109 Quiet zone free white space area 5 mm 0 2 8 English 101 Page 101 Nov 25 2020 04 16 Reading ...

Page 106: ...ell size 0 50mm 0 02 Label size 30mm 1 18 square max Preferred print quality 600dpi Print drift from page to page 2mm max Colour background White Datamatrix can be read in all directions Minimum white space 2mm 0 08 all around 102 Page 102 Nov 25 2020 04 16 Reading 8 English ...

Page 107: ...space 4mm 0 20 all around PDF 417 Bar width 0 35 mm 0 014 min Smallest element size 0 5 mm 0 020 max Preferred print quality 600dpi Print drift from page to page 2mm max Colour background White Minimum white space 2mm 0 08 all around Printing contrast The label must be strongly printed in black on white background for maximum contrast Other light backgrounds may be acceptable subject to test 8 Eng...

Page 108: ...ed at least 7 mm 0 28 from the trailing and leading edge of the sheet LH and RH margins Document width 210mm maintain at least 2mm 0 08 clearance from both side edges Document width 210mm maintain at least 5mm 0 2 clearance from both side edges 104 Page 104 Nov 25 2020 04 16 Reading 8 English ...

Page 109: ...ng functions are available Page N of M as long as N is below M the document set is not complete As soon as N M the set is complete and will be inserted into an envelope Insert Accumulate defines when a document set is complete and must be inserted into an envelope Customer ID BCR uses the Customer ID code to complete a set If the ID changes the set is inserted This is only possible with reverse re...

Page 110: ... Reading stop Stop mark read Selective feed If the system reads the command an enclosure from the enclosure feeder is added to the set This function is printed on the last sheet of a set It is also possible to add an enclosure from the versaFeeder s Sealing control Determines if envelopes are sealed or not Present on Deck Continue The set leaves the system from the upper unit The system does not s...

Page 111: ... 3 9 inch This parameter is set in the job settings The code must have a consistent number of marks on every page The white area in the picture shows the limits where the code can be printed OMR license types There are two OMR license types Basic Advanced 8 English 107 Page 107 Nov 25 2020 04 16 Reading ...

Page 112: ...MR With skewed paper the reading head can miss part of the reading code In these situations the safety mark is not read and the system will give an error The safety mark also indicates the end of the reading code This mark must always be present on the document if it is part of the code definition The minimum code is one mark in one line insert However for reliability it is advised to use at least...

Page 113: ...mines if the envelope is transported to stacker or to the side exit Present on deck The set leaves the system from the upper unit The system does not stop processing The envelope is not sealed Present on deck and stop The set leaves the system from the upper unit The system stops The envelope is not sealed Sealing control Determines if envelopes are sealed or not If a mark is printed the envelope ...

Page 114: ...The first position is used for the start mark which must be printed on every sheet The second mark position is used for the insert accumulate command A printed mark means insert no mark means accumulate Therefore the mark is printed on the last sheet of the set Position 3 is reserved for selective feed from the enclosure feeder Print a mark on position 3 when a selective feed from the enclosure fe...

Page 115: ...supported OMR BCR 1D BCR 2D Depending on the license up to 9 Flex definitions can be used on the system Creating a Flex job is similar like creating a OMR BCR reading job Create Jobs with Reading Create a BCR Job Create a BCR job To create a job with BCR From the Job list menu tap New job 1 2 Choose Manual to define the job settings 3 Select an envelope 4 Tap Main document 5 Tap Custom 6 Enter the...

Page 116: ...ation tap Save to save job If required the maximum number of sheets can be reconfigured Refer to Reading Settings for more details on how to change these settings Read a Configuration Sheet If you want to set the code definition for BCR use a BCR configuration sheet The configuration sheet function is available when you are logged on as a supervisor on page 6 To read a configuration sheet Go to th...

Page 117: ...p READ 6 Tap Save to save the new barcode definition After reading a configuration sheet jobs with BCR reading might have changed These jobs are marked with an exclamation mark verify the job settings before running the job You can also read a configuration sheet when you create or edit a BCR job The function is available in the side menu 8 English 113 Page 113 Nov 25 2020 04 16 Reading ...

Page 118: ...p the Reading tab 8 Select the code type OMR 9 Configure the location of the OMR marks by setting the offset of the top and left side of the sheet 10 Load a sample document in the feeder tray as indicated 11 Tap Verify to read an example sheet to check the correct reading of the OMR marks 12 If necessary adjust the position from top and from left side Verify again with a sample sheet 114 Page 114 ...

Page 119: ...heets can be reconfigured Refer to Reading Settings for more details on how to change these settings Create a Flex Reading Job To create a job with Flex reading From the Job list menu tap New job 1 2 Choose Manual to define the job settings 3 Select an envelope 4 Tap Main document 5 Tap Custom 6 Enter the document size or select a standard type 7 Tap the Reading tab 8 English 115 Page 115 Nov 25 2...

Page 120: ...ng steps to complete the job If required the maximum number of sheets can be reconfigured Refer to Reading Settings for more details on how to change these settings Reading Settings When you create a reading job for OMR BCR 1D 2D or Flex reading the following options can be set 116 Page 116 Nov 25 2020 04 16 Reading 8 English ...

Page 121: ...incorrect set is diverted The final part of the set is also diverted and then the system starts processing again The maximum number of sheets in a set is 25 When the number of sheets exceeds 8 or 10 depending on the fold the document can not be folded anymore In this case the maximum length of sheets is 148 mm for a C5 6 envelope Also make sure that the fold is set to No fold Ignoring this will ce...

Page 122: ...k is printed on the first page of the set The system will detect the end of a set by detecting the first page of the next set For example in case of BCR using the Customer ID to complete a set If the ID changes the set is inserted In case the feeder runs empty the last set is still on the collator because the beginning of the next set could not be detected In this case the feeder empty message con...

Page 123: ...with reading no mark space means sealed a mark means not sealed Reading reading has two options switch exit on mark and let the code define which exit is used Switch exit on mark means that at every exit code the system changes the exit If the code defines the exit you define what happens if the exit code is read exit code means stacker or exit code means side exit Weight When using reading the si...

Page 124: ...he machine is delivered with an extra set of brushes To always have one clean set available it is recommended to soak one set in water and use the other set Weekly When dirty or saturated clean the brushes of the envelope sealing or replace them see Clean and replace brushes When dirty or saturated clean the moistening cloth or replace if necessary see Replace moistening cloth Clean feed and inser...

Page 125: ...om the brush holder 3 Replace the brushes Make sure that the studs on the brushes are fitted in the corresponding holes in the brush holder Replace or Clean Moistening Cloth When dirty or saturated clean the moistening cloth or replace if necessary Proceed as follows Open the front cover A 1 2 Remove the sealing liquid reservoir B from the system 9 English 121 Page 121 Nov 25 2020 04 16 Operator M...

Page 126: ...the cloth Calibrate Photocells When too much paper dust is built up at the sensors a warning message is displayed In that case calibrate the photocells as follows Log in as supervisor 1 2 In the settings menu tap the Diagnostics tab 3 Tap Maintenance 122 Page 122 Nov 25 2020 04 16 Operator Maintenance 9 English ...

Page 127: ...ch photocells you want to calibrate 5 Remove all documents and envelopes and close all covers before starting the calibration 6 Tap Calibrate photocells 9 English 123 Page 123 Nov 25 2020 04 16 Operator Maintenance ...

Page 128: ...s Introduction There are three different types of messages Indications Warnings Errors Indications When you run a job indications can appear like the ones in the example 124 Page 124 Nov 25 2020 04 16 Fault Finding 10 English ...

Page 129: ... indication of the area in which the event occurred A warning description A suggested solution behind the arrow An event message number use this number in case that you call support Tap the i button to view more information about the event 10 English 125 Page 125 Nov 25 2020 04 16 Fault Finding ...

Page 130: ...curred error and about the possible actions to avoid the error from re occurring After solving the problem tap x to reset the error the error screen will disappear Special Errors Reading errors when reading is enabled The document set is diverted The operator must remove the document set and has to complete the set manually Technical errors The display shows a message The error cannot be solved by...

Page 131: ...each the exit sealing and inserting area B side cover to reach the lower envelope track C Folder unit cover to reach the folding area D vertical transport cover to reach the vertical transport and feeding area E collator arm to reach the collating area 10 English 127 Page 127 Nov 25 2020 04 16 Fault Finding ...

Page 132: ...ck envelope 4 Release lever A 5 Make sure the separation setting is still correct see Loading Envelopes 6 Return lever B 7 Tap x to reset the error and restart the job Exit Sealing and Inserting Area When a stoppage occurs in the exit sealing and inserting area remove the material as follows Lift the unlocking lever A of the upper unit and pull up the upper unit 1 128 Page 128 Nov 25 2020 04 16 Fa...

Page 133: ...x to reset the error and restart the job Lower Envelope Track When a stoppage occurs in the lower envelope track remove the envelopes as follows Open the side cover 1 2 Pull down the blue handle A 10 English 129 Page 129 Nov 25 2020 04 16 Fault Finding ...

Page 134: ...dle C To transport a mail set manually turn handle B 4 Close the side cover 5 Tap x to reset the error and restart the job Folder unit When a stoppage occurs in the Folder unit remove the documents from the Folder unit as follows Push the lower end of the locking handle A to open the Folder unit cover B 1 130 Page 130 Nov 25 2020 04 16 Fault Finding 10 English ...

Page 135: ...se the delivered pin to turn the rollers The pin is delivered in the spare parts bag Remove the pin when finished 3 Close the Folder unit cover 4 Tap x to reset the error and restart the job 10 English 131 Page 131 Nov 25 2020 04 16 Fault Finding ...

Page 136: ...ransport hand grip A upward to open the vertical transport cover B 1 2 Remove the documents 3 Close the vertical transport cover B push the bottom side of the cover towards the system and next the top of the cover 4 Tap x to reset the error and restart the job 132 Page 132 Nov 25 2020 04 16 Fault Finding 10 English ...

Page 137: ...ator arm A 1 2 Remove the documents 3 Lower the collator arm 4 Tap x to reset the error and restart the job versaFeeder When a document is blocked in the separation unit the document can be removed as follows Open the separation by placing the release handle D in the upper position 1 10 English 133 Page 133 Nov 25 2020 04 16 Fault Finding ...

Page 138: ...the inserter to reset the error and restart the job Operator Troubleshooting To resolve problems Write down the event message number that is shown in the message on the screen 1 2 Try to solve the problem by consulting the Troubleshooting Table 3 Switch the inserter off and on again to verify system operation 4 When the error still occurs contact your service organization When contacting the servi...

Page 139: ...e type used not according to specifications or job settings Loading Envelopes on page 69 Adjust envelope sep aration Envelope separation not correctly set Envelopes are double fed Loading Envelopes on page 69 Check and replace if needed Envelopes not placed properly in the hop per Loading Envelopes on page 69 Check side guides and adjust if needed Side guides of the envelope hopper are set too wid...

Page 140: ...d Fingers adjusted too deep into the envel ope Fingers are placed on top of the envelope Verifying the Insert Position on page 39 Check envelope stop position adjust if needed Envelope stops too early Adjusting the envel ope insert fingers on page 40 Check fingers posi tion adjust if needed Fingers not correctly adjusted System stops while inserting stoppage at the inserting point Editing a job on...

Page 141: ...r clean moistening cloth on page 121 Check the moistening felt clean if needed Moistening felt dirty Clean and replace brushes on page 121 Replace brushes Brushes worn out Replace or clean moistening cloth on page 121 Replace moistening felt Moistening felt worn out Editing a job on page 48 Check fold settings adjust if needed Inserted document too big Envelope not always ejected from sealer Verif...

Page 142: ...g the Separa tion of the maxiFeed er on page 60 Adjusting the Separa tion of the versaFeed er on page 67 Adjust the separation Separation set too wide too tight Adjusting the side guides standard feeder trays on page 56 Adjusting the side guides maxiFeeder on page 59 Adjusting the side guides High Capacity Document Feeder on page 64 Adjusting the side guides versaFeeder on page 66 Adjust the side ...

Page 143: ...xiFeed er on page 60 Adjusting the Separa tion of the versaFeed er on page 67 Adjust the separation Separation set too wide Double documents fed Verifying the Insert Position on page 39 Check insert position Insert position not correct Document set not correctly inserted Adjusting the envel ope insert fingers on page 40 Check insert finger position Insert fingers not cor rectly positioned Adjustin...

Page 144: ...230V 10 10 Voltage tolerance 100 115 Vac T 5 0 A 125 V Fuse Time lag 5 0 Amps rated current 125 V 230 Vac T 2 5 A H 250 V Time lag 2 5 Amps rated current high breaking capacity 250 V RED Radio Equipment Directive 2014 53 EU Approvals FCC certification conform 47CFR part 15 CB Certificate conform IEC 62368 1 UL Listed I T E Information Technology Equipment Conform UL IEC 62368 1 file E153801 Confor...

Page 145: ...s 80 g m Envelope hopper 325 sheets 80 g m Document feeder tray 725 sheets 80 g m High Capacity Document Feeder tray Configuration Dimensions 5 6 stations 3 4 stations 2 stations 970 mm 38 2 800 mm 31 5 630 mm 24 8 Height 420 mm 16 5 420 mm 16 5 420 mm 16 5 Width 1480 mm 58 3 1480 mm 58 3 1480 mm 58 3 Length 101 kg 223 lb 87 kg 192 lb 97 5 kg 175 lb Weight Length with side exit 1490 mm 58 7 with s...

Page 146: ...8 sheets max 80 g m Double V fold 4 sheets max 80 g m Folding capacity Standard BRE Business Reply Envelopes Envelope sizes Minimum 80 g m 20 lb bond Maximum 120 g m 30 lb bond Envelope quality Envelope and Document Set Specifications When choosing envelopes ensure the envelope size is well between the maximum and minimum specification Envelopes close to the minimum or maximum size specification a...

Page 147: ...imum 120 g m 30 lb bond Maximum Remarks The specification of the paper handling equipment is often wider than that of the envelopes and documents handled The condition of material handled will limit the specified environmental conditions We recommend that materials to be handled are stored at a temperature of 20 C 68 F with a relative humidity factor of 50 If difference in temperature occurs betwe...

Page 148: ...nformation Technology Equipment conform UL IEC 62368 1 file E153801 Conform EN IEC 62368 1 and derivatives Approvals 210 mm 8 3 inch Height 285 mm 11 2 inch Width 425 mm 16 7 inch Length 5 05 kg 11 1 lbs Weight see Technical Specifications Noise level 10 C 40 C 50 F 104 F Operating tem perature 30 80 Humidity 1200 sheets A5 80 gr 325x Business Reply Envelopes Feed tray capa city 1200 sheets A4 80 ...

Page 149: ...FCC Certificate conform 47CFR part 15 UL Listed I T E Information Technology Equipment conform UL IEC 62368 1 file E153801 Conform EN IEC 62368 1 and derivatives Approvals 550 mm 21 7 inch Height 440 mm 17 3 inch Width 360 mm 14 2 inch Length 12 kg 26 5 lbs Weight Refer to noise level of the system Noise level 10 C 40 C 50 F 104 F Operating tem perature 30 80 Humidity C5 6 1x A4 C fold 325 envelop...

Page 150: ...ology Equipment conform UL IEC 62368 1 file E153801 Conform EN IEC 62368 1 and derivatives Approvals 407 mm 16 0 inch Height 440 mm 17 3 inch Width 500 mm 19 7 inch Length 31 kg 68 3 lbs Weight Lp 68 dB A 2 dB A ISO 7779 DIN EN 2779 part 7 Noise level 10 C 40 C 50 F 104 F Operating tem perature 30 80 Humidity Minimum 80 g m 15 lb bond single sheets max 500 sheets Booklets up to approximately 2 5 m...

Page 151: ... mm 3 5 Maximum length 162 mm 6 4 Document size Booklets with a tough cover maximum height 250 mm Booklets with a weak cover maximum height 150 mm Single sheets 80 gr m maximum height 50 mm Hopper tray ca pacity 11 English 147 Page 147 Nov 25 2020 04 16 Specifications ...

Page 152: ...tal x coordinate a vertical y coordinate a horizontal width w and a vertical height h Address position The feature of an Inserting System to automatically determine its Job settings by measuring the sizes of documents and envelope From all Feeders that are loaded one sheet will be taken Based on the maximum document length which is also the length of the documentset and the length of the envelope ...

Page 153: ...can be divided into address carriers and enclosures For personalized mailings there is always one address carrier and an optional number of enclosures Document The document set is the physical collection of address carrier and en closure s that is under production in the Inserting System The docu ment set is completed during production and is to be inserted in the envelope The number of enclosures...

Page 154: ...g downwards and the bot tom of the sheet is closest to the separation unit in a document feeder Face down trailing Situation in which the front of a sheet is facing upwards when placed in a document feeder Face up Situation in which the front of a sheet is facing upwards and the top of the sheet is closest to the separation unit in a document feeder Face up leading Situation in which the front of ...

Page 155: ...cooperate to perform the inserting function accumulate document set fold and insert and have a single point of control Inserting system Interface for the franking machine insert n Frank insert n Mail mailing machine A job is an actually produced collection of mail sets based on a certain Job Definition at a certain point in time for a specific purpose It consists of The Job definition used for the...

Page 156: ...nd interpreted according to the used OMR code definition Reading marks The feature that makes it is possible to analyze a problem on an Inserting System from a remote location Remote diagnostics Technical engineer whose task it is to resolve problems with systems in the field Besides dealing with problems service engineers are also responsible for preventive maintenance Service engineer See V fold...

Page 157: ...ure below Synonym Single fold V fold The vertical transport section between feeders and collator Vertical transport A Z fold means that a document is folded twice in such a way that each folded flap is on a different size of the folded document resulting in a Z shape This fold is illustrated in the picture below The position of both folds is adjustable Synonyms zigzag fold Z fold 12 English 153 Pa...

Reviews: