


21
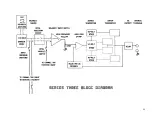
When the amp is turned on, the relay contacts are open and no sound comes from the speakers. With no current
through the relay, the +8mA flowing through R12 from the positive supply makes the red section of the bicolor
protect/power LED light up. E7, a 10
µ
F capacitor, is initially discharged, and takes 3 seconds to charge to the point
where R29 can turn on Q18. When this happens, Q17 sends –20mA through the relay, turning on the speaker and
overcoming the +8mA into the pilot LED, reversing it to green. LD6 in series with Q18 creates a –2.2V threshold at
the base of Q18 (1.6V + .6V). When the pilot LED is red, it has +1.6V across it, which means that the total voltage
across the 100k R30 must be 3.8V before Q18 can turn on. When E7 reaches –15V, the 330k R29 will send enough
current to get 3.8V across R30 and Q18 turns on, driving Q17 and thus the relay. When the relay turns on, the
voltage across the pilot LED is reversed. R30 then sends positive feedback from this event back to Q18, which
ensures a positive “latching” on or off. When the amp is turned off, E5 quickly discharges, removing power from the
relay, and “resetting” E7 through D17.
Thermal protection is accomplished by using a PTC (positive temperature coefficient) resistor attached to the heat
sink. The +8mA from R12 flows through this part. Below 75C, the resistance remains at 100 ohms, which means
that there is only the PTC goes up and the voltage begins to increase. As the voltage reaches 3V, it begins to power
a flashing red LED (LD1) connected to E3 and R3. This signals the user that temperatures are nearing the limit.
When the temperature reaches about 95C, the voltage across the PTC reaches 6V, which is enough to turn off Q18
through the 7.5V zener Z17. This, of course, shuts off the relay and removes the load until the amp cools down.
DC protection is accomplished with another auxiliary circuit. R27 and E6 filter the audio output, but if the frequency
drops below 10Hz, or DC appears for more than .1 second, the voltage on E6 will reach about 2V. This is enough to
forward bias the bridge rectifier B2, and turn on Q19. Note that Q19 is connected to the rectifier so that either
polarity of DC will trigger it. When Q19 turns on, it discharges E7, and shuts off the relay. The recharge time of E7
prevents destructive “chattering” of the relay.
Important. Note that the entire relay circuit is referenced to the power supply, not to ground. Therefore, be careful
when measuring or substituting parts, to keep track of what voltages you are connecting to.
The –30dB signal presence LED, LD4, comes on whenever the speaker voltage exceeds about +1V. D1 and D2 are
arranged to steer the current form R48 into the LED above this voltage. When the speaker output exceeds about
half the power supply voltage in the negative direction, R47 and D3 turn on LD3, the –6dB signal indicator.
7. Input and Output (Jack Plane) Functions
Please turn to the schematic for the Series Three jack plane. You will note that we have ¼”, XLR, and barrier strip
input jacks, all in parallel. In addition, we have an octal socket, which uses the bipolar 15V supplies from the
amplifier op-amp for powering input accessories.
The 8-position microswitches enable a number of functions. Poles 1 and 2 bypass the octal socket when not in use.
Closing poles 3 on both channels connect the inputs in opposite polarity for bridged mono operation. Using this
method requires that each channel be set for the same Gain, but it also enables each channel to continue operation
even if the other fails. Together with the load grounding relay scheme noted in Section 6, this means that in the
bridged mono mode, the remaining channel still can drive the load at a 6dB lower level. Closing pole 4 on each
channel permits the output of octal module number 1 to drive both channels.
Poles 5, 6, 7, and 8 allow the user to switch the polarity of the XLR input. The normal, factory-set position is poles 7
and 8 closed, for pin 2 positive (international standard).
You will also note that a ground-lift barrier strip is provided. Removing the jumper disconnects the audio ground
from the chassis ground, which must remain grounded by the AC cord for safety reasons. This gives the user more
options in eliminating ground loops.
Summary of Contents for III Series
Page 1: ...Series III Power Amplifiers TECHNICAL SERVICE MANUAL 3800 R E V B TD 300001 AX 3500 3350 3200...
Page 3: ...3 SERIES THREE POWER AMPLIFIERS...
Page 22: ...22...
Page 37: ...Series Three Schematics Model3200...
Page 38: ...Model 3350...
Page 39: ...Model 3500 Early Version...
Page 40: ...Model 3500 Late Version...
Page 41: ...Model 3800...
Page 42: ...Series Three PCB Drawings Model 3200 PCB...
Page 43: ...Model 3350 PCB...
Page 44: ...Model 3800 46A PCB...
Page 45: ...Model 3800 47A PCB...
Page 46: ...Model 3800 48B PCB...
Page 47: ...Model 3800 Gain PCB...


