7
Safety Warnings
1.
The XCubeNXT can operate normally in the temperature of 0ºC~40ºC (31.99
~ 103.99°F). Please make sure the environment is well-ventilated.
2.
The power cord x 2 and devices connected to the XCubeNXT must provide
a correct supply voltage (100-127V~/ 10A, 50-60Hz. 200-240V~/ 5A, 50-
60Hz).
3.
Do not place the XCubeNXT in direct sunlight or near chemicals. Make
sure the temperature and humidity of the environment are in the optimized
level.
4.
Place the product right side up at all times.
5.
Unplug the power cord and all connected cables before cleaning. Wipe the
XCubeNXT with a dry towel. Do not use chemical or aerosol to clean the
storage.
6.
Do not place any objects on the XCubeNXT for the
server’s normal operation
and to avoid overheat.
7.
Use the screws provided in the product package to lock the hard disks in the
XCubeNXT when installing hard disks for proper operation.
8.
Do not place the XCubeNXT near any liquid.
9.
Do not place the XCubeNXT on any uneven surface to avoid falling off and damage.
10. Do no place the XCubeNXT on the ground and do not step on the system
to prevent any potential damages.
11. Make sure the voltage is correct in the location where the XCubeNXT is
installed. Contact the distributor or the local power supply company for the
information.
12. Do not place any object on the power cord.
13. Do not attempt to repair the XCubeNXT in any occasions. Improper
disassembly of the product may expose the users to electric shock or other
risks. For any inquiries, please contact the distributor.
14. To remove all electrical current from the device, ensure that all power cords
are disconnected from the power source.
15. The XCubeNXT should only be installed in restricted access location such
as in the server room and maintained by the qualified service person. The
server room is locked by key or keycard, or other means of security access
and only a qualified service person is allowed to enter the server room.
Summary of Contents for XCubeNXT XN5012D
Page 1: ...XCubeNXT 硬件手册 适用机型 XN5012D XN5016D XN5024D XN5026D ...
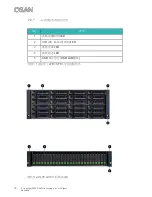
Page 17: ...19 编号 说明 1 系统左耳 2 磁盘托盘 3 系统右耳 4 系统的控制按钮和指示灯 前面板 ...
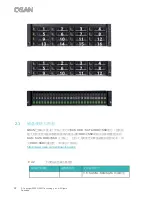
Page 23: ...25 3 1 2 LFF 磁盘托架说明 表 3 1 LFF盘驱动器托盘的前端组件 项目编号 说明 1 释放按钮 2 释放按钮锁 3 托架手柄 ...
Page 25: ...27 握住托盘手柄并拉出磁盘驱动器托盘 重复上述步骤以卸下其他磁盘 驱动器托盘 LFF SFF ...
Page 41: ...43 1 拉出内轨并将中间轨向后滑动 2 将内部组件安装到机箱上 ...
Page 42: ...44 Copyright 2020 QSAN Technology Inc All Rights Reserved 3 将外部导轨 支架组件安装到框架 对另一侧重复此步骤 ...
Page 50: ...52 Copyright 2018 QSAN Technology Inc All Rights Reserved 2 点击重置设备按钮继续 ...
Page 59: ...61 9 2 部署您的装置 请依照以下配置扩展您的存储空间 1 透过SAS扩展和SAS传输线 将您的XCubeNAS连接到一个或多个扩展柜 a 单路径扩展 ...


