background image


Quick Start Guide 

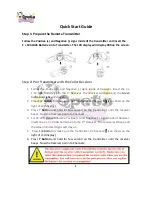
Step 1: Prepare the Remote Transmitter 

Follow the Positive (+) and Negative (-) signs inside of the transmitter and insert the    

x

 6V 4LR44 Batteries into Transmitter. The LCD display will display 000 on the screen.


Step 2: Pair Transmitter with the Collar Receiver 

1.


Follow  the  Positive  (+)  and  Negative  (-)  signs  inside  of  Receiver.  Insert  the  2  x 
1.5V  AAA  batteries  into  the  1

st

  Receiver.  The  receiver  will  beep  and  the 

Green 

Indication Light

 will stay on. 

2.


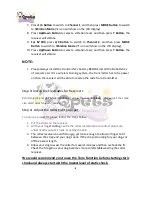
Press 

1/2 Button

 to make sure the Transmitter in Channel 1(

1

 icon shows on the 

right of LCD display) 

3.


Press

  Y


Button

  and  hold  for  few  second  on  the  transmitter  until  the  receiver 

beeps. Now the Receiver pair into Channel 1. 

4.


For SP 209, please follow he Positive (+) and Negative (-) signs inside of Receiver. 
Insert the 2 x 1.5V AAA batteries into the 2

nd

 Receiver. The receiver will beep and 

the Green Indicated Light will stay on. 

5.


 Press 

1/2 Button

 to make sure the Transmitter in Channel 2(

2

 icon shows on the 

right of LCD display) 

6.


Press

  Y


Button

  and  hold  for  few  second  on  the  transmitter  until  the  receiver 

beeps. Now the Receiver pair into Channel 2.  


Summary of Contents for SP 209

Page 1: ...Please read this guide before using...

Page 2: ...ts at the same time The Training System has 100 levels static shock 100 levels vibration beep and light function with LCD display The range is up to 300 feet SP 208 only has one receiver for training...

Page 3: ...the receiver with we recommend you to pair receiver with Channel 1 3 Light Button 6 for the LED Light 2 which on the Transmitter 4 Y 8 Button is a Launch button for the receiver and also a WORKING BU...

Page 4: ...the receiver with we recommend you to pair receiver with Channel 1 3 Light Button 6 for the LED Light 2 which on the Transmitter 4 Y 8 Button is a Launch button for the receiver and also a WORKING BU...

Page 5: ...on 2 Press 1 2 Button to make sure the Transmitter in Channel 1 1 icon shows on the right of LCD display 3 Press Y Button and hold for few second on the transmitter until the receiver beeps Now the Re...

Page 6: ...smitter Step 3 Install the Electrodes for Receivers Randomly pick on pair of electrodes and screw them on receivers Please pick the same size electrodes for each receiver Step 4 Adjust the collar to f...

Page 7: ...vary 2 The life time of the batteries vary according as how often you use the product Your first battery may not last as long as your expect 3 This product is for pet training Good effect can only be...

Page 8: ...Time Email qpets lavasat com Add LAVA Electronics Inc 2580 E Philadelphia ST D Ontario CA 91761 This product has a limited Manufacturer Warranty Details of the warranty can be found on www lavasat co...

Page 9: ...LAVA Electronics Inc 2580 E Philadelphia St D Ontario CA 91761 USA 1 909 923 8743 www lavasat com Email qpets lavasat com Copyright LAVA Electronics Inc 2010 All rights reserved...

Reviews: