


CAI-QLR-01
: QLink Receptacle Customer Assembly Instructions
Page 6 of 11
TERMINATE
For Cable Options with Backshell Configurations
Use the Stripping Length Diagrams in the Appendix located in the back of this Assembly Instruction for the
desired connector configuration to Terminate and polish the fiber and install the Electrical Contacts using
the provided Fiber Optic Termini / Contacts. For Fiber Optic / Wire Termination and Polishing details,
reference CAI-TERM-02.
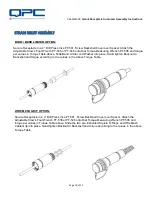
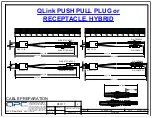
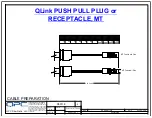
For 2mm or 3mm Cable Options
Slide the Crimp Sleeve onto the cable and strip the cable according to the lengths in the diagram below for
Pin or Socket Fiber Optic Termini. Leave 5/16-Inches (8mm) of Kevlar on the cable for crimping. Thread the
bare fiber through the back of the Termini making sure that the fiber slides through the other end of the
Ferrule. Slide the Kevlar under the Crimp Sleeve. Use Fiber Optic Termini Crimp Tool PT-005 (Hex Size
.147) to crimp the Crimp Sleeve into place. For Fiber Optic / Wire Termination and Polishing details,
reference CAI-TERM-02.
Note: After Polishing Sockets, slide the Split Alignment Sleeve over the Fiber Optic Termini and then slide
the Sleeve Retainer over the Split Alignment Sleeve to the base of the Fiber Optic Termini. Apply Vibra-Tite
VC-3 Threadmate on the threads per manufacturer’s instructions. Screw the Sleeve Retainer onto the
thread of the Fiber Optic Termini. Torque using the Sleeve Retainer Torque Tool PT-589 to the torque
values in the torque table above.


