background image

- 18 -


4.


Connect the visualizer's projector control port to the RS232 port with a RS232 cable
(Please disconnect the computer from the RS232 port first). Then use buttons on the 
operation panel to control the projector. 
The visualizer provides a 6-pin to 9-pin RS232 cable. If this cable does not match to 
your projector's RS232 port, an additional RS232 cable is needed. This additional RS232 
cable can be made based on the pin location of the projector's RS232 control port. The 
pin locations of the visualizer are: the pin 1 is RXD (Received Data); the pin 5 is TXD 
(Transmitted Data); the pin 4 is GND (Ground). Other pins are not defined. The pin location 
information of the projector is provided by the projector's manufacturer. The projector's 
RS232 control port normally has RXD pin, TXD pin and GND pin, the name may be different. 
The parallelism of each data pin is shown as follows: 
Visualizer's RXD pin ----------------------- Projector's TXD pin 
Visualizer's TXD pin ----------------------- Projector's RXD pin 
Visualizer's GND pin ---------------------- Projector's GND pin 


5.


If you can not use buttons on the operation panel to control the projector, please use 
Code- Writing software's projector control code testing function to check if the control 
code is correct. 
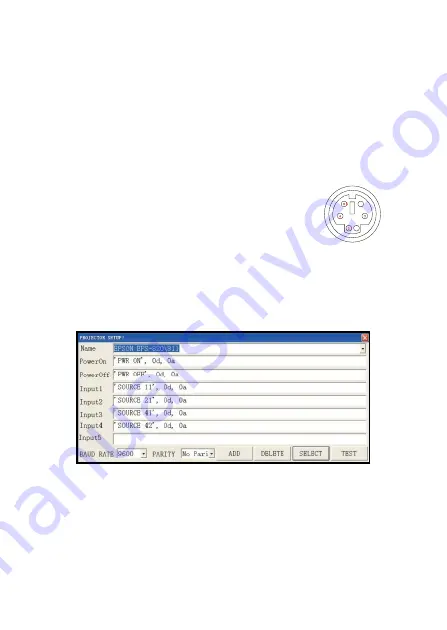
Click  “ P rojector ”  button, the following dialog box appears as below: 


Connect the visualizer to a computer with a RS232 cable (Please disconnect the projector 
from the RS232 port first) and select the Baud Rate and Parity based on the projector's 
Baud Rate, then click the  “ TEST ”  button to pop up the Projector Code Test dialog 
box, input the Baud Rate and Parity based on the projector's Baud rate, then click 
“ O pen ” .  

Summary of Contents for QD3900H2

Page 1: ...QD3900H2 User Manual Model QD3900H2 V1 0 38 ...

Page 2: ...ents Parts Identification 2 Control Panel 3 Remote Control 4 Making Connections 6 Menu Operating Instructions 9 Basic Operation 11 USB Port 15 Folding The Unit 20 Problems And Solutions 21 Specifications 22 ...

Page 3: ...ge to the camera lens Be careful not to spill water or other liquids onto the unit or allow combustible or metallic objects to get inside the cabinet Unplug the visualizer from the wall outlet when it is not in use for an extended period of time Clean cabinet with a soft cloth lightly moistened with a mild detergent Clean lens carefully with an air spray or soft dry cloth to avoid scratching When ...

Page 4: ...ication 7 8 9 10 11 12 13 14 Zoom in Zoom out Knob Camera Stand Left Arm Lamp Bottom Lamp Remote Control Slot Control Panel Camera Case Infrared Receive Area Rear Connector Right ArmLamp Work Stage Side Connector Built in Microphone SD Card Slot ...

Page 5: ...image press again to unfreeze Hold Freeze button for 3s enter exit split Re display stored imaged and videos Image rotation of 90 180 270 Select resolution from XGA SXGA WXGA 720P 1080P 800P and 1200p directly Control the arm lamp and bottom lamp Automatic white balance auto focus and auto adjust brightness Move the cursor Left zoom out Move the cursor Right zoom in Move the cursor Up Increase the...

Page 6: ...XGA 720P 1080P 800P and 1200P directly OK Move the cursor Left Right Up Down Confir m Menu Invoke menu Zoom in Zoom out Increase and decrease magnification Snap Capture a still image Record Record a video clip Far Near Focus near or far Freeze Freeze the image press again to unfreeze Playback Re display stored imaged and videos Projector Power Control the ProjectorOn Off Projector Source SelectPro...

Page 7: ...eparations 1 Place one hand firmly on the base of the visualizer while carefully lifting up the camera stand using the otherhand 2 Open the arm lights and rotate the camera head until they are properly positioned ...

Page 8: ...converter cable in addition to this standard RS232 cable to connect to the projector control port for the pin locations and shape of some projectors control port connector may be different from the connector of a standard RS232 cable Once the visualizer is connected to the projector you can control the projector s power on standby and input selection by using the visualizer Aside from Hitachi proj...

Page 9: ... 7 Connect to a desktop computer Connections for external control from thecomputer ...

Page 10: ...o control the visualizer from an external computer A USB connection enables the computer to capture still images and or video streams from the visualizer Special software is required for this operation Connect power source First connect the power cord to the 12V IN connector ...

Page 11: ... 1 5 Imag e Setti ng Photo Resolution 1280 720 1920 1080 2688 1512 Recording Resolution 1080P 30FPS VGA Video format AVI Syst em Setti ng Language Support Chinese English Spanish Russian French German and Italian System Time Time Sett User defined Display Information Set to display the information on top of the display or not USB to PC PC Camera Mass Storage File Manager Copy to external storage D...

Page 12: ...Text Mirror Normal Left right Mode Up down Mode Effect Normal Black white Mode Negative Mode Frame per second 50HZ 60HZ Brightness Sharpness DNR Contrast Saturation Use to adjust its setting Time laps e Phot o ON OFF ON OF Interval User defined Infor mati on Firmware version xxx Hardware version xxx Release Date xxx ...

Page 13: ...e AUTO button Working outside the stage Toshowa3 dimensionalobjectusingthevisualizer placetheobjectonthe working surface and adjust the zoom In out and AUTO keys If the object is too large forthestageorifyouwouldliketoshowitfromoneofits side oradifferentangel just place the object behind or in front of the unit and manually tilt the camera head remove the close up lens prior to titling the camera ...

Page 14: ...ach time you press the LAMP button the lighting changes occur as demonstrated The arm lights turn on The back light turns on All the lights turn off Adjusting image size To reduce or enlarge the image size displayed on the screen rotate the Zoom in or Zoom out knob ...

Page 15: ...To show a still image on the screen when the output signal is RGB press the Freeze button Thefrozenimagecannotbeadjusted Zoomin out color adjustment etc White balance adjustment Each time the lighting condition changes the user should adjust the white balance of the CAM Press the AUTO button to adjust the white balance automatically Auto adjustment One of the visualizer s special functions is auto...

Page 16: ... hold for more than 3seconds Projector inputs selection When the projector is connected to several input sources use the PROJECTOR SOURCE button to switch betweenprojectorsignal inputs Image rotation In order to rotate the image press the Rotate button once the displayed image will be rotated 90 180 270 degrees clockwise Continue to press the Rotate button to restore the image to its initial posit...

Page 17: ...programthatcapturesimagesintheAVIor JPG format C ClicktheCode WritingProgramfiletoinstallCode WritingProgram D Shutdownyourcomputerwhenpromptedinorderforthechangestotakeeffect E UsetheUSB2 0cableprovidedtoconnectyourcomputertothevisualizerbefore your computerisrestarted USB Port The USB port can be used to store still images from the visualizer in a computer Connect the visualizer to your computer...

Page 18: ...onnectthevisualizertotheprojectorwiththeRGBcables 3 ConnecttheRS232cabletothecomputer sconnector Thevisualizer sRS232portislocatedon its rightside 4 Aftercompletionoftheconnection turnonthevisualizer click start All Programs Visualizer andthefollowingdialogbox appearsasbelow When the indicator of Current RS 232 Connection Status is green that means the connection between the visualizer and the com...

Page 19: ...manual is BE EF 03 0 6 00 BA 0 2 01 0 0 00 6 0 01 0 0 In the POWRE ON box Input be ef 03 06 00 ba d2 01 00 00 60 01 00 Then use the same input rule to input other code b If the data is in the character string format input character string Forexample the POWERON codeintheSHARPC40 50projectormanual is P O W E 1 isspace is enter In the POWER ON box input POWR 1 0d 0a Input other codes in the same way...

Page 20: ...by the projector s manufacturer The projector s RS232 control port normallyhasRXDpin TXDpinandGNDpin thenamemaybedifferent Theparallelismof eachdatapinisshownasfollows Visualizer sRXDpin Projector s TXDpin Visualizer sTXDpin Projector s RXDpin Visualizer sGNDpin Projector s GNDpin 5 Ifyoucannotusebuttonsontheoperationpaneltocontroltheprojector pleaseuse Code Writingsoftware s projectorcontrol code...

Page 21: ...ogramreceivedis thesameasthesendingcode Ifthereceiving codeis sametothesendingcode theinputcodesarecorrect Ifthevisualizercannot controlthe projector pleasedothefollowing 1 Checktoseeifthesourcecontrolcodesofprojectorarecorrect 2 Checktomakesuretheconnectionbetweenthevisualizerandtheprojectoriscorrect ...

Page 22: ... 20 Folding The Unit Foldtherightarmlightdownfirstontothebase thentheleftarmdown Rotatethecamerahead clockwiseuntilthecameraheadisparalleltothecamerastand Carefullyfoldthecamerastanddowntothefrontpanel ...

Page 23: ... of the external equipment is set incorrectly Reset the resolution of the external equipment The device is not switched to the correct source of signals Switch to the correct source of signals The computer transfer key VGA is activated Press the source of signal CAM HDMI is activated Press the source of signal CAM The image can not be moved around The image can not be moved around because the Free...

Page 24: ...e Auto Negative Positive conversion Yes Black White and color selection Yes Image Text mode conversion Yes Image Title Yes Image Freeze Yes Image split Yes Image Mirror Yes Image Rotate 0 90 180 270 Lights Arm Lamp 1 5W LED lamps x 2 Bottom Lamp 2 5W LED lamps Input connectors HDMI 1 USB TYPE A 1 USB TYPE B 1 MIC built in 1 RS232 DB9 1 VGA 1 Audio IN Mini Jack 1 Output connectors HDMI 1 Audio OUT ...

Page 25: ...Power requirements 12V 2A external AC adapter Dimension W x D x H Folded 510 x 410 x 120mm Setup 510 x 530 x 570mm Packing 600 x 200 x 480mm Weight N W 5 0Kg G W 7 0Kg ...

Reviews: