background image

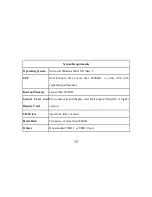
System Requirements

Operating System

Microsoft Windows2000, XP, Vista, 7

CPU

Intel   Pentium   III   of   more   than   800MHz     or   other   CPU   with

equivalent performance

Internal Memory

Larger than 512MB

Sound   Card   and

Display Card

The sound card and display card shall support DirectX8 or higher

version.

CD Driver

Speed of 4 times or faster

Hard Disk

Free space of more than 500MB

Others

One standard USB1.1 or USB2.0 port

15

Summary of Contents for DVT123SA

Page 1: ...ACTION CAMCORDER 50203 USER MANUAL 0...

Page 2: ...emory cards Pending your user settings it is recommended that a 4GB or higher CLASS 10 SD Card be used to avoid Read Write complications which will appear as an error message on the screen during use...

Page 3: ...Mounting Accessories 2...

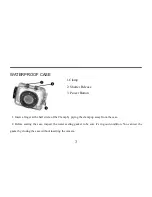
Page 4: ...e Clamp by prying the clamp up away from the case 2 Before sealing the case inspect the water sealing gasket to be sure it s in good condition You can test the gasket by closing the case without inser...

Page 5: ...he entire interior is dry the case and gasket are safe for use under water 3 There are just two buttons required for recording video and images the Shutter Release and the Power Button 4 Remember to p...

Page 6: ...l the accessories with a 1 4 20 screw the camera must be enclosed in with the waterproof case or in the included mounting adapter 2 Turn the waterproof case or mounting adapter clockwise onto the 1 4...

Page 7: ...ned to allow you to wrap the Handlebar Clamp around the actual handlebar of your bicycle 6 After positioning the Handlebar Clamp where you want it close up the bottom half of the clamp and tighten the...

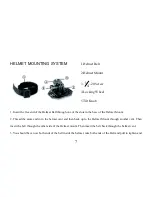
Page 8: ...o the helmet vent and then back up to the Helmet Mount through another vent Then insert the belt through the other side of the Helmet mount Then insert the belt back through the helmet vent 3 You shou...

Page 9: ...the 1 4 20 screw of the Helmet Mount until secured 5 Turn the Locking Wheel so it applies pressure to the case to keep the connection secure 6 Loosen the Tilt Knob to adjust for the proper aiming ang...

Page 10: ...SHIELD 1 This Mounting Adapter allows you to attach mounting accessories that have a 1 4 20 screw 2 The camera will clip right in to this adapter 9...

Page 11: ...Quick User Guide 10...

Page 12: ...irect way Difference may arise between these displays and illustrations and the digital camera actually available for you due to difference in technological development and production batch under whic...

Page 13: ...beach or water because water sand particles dust or component containing salt may damage the video camera Keep the video camera contaminated free of dust and chemical materials Place it in a cool dry...

Page 14: ...and then wipe the camera gently with rag or tissue applicable to optical equipments Please use the cleaning agent of video camera for wiping if necessary Do not use organic solvent to clean the video...

Page 15: ...Electrostatic or electromagnetic field exists around the memory card 5 This memory card is taken out or power supply is interrupted when this video camera or computer is connected to the memory card i...

Page 16: ...800MHz or other CPU with equivalent performance Internal Memory Larger than 512MB Sound Card and Display Card The sound card and display card shall support DirectX8 or higher version CD Driver Speed o...

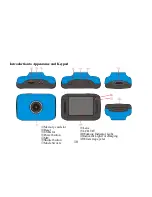
Page 17: ...arance and Keypad Introduction to Appearance and Keypad 16 Memory card slot Reset USB slot Power button MIC Shutter button Mode Switch Lens LCD TFT Working Indicator Light Indicator Light for charging...

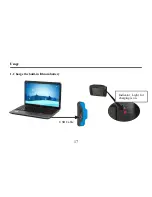
Page 18: ...Usage Usage 1 Charge the built in lithium battery 17 USB Cable Indicator Light for charging is on...

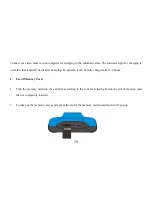
Page 19: ...l be off after charging In general it can be fully charged after 2 4 hours 2 Use of Memory Card 1 Push the memory card into the card slot according to the concave lettering beside the slot of memory c...

Page 20: ...uilt in memory is available in this video camera Make sure to insert memory card before using 3 Startup Shutdown 3 1 Startup Press the POWER button for 3 seconds the screen is displayed and the camera...

Page 21: ...camera for automatic shutdown is 5 minutes 3 3 Shutdown in case of power shortage when the power of the battery is insufficient the LCD display screen will display the low power icon Please charge it...

Page 22: ...switch after startup Picture taking mode pictures can be taken Video recording mode video can be recorded Vehicle mounted mode videotape can be recorded one section every 5 minutes 21 Picture taking m...

Page 23: ...ts the user that the camera is charging 6 Video recording mode When the mode switch is turned to video recording mode press the shutter button once or click the LCD center once to begin recording unde...

Page 24: ...the video camera is in video recording mode 3 videoing size clicks this icon and you can choose 720P VGA 4 means that the memory card is inserted at present 5 digital zoom icon click it and enlarge it...

Page 25: ...this icon to set the date and time finished setting and press Shutter key to confirm 7 Picture taking mode Switch the mode switch into the Picture taking mode press the shutter button or click the LC...

Page 26: ...o select the photo resolution 4 means that the memory is been inserted at present 5 digital zoom icon click it to enlarge 6 digital zoom icon click it to minify 7 visual shutter touch this visible fra...

Page 27: ...cle mounted mode Turn the mode switch to vehicle mounted mode press the shutter button or click the LCD center once under the preview state to begin recording save a segment for recording every 5 minu...

Page 28: ...video size click this icon to select 720P VGA 4 represents that the memory card has been inserted 5 digital zoom icon click it to enlarge 6 digital zoom icon click it to minify 7 visual shutter touch...

Page 29: ...f automatically during recording process in order to save power user can press the power button shortly to start the screen and restore display 9 Playback mode 9 1 After starting up and entering the p...

Page 30: ...device 4 Means that clicking can select files frontwards 5 Means that clicking can select files backwards 6 Means that clicking can activate to confirm the deletion of the current file picture 7 Means...

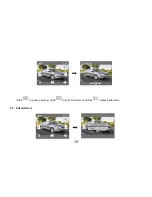
Page 31: ...Click to pause playing click to play forward and click to play backward 9 3 File deletion 30...

Page 32: ...lay function Connect the device to the computer with USB line under turning on state then it will be switched into the movable hard disk mode Icon of movable disk will appear on the window of my compu...

Page 33: ...ounted mode removable disk Camera lens F3 1 f 9 3mm Digital zooming 4 times Shutter Electronic shutter LCD display screen 2 0 inch touch screen Image resolution 5M 2592 1944 3M 2048 1536 1M 1280 1024...

Page 34: ...eo AVI Storage medium Micro SD card Supporting up to 32GB without built in flash memory USB interface High speed USB 2 0 interface Power Supply Built in 3 7V rechargeable lithium Dimension length widt...

Page 35: ...ment of the product and battery please dispose them in accordance to any applicable local laws of requirement for disposal of electrical equipment or batteries In so doing you will help to conserve na...

Reviews: