background image

Keeping the

Printer Clean

5-9

Printer Care

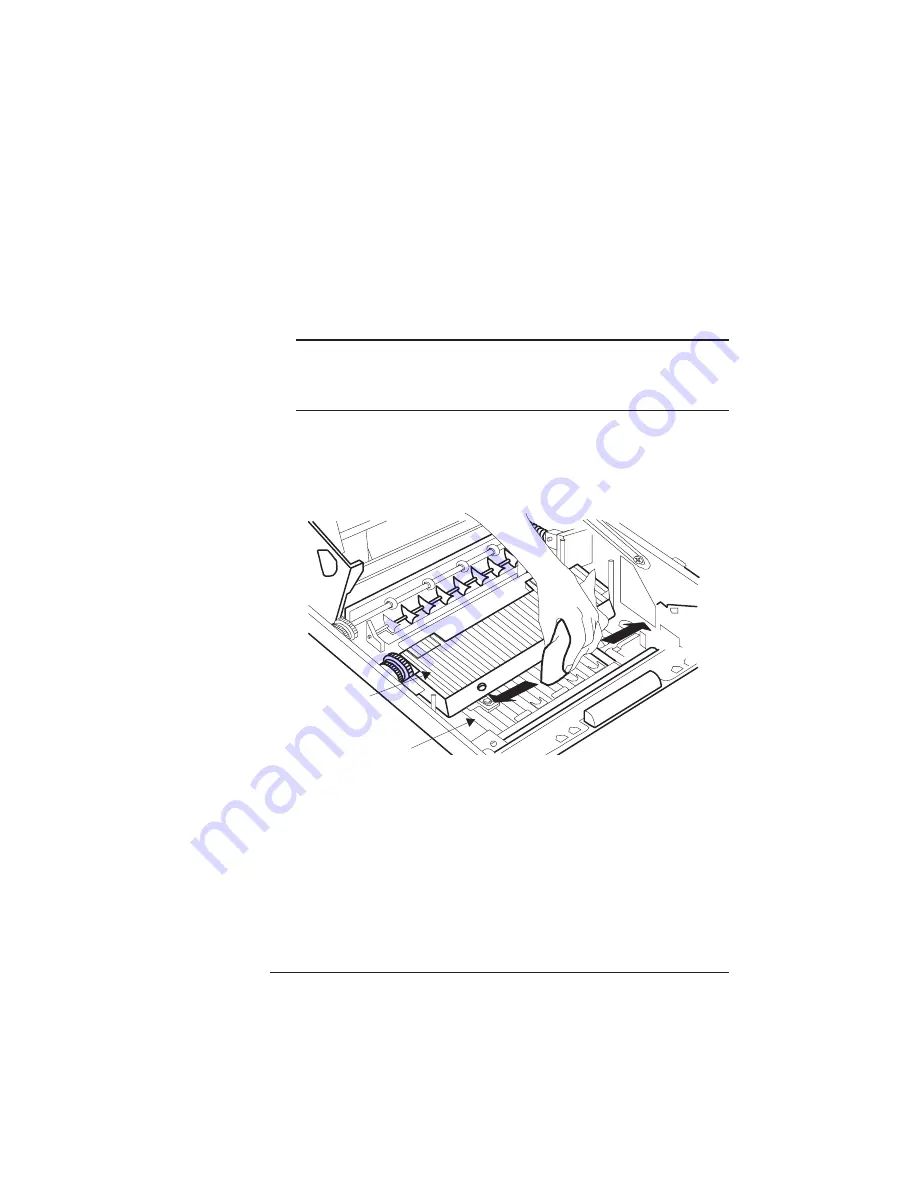
Cleaning the Media-Feed-Guide Area

The media feed guide area provides the media path between the 
transfer guide area and the fuser assembly.

M WARNING: Be careful; the area around the fuser assembly is hot.

ACHTUNG! Verletzungsgefahr! Bei Betrieb wird die Umgebung der

Fixiereinheit heib.

1

Make sure the printer’s power cord is unplugged and open 
the printer top section.

2

With a water-dampened, soft cloth, wipe off any accumulated 
dust from the media feed guide area.

3

Using a dry, soft cloth, wipe the cleaned area to remove 
moisture.

v

Media

feed

guide

Fuser

assembly

Summary of Contents for 1725 SLS

Page 1: ...QMS 1725 SLS Print System User s Guide 1800332 001B...

Page 2: ...le with Adobe s PostScript Level 2 language Adobe Adobe Systems Incorporated AppleTalk EtherTalk LaserWriter LocalTalk Macintosh TrueType Apple Computer Inc CompuServe H R Block DEC DECnet LN03 VMS Di...

Page 3: ...s section as a road map to discover what s in the Getting Started guide n About the Documentation This section functions as a Wel come Center It gives you an idea about what s in your Setup and User s...

Page 4: ......

Page 5: ...Related Documentation 1 5 About This Manual 1 5 Typographic Conventions 1 5 Printer Features 1 6 Media Flexibility 1 6 Multiple Resolutions 1 6 Five Resident Emulations 1 7 Sessions Support 1 8 Reside...

Page 6: ...ng the Configuration Menu 2 5 Selecting Configuration Menu Options 2 6 Changing Character Information 2 8 Saving Configuration Changes 2 10 Canceling Configuration Changes 2 11 Setting the Message Win...

Page 7: ...oading the PostScript Error Handler 2 46 Memory 2 46 QMS Memory Management 2 47 Memory Terms 2 48 Evaluation of Your Printing Environment 2 50 Duplexing and Memory Requirements 2 51 Memory Clients 2 5...

Page 8: ...Formatting a Hard Disk 2 65 Collation 2 66 Spool Overflow 2 66 Installation 2 67 Operator Password 2 67 Use Operator Password 2 67 Admin Password 2 67 Use Admin Password 2 68 Using Passwords 2 68 Conf...

Page 9: ...ile 3 18 Creating a Network Job Separator 3 20 Working with Status Pages 3 20 Identifying a Status Page Type 3 20 Printing a Status Page 3 21 Cancelling Ending Print Jobs 3 21 Cancelling a Print Job 3...

Page 10: ...6 5 Testing PC Communication 6 6 Creating the Test File 6 6 Sending the Test File 6 7 Verifying the Serial Port Setting Changes 6 11 Testing Macintosh Communication 6 12 Printer Problem Checklist 6 12...

Page 11: ...27 Image Easily Smears when Rubbed 6 27 Placing a Service Call 6 28 7 Professional Printing Introduction 7 2 About Typefaces and Fonts 7 2 Typeface Classification 7 3 Typography Terms 7 4 Resident Fo...

Page 12: ...20 Re installing the Tray Assembly 8 24 Memory Modules SIMMs 8 26 Installing a SIMM 8 26 Removing a SIMM 8 29 Installing Optional Interfaces 8 30 Installing an Optional Interface Card and Daughterboa...

Page 13: ...to Serial B 11 Warranty Considerations B 12 Consumables and Your Warranty B 12 Electrostatic Discharge and Your Warranty B 12 C Document Option Commands Introduction C 2 Supported DOCs C 2 Header Trai...

Page 14: ...Sessions D 2 What is a Session D 2 How is a Session Used D 3 Session Command D 4 Examples D 7 Sessions Document Finishing Terminology D 9 Document Finishing DOC D 10 E Notices Manual Notice E 2 Laser...

Page 15: ...Contents xi F Configuration Menu Menu Diagrams F 2 Glossary Index v...

Page 16: ......

Page 17: ...uction In This Chapter n About the printer n About the documentation n About this manual n Printer features and user benefits n Printer options n Using the printer s control panel n Printer host commu...

Page 18: ...including duplex printing and flexible emulation support In addition it prints 17 pages per minute letter A4 paper size and is a high quality 300x300 and 600x600 dpi multiple resolution desktop printe...

Page 19: ...m Setup Guide Refer to this guide as you unpack and set up the printer It con tains detailed illustrated instructions to guide you as you unpack and set up your printer and connect it to a host comput...

Page 20: ...res that cannot be accessed by your application or page description language This manual lists and explains all of the DOCs Using QMS DOC you can develop one driver to support all languages and emulat...

Page 21: ...the features operation and main tenance of your QMS 1725 SLS printer Each chapter begins with highlights of its contents An extensive index at the end of the manual further helps to locate specific t...

Page 22: ...ehensweise da sonst Verletzungsgefahr bestehen k nnte Printer Features This brief overview will acquaint you with your printer s major features and how they can benefit you Consult the index or the ta...

Page 23: ...P GL plotter emulation 7470A 7475A 7550A and ColorPro at 300x300 dpi and 600x600 dpi Lineprinter Emulation The Lineprinter emulation prints simple unformatted text files at 300x300 and 600x600 dpi Eac...

Page 24: ...Symbol Sets Your printer comes with 12 PostScript typeface families containing 39 licensed fonts and it provides TrueType font support in PostScript emulation only All resident PostScript typeface fa...

Page 25: ...Talk network or directly to an IBM or compatible PC The printer also works in many minicomputer and mainframe computer environments User Benefit You can have more than one computer printing to the pri...

Page 26: ...automatic jam recovery Automatic Jam Recovery With most printers if a media jam occurs you must remove the jammed media and then reprint the job On a QMS Crown printer if the Page Recovery menu optio...

Page 27: ...t System comes with 13 MB of RAM How ever you can upgrade this RAM to 32 MB through the installation of SIMMs single in line memory modules Additional RAM allows you to print at higher resolutions on...

Page 28: ...mages Network Interfaces The QMS 1725 SLS Print System can use optional interfaces such as IBM 3270 IBM 5250A or one of the CrownNet NICs network inter face cards running multiple protocols Contact yo...

Page 29: ...ition it displays the current status of the printer including any condition that needs your attention The control panel consists of the following parts n Sixteen indicators provide printer status info...

Page 30: ...or intervention This indicator is usually accompanied by a status message in the message window Lights when the printer is receiving data from one or more of the simultaneous interfaces Lights when th...

Page 31: ...n menu refer to chapter 2 Printer Configuration for complete information This light will flash to indicate the printer is terminating the current print job Menu Administration Miscellaneous Keypad Lan...

Page 32: ...line and ready to accept new print jobs the indicator goes back on If a remote console has the printer off line pressing the Online Offline key will not take effect until the console puts the printer...

Page 33: ...evious key to return to the previous selection or option for the current menu When changing character information use this key to return to the previous choice for the current input character Press th...

Page 34: ......

Page 35: ...2 Printer Configuration In This Chapter n Methods of configuration n Configuration menu n Operator control menu n Administration menu n Installation menu...

Page 36: ...he feature s location in the configuration menu the avail able choices for that feature and the factory default the value set at the factory Methods of Configuration You have different methods of conf...

Page 37: ...n line help for details on using the software Using Printer Commands Printer commands such as PostScript operators QMS Document Option Commands DOCs and HP PCL and HP GL commands can enable job specif...

Page 38: ...change selections send the job and then change the defaults back Note Defining document processing selections for a particular job through the control panel is not recommended in a shared environment...

Page 39: ...nce to exit the configuration menu and put the printer back on line ready to accept new print jobs the indicator goes back on Press the Menu key to access the configuration menu after the printer goes...

Page 40: ...nd idle before you can access the config uration menu Selecting Configuration Menu Options Once you access the configuration menu you use the control panel keys to move through the menu Use the follow...

Page 41: ...t Advance to the Communications Parallel menu COMMUNICATIONS PARALLEL Select Access the Parallel menu PARALLEL MODE Next Advance to the Parallel Emulation menu PARALLEL EMULATION Select Access the Emu...

Page 42: ...the character selection process move the cursor to the last character of the input field the character farthest to the right and press the Select key or move to the first character of the input field...

Page 43: ...n IDLE Menu Access the configuration menu CONFIGURATION OPERATOR CONTROL Next Advance to the Administration menu CONFIGURATION ADMINISTRATION Select Access the Administration menu ADMINISTRATION COMMU...

Page 44: ...CENT Online Offline or Menu Exit from the menu Online Offline or return to the previous menu Menu You are prompted to save your change s SAVE CHANGES NO Next Advance to the Save Changes Yes option SAV...

Page 45: ...the order shown in the following table The printer responds by dis playing a status message in the message window Setting the Message Window Language Status messages and configuration menus can be dis...

Page 46: ...jobs through the printer control panel Notes The printer must be restarted for changes to the Keypad Language menu to take effect You can either let the printer restart automatically after you save th...

Page 47: ...the default cassette input bin from which media is drawn into the printer Menu Operator Control Collation Choices On Off Default On Notes For additional information on collation refer to Collating Ou...

Page 48: ...medium to be fed manu ally Menu Operator Control Outputbin Choices Upper face up Default Upper Menu Operator Control Chain Inputbins Choices On Switch to the next input bin with the same size and typ...

Page 49: ...Duplex Choices On Off Default Off Notes This is an optional feature and supported only if the duplexing unit and enough memory are installed See Quick Config in the Memory submenu later in this chapt...

Page 50: ...he amount of time the printer waits on transmission from the host for various types of data Setting a PostScript Emulation Timeout The PostScript emulation timeout is the maximum number of seconds the...

Page 51: ...inting the job in the default emu lation Setting Serial Interface Parameters Use the Administration Communications Serial menu to set the serial interface communication values used for printer host co...

Page 52: ...Disabled Turn off serial communication with the host The printer stops accepting print jobs over the serial interface Default Interactive Notes The printer must be restarted for changes to the Mode me...

Page 53: ...started for changes to the Min K Spool menu to take effect You can either let the printer restart automatically after you save the change and exit the Configuration menu or you can wait for the change...

Page 54: ...es how the printer should handle parity errors Menu Administration Communications Serial Def Job Prio Choices 001 100 highest lowest priority Default 001 highest priority Menu Administration Communica...

Page 55: ...haracter Choices Off Ignore parity errors The printer prints its best interpretation of the character s affected by the error On Don t ignore parity errors The printer replaces the character s affecte...

Page 56: ...tl Choices DSR POL DSR DTR POL DTR RTS CTS Normal reverse Off on Normal reverse Off on Off on Off on Defaults DSR POL DSR DTR POL DTR RTS CTS Normal Off Normal On Off Off Notes If the host uses hardwa...

Page 57: ...s Normal Fixed Enable standard ASCII hex protocol Print jobs cannot alter this value through PostScript operators Binary Enable Quoted binary communications protocol Print jobs can alter this value th...

Page 58: ...tions Parallel Emulation Choices ESP Hexdump PostScript PCL5 HPGL CCITT Lineprinter Other optional emulations also appear if installed Default ESP Menu Administration Communications Parallel Min K Spo...

Page 59: ...nistration Communications Parallel Spool Timeout Choices 00000 99999 Default 00030 Menu Administration Communications Parallel Data Bits Choices 7 Bits 8 Bits Default 8 Bits Menu Administration Commun...

Page 60: ...ived via the parallel interface priority over jobs received via the serial and AppleTalk interfaces Menu Administration Communications Parallel PS Protocol Choices Normal Enable standard ASCII hex pro...

Page 61: ...lly turn on the printer Menu Administration Communications AppleTalk Connection Choices Conventional Allow one LocalTalk connection and accept only one print job at a time If two users send print jobs...

Page 62: ...e less than the K Mem for Spool value A 00000 value does not turn off the spooling buffer for the parallel interface If the value is set to 00000 the printer calculates the Min K Spool automatically a...

Page 63: ...ult Emul sets the ESP default emulation used when ESP is unable to identify the language of a print job This allows the system administrator to select alternate default emulations Setting PostScript P...

Page 64: ...t Level 1 files Level 1 B W For files that contain only black and white PostScript Level 1 operators This mode does not support the PostScript color operators the use of color operators could cause th...

Page 65: ...ts100 Zapf Dingbats200 Zapf Dingbats300 Default Roman 8 Notes Not all symbol sets are available with certain resident fonts The Desktop PS Math Math 8 Microsoft Pub Pi Font PS Text Ventura Intl Ventur...

Page 66: ...o choose whether to retain temporary HP PCL5 fonts and macros at the end of each print job Menu Administration Emulations PCL 5 Lines Per Inch Choices 1 48 Default 6 Menu Administration Emulations PCL...

Page 67: ...the entire state of PCL as well as the temporary macros fonts and patterns from previous PCL jobs unless you do one of the following n Change any PCL front panel option n Send any PCL specific DOC ex...

Page 68: ...emulate a monochrome or color plotter Default Enable Notes This feature may be useful when printing PCL4 documents which may inadvertently select unwanted scalable fonts Menu Administration Emulation...

Page 69: ...rmula White Y 1 0 30 1 0 59 1 0 11 100 gray Black Y 0 0 30 0 0 59 0 0 11 0 gray Red Y 1 0 30 0 0 59 0 0 11 30 gray Green Y 0 0 30 1 0 59 0 0 11 59 gray Yellow Y 1 0 30 1 0 59 0 0 11 89 gray Blue Y 0 0...

Page 70: ...efault 7550A Menu Administration Emulations HPGL Scaling Percent Choices 001 150 1 150 Default 100 100 Notes To scale plots select the paper size originally used for the plot in the Paper Type menu an...

Page 71: ...a black background Off Print a black image on a white background Default Off Menu Administration Emulations HPGL Enhanced Mode Choices On Uses an increased resolution for the grid Off Uses standard re...

Page 72: ...its are set to 0 197 5 mm on three sides and 1 143 29 mm on the fourth side The HP GL emulation senses the media size when the Paper Type is set to Scale to Paper or when it is set to a particular med...

Page 73: ...ck Pen 5 Blue 89 black Pen 6 Violet 59 black Pen 7 Orange 25 8 black Pen 8 Brown 50 black Notes Cyan 30 black magenta 59 black and yellow 11 black Menu Administration Emulations Lineprinter Font Choic...

Page 74: ...the print job is translated to a carriage return line feed CRLF combination Menu Administration Emulations Lineprinter Character Map Choices ASCII EBCDIC Default ASCII Menu Administration Emulations...

Page 75: ...n Autowrap Specifies whether long lines are to be wrapped to the next line instead of being truncated Menu Administration Emulations Lineprinter CR is CRLF Choices On Translate all carriage returns to...

Page 76: ...or detailed information on the contents of these special pages Working with Status Pages Printing a status page is a two step procedure Identify the type of status page you want to print and then prin...

Page 77: ...Standard Lists printer identification information current memory configuration timeouts communication settings input buffer sizes and available fonts Advanced Contains the same information as the stan...

Page 78: ...al Pages Header Inputbin Choices Upper Pull header page media from the upper input bin Lower Pull header page media from the lower input bin Default Upper Notes If you used the Administration Engine I...

Page 79: ...the printer such as its name the PostScript emulation level and version and various printer settings However you can turn the start up page off to conserve paper and toner Menu Administration Special...

Page 80: ...ns to be run Each printer comes standard with a certain amount of memory but you may add more memory as necessary Menu Administration Startup Options Do Sys Start Choices Yes Check the hard disk for a...

Page 81: ...r printer s memory Just remember that if your printing needs change not only do you have the ability to increase the amount of printer memory but you also can redistribute it where you feel it would b...

Page 82: ...1725 SLS Print System comes standard with an internal hard disk and has the option of upgrading to a larger internal hard disk up to 512 MB and adding up to six external drives See also SCSI Memory M...

Page 83: ...t The number and type of features you can run on your printer simulta neously depend on the amount of RAM you have and how that RAM is distributed Your printer comes with 13MB of RAM but it is upgrad...

Page 84: ...n take the memory in the clients that control the unused features and assign it to other clients that need additional memory Evaluation Questions To get a better idea of what your printing requirement...

Page 85: ...have answered all of these questions read the following sections to find out which memory clients control features you plan to use and which memory clients control features you don t need Duplexing a...

Page 86: ...ent The Quick Config option is intended to allow you to specify the following items n Resolution 300 or 600 dpi n Printing mode simplex or duplex n Page size letter executive A4 or legal The Quick Con...

Page 87: ...s all float memory PostScript Heap The K Mem for PSHeap listed on the status page as Heap is the number of kilobytes of RAM dedicated to the PostScript emulation interpreter This memory client holds d...

Page 88: ...tatus Page Alias Font Cache Choices 00088 99999 Default Variable Notes This memory setting can reduce the number of times a PostScript font must be converted from outline form to bitmap form thus redu...

Page 89: ...on Memory K Mem Emul Tmp Choices 00256 99999 Default Variable Notes This value must be greater than the sum of the Min K Spool for all installed and enabled interfaces Data in this client disappears w...

Page 90: ...not be The recommended amount of memory for the disk cache client is n 120 KB minimum n 0 5 KB per MB of disk storage total for all disks For example the recommended amount of memory for the disk cac...

Page 91: ...nches x vert resolution dpi number of scan lines scanline width bytes x number of scanlines total frame buffer memory bytes bytes 1024 KB For example if you are printing a duplex 8 5 x 11 0 page at 60...

Page 92: ...placement of printed images To check image alignment print a standard status page Administra tion Special Pages Print Status When the printer is placing images properly the alignment angle bar in the...

Page 93: ...ffset Choices 00000 00300 0 00 0 mm 1 00 25 4 mm Default 00100 0 33 84 mm Notes Values above 100 move the image to the right Values below 100 move the image to the left Menu Administration Engine Imag...

Page 94: ...rred Menu Administration Engine Outputbin x Name Choices Up to 16 alphanumeric characters Default Outputbin 1 upper Outputbin 2 face up Menu Administration Engine Def Resolution Choices 300 dpi 300x30...

Page 95: ...t both simplex and duplex jobs on letterhead paper from the same input bin cassette without having to sort the pages manually Menu Administration Engine Toner Out Act Choices Continue Printing when a...

Page 96: ...ctory defaults Menu Administration Engine Page Counters Sheets Printed Choices Ten digits non configurable For information only Default Current page count Notes The sheets printed number represents th...

Page 97: ...the start up and the status page Once this reorganization is done the files on the hard disk can no longer be accessed if the hard disk is reattached to an earlier QMS Crown printer This reorganizatio...

Page 98: ...ommended device number for the internal SCSI hard disk if present is DSK6 Note For the printer to recognize any attached hard disk s each hard disk must be turned on before you turn on the printer DIS...

Page 99: ...ties offer formatting options for both Macintosh and PC setups See the on line documentation for details on formatting disks Using the Printer Configuration Menu After you have accessed the Administra...

Page 100: ...ion Spool Overflow This option is used to specify which disk and how much of that disk should be used to store print jobs when the jobs can not be accom modated by RAM The maximum setting varies accor...

Page 101: ...nts the password used to enter the Administration menu when enabled Menu Installation Operator Passwrd Choices Up to 16 alphanumeric characters Default Blank no password Notes Enable the password in t...

Page 102: ...you enter an invalid password the message win dow flashes INVALID PASSWORD for three seconds and then returns you to the Configuration menu Configuring Optional Features Several of the optional featur...

Page 103: ...3 Daily Operations In This Chapter n Printing modes n Using different print media n Paper feeding...

Page 104: ...elines set for the printer See appendix B Technical Specifi cations n If you have problems with double feeding remove the media from the cassette or input bin and fan the edges The sheets may be stick...

Page 105: ...heat stability This assures good image transfer with out excessive curling of the paper You can use special paper such as bond paper often used for statio nery for special applications However textur...

Page 106: ...nt quality and printer operation Improperly stored paper increases the chance of paper jams during printing and can drastically affect the appearance of your printed pages Keep paper in good condition...

Page 107: ...ding depth is 1 97 inches 50 mm Use the following instructions to install a cassette 1 Fill the cassettes with paper If you re using n Letterhead and printing simplex single sided be sure to place the...

Page 108: ...feed individual sheets of paper or other material such as envelopes label stock and transparencies into your printer Paper weight can range from 16 to 36 pounds 60 to 135 g m2 Envelopes can be fed fro...

Page 109: ...e key to take the printer offline 2 Press the Tray Select key until the Manual Feed indicator is lit 3 Select the manual feed size in the Operator Control menu 4 Adjust the manual feed guides on the u...

Page 110: ...f paper Use the fol lowing instructions to attach the face up output bin 1 Insert the two end tabs of the face up output bin into the slot on the back of the printer 2 Allow the extended part of the b...

Page 111: ...ia path Printing Labels Adhesive label stock has pressure sensitive peel and stick adhesive backing The procedure for feeding labels is almost the same as for regular paper however you must use the fa...

Page 112: ...instructions to print on envelopes from your software Read the printing section of your application man ual to find out how your software supports envelope printing The page orientation should be in...

Page 113: ...ed and check the manual feed guides to make sure they re not too tight and buckling the envelopes Also make sure envelopes meet specifications listed in appendix B Technical Specifications If envelope...

Page 114: ...The most convenient way to configure the printer is through its control panel Use the following table to help you configure cassette chaining through the control panel Note Make sure that the two cas...

Page 115: ...space is consumed during a print job the printer begins chunk collat ing Chunk collation breaks a job into sections and performs collation on each of those sections The next diagram shows the printing...

Page 116: ...LS Print System examines the first part of each print job to determine its emulation Once the emulation is identified the print job processes without checking for any changes in emulation until an EOD...

Page 117: ...t appears to be program code instead of your PostScript print job n You want to print multiple jobs with header pages n You want to print multiple jobs where job separation is important When your prin...

Page 118: ...for the Serial and Parallel Protocols Your printer can be connected through the serial or parallel interface to a stand alone PC to a PC print server or to some other type of print queuing system This...

Page 119: ...em Note If you print both serial and parallel protocol jobs then you must set the end job mode for each protocol Wait for the printer to go idle and then press the control panel keys in the order show...

Page 120: ...e menu PARALLEL SERIAL END JOB MODE Select Accesses the End Job Mode menu END JOB MODE OPTION Next Advances to the appropriate option QMS EOD HP EOD or None END JOB MODE OPTION Select Selects the opti...

Page 121: ...an INPUT IDLE message remaining in the printer message window after the document finishes printing When the QMS EOD or the HP EOD is set the printer does not rec ognize the Ctrl D EOD command Add your...

Page 122: ...ave different procedures for creating the job separator such as initializa tion sequences custom banner pages print job headers or print job trailers The print server does not necessarily send multipl...

Page 123: ...as the standard status page as well as configuration menu settings and a full list of fonts and downloaded emulations Printing a Status Page After you have identified the type of status page to print...

Page 124: ...are no equivalent functions in the configuration menu Note If you need to cancel the cancel job or end job procedure press the Menu key Cancelling a Print Job Press the control panel keys in the orde...

Page 125: ...job indicator in the Administration Communications P arallel and Administration Communications Serial menu See chapter 2 Printer Configuration for more information The message window momentarily disp...

Page 126: ...tem User s Guide 3 24 SAVE CHANGES NO 4 To save your change press the Next key so that the mes sage window displays SAVE CHANGES YES 5 Press the Select key to save the change The Online Offline indica...

Page 127: ...4 Print Quality In This Chapter n Setting print density n Using gamma correction n Using the calibration page n Changing printer resolution...

Page 128: ...es is through setting the print resolution Your printer is capable of printing at 300 or 600 dpi For pages requiring the best quality y our printer can provide set the printer resolution to 600 dpi Se...

Page 129: ...rear of the printer T o decrease density lighten print on the page slide the dial toward the front of the printer The dial clicks at the center setting Note You may want to increase density as the ton...

Page 130: ...nly spaced spots of v ariable diameter that when printed v isually blur together to appear as shades of gray Your QMS 1725 SLS Print System creates halftone cells by mapping each gray level onto a col...

Page 131: ...n frequency and the print resolution The default v alue for screen frequency using 600 dpi is 71 lpi This typically allows 73 dif ferent levels of gray The default v alue for screen frequency using 30...

Page 132: ...rint quality of a scanned image by improving halftones at a giv en resolution T o get the best gray scale PostScript image at any resolution gamma correction should be turned on You can set gamma corr...

Page 133: ...diagonal line across the top of the calibration page shows the quality of the diagonal line At 600 dpi the line is less jagged than at 300 dpi Halftone Bar Black to White The v ertical bar on the lef...

Page 134: ...rk area in the center of the circle at 600 dpi The arc rotation is by 2 degrees The near vertical and near horizontal lines are less jagged Horizontal Resolution The rectangle on the bottom right hand...

Page 135: ...d in the printer 3 Check your grayscale quality by printing a calibration page Use the Calibration Page option in the Administration Spe cial Pages submenu to print a status page 4 Repeat steps 1 thro...

Page 136: ......

Page 137: ...5 Printer Care In This Chapter n Toner cartridge installation n Printer handling practices n Printer cleaning procedures...

Page 138: ...prints at 5 cover age For example a one page letter with no graphics When the car tridge toner supply runs low the printer message TONER OUT displays Usually parts of the page print lighter It is you...

Page 139: ...s and floppy disks since damage may occur to stored data Additional toner cartridges may be purchased from your QMS vendor Toner specifications are in appendix B Technical Specifications Installing th...

Page 140: ...ter until it fits firmly 4 Grasp the tab protruding from the left side of the cartridge and flex it to break it loose 5 Pull the tab straight out Pull the attached 22 inches 55 cm of tape completely o...

Page 141: ...the bottom only n Keep the output bin at minimum level If paper stacks too high you may experience paper jams and excessive paper curl n Do not leave the printer open for any length of time especially...

Page 142: ...eth n The transfer guide lock tray green with handle n The transfer guide strip silver metal n The media feed guide area black steel M WARNING Unplug the printer s power cord before cleaning the print...

Page 143: ...ition guides located directly behind the control panel on the inside of the printer 2 Use the cleaning brush to wipe clean the anti static teeth O Caution Be careful not to touch the transfer charging...

Page 144: ...area 1 Make sure the printer s power cord is unplugged and open the printer top section 2 With a water dampened soft cloth gently wipe off any dust that may have accumulated on the transfer guide loc...

Page 145: ...l the area around the fuser assembly is hot ACHTUNG Verletzungsgefahr Bei Betrieb wird die Umgebung der Fixiereinheit heib 1 Make sure the printer s power cord is unplugged and open the printer top se...

Page 146: ......

Page 147: ...6 Troubleshooting Printer Problems In This Chapter n Status messages n Printer problem checklist n Media jams n Problem descriptions n Print quality problems n Image defects n Placing a service call...

Page 148: ...rvice call if one becomes necessary Status Messages Printer control panel messages help you locate many problems When the printer needs operator assistance the message window displays one of the follo...

Page 149: ...is on line and printing jobs already in the queue No new jobs are arriving at the communication interfaces OUTPUTBIN OUTPUTBIN FULL The specified output bin is full OUTPUTBIN OUTPUTBIN JAM Media has j...

Page 150: ...ssage window turn the printer off and back on This often clears the service message indicator and printer operation resumes Always try this before making a service call Service calls should be placed...

Page 151: ...nu Error Handler is a diagnostic tool that identifies PostScript errors encountered during a print job HP GL Error Code Explanation PCL Error Codes Explanation 0 Not enough memory for job 0 Not enough...

Page 152: ...rcase letters however you must type the PostScript showpage operator in lowercase letters The symbol means to press the Enter key To produce the D and Z press and hold down the Ctrl key while you type...

Page 153: ...parallel port names 3 If the printer and PC are communicating a blank page ejects from the printer Skip ahead to PC Printing Software to fin ish connecting the printer If a blank page doesn t eject a...

Page 154: ...ectly you may want to check your AUTOEXEC BAT file in DOS to make sure that the printer s serial port settings match those of the PC a Look for a command line like this in your AUTOEXEC BAT file mode...

Page 155: ...EC BAT file and on the start up page may be the same However if they differ you must configure the printer to use the serial settings specified in the AUTOEXEC BAT file The following instructions expl...

Page 156: ...the currently selected baud rate 9600 BAUD Note The asterisk denotes the selection in the menu that is currently active 11 Press the Next key to cycle through the list of baud rates 300 BAUD 4800 BAU...

Page 157: ...save the change The Online Offline indicator lights and the message window dis plays IDLE Verifying the Serial Port Setting Changes 1 Reboot the printer 2 Compare the serial port settings listed on th...

Page 158: ...ecessary options Then select OK 3 Print a directory or a window a Choose Print Directory or Print Window from the File menu A dialog box appears b Select the printing options you want then click OK Fo...

Page 159: ...he Error indicator lights n Is the method of tray delivery configured correctly See chapter 2 Printer Configuration n Are all the printer covers closed securely n Is there a media jam If a paper jam m...

Page 160: ...ESP timeout See chap ter 2 Printer Configuration to change it from the control panel or use the PS Executive Series Utilities n If you continue to have problems with the ESP mode selecting the approp...

Page 161: ...edia from the areas indicated open and close the printer cover to clear the jam signal If all the jammed media has been removed printing automatically restarts when the cover is closed If printing doe...

Page 162: ...remove the cassettes from the printer first 3 If you experience difficulty in removing the media or if media isn t visible under the transfer guide lock tray lift the green lever on the inner metal p...

Page 163: ...nter or the printer may be damaged 5 Close the printer s top cover Clearing an Image Transfer Area Media Jam To clear a media jam from the image transfer area follow these steps 1 Open the printer top...

Page 164: ...ock tray O Caution Make sure the transfer guide lock tray is properly in place before closing the printer or the printer may be damaged 4 Close the printer top cover Clearing a Fuser Assembly Area Med...

Page 165: ...ing It may contain some unfused toner 3 If the media is stuck in the rear of the fuser assembly open the green fuser assembly rear door Remove the media by turning the green plastic knob at the left o...

Page 166: ...a Jam Follow these steps to clear a jam from the output area 1 Open the printer top cover and locate the fuser assembly M WARNING Be careful the area around the fuser assembly is hot ACHTUNG Verletzun...

Page 167: ...l out the media slowly After removing the media lower the media guide arm Clearing a Duplexer Media Jam To clear a jam from the duplexing unit follow these instructions 1 Press lightly on the upper ed...

Page 168: ...r more information Data Indicator Stays Lit If the printer has warmed up and the Data indicator stays on two problems may exist If you are downloading additional typefaces too many can overload the pr...

Page 169: ...Has the start up page been disabled Use the PS Executive Series Utilities or the control panel to make sure the start up page is on 2 Turn the printer off From a cold start the printer takes approxim...

Page 170: ...t up page ejects or blank pages come out during a print ing job try the following 1 Check the toner cartridge The image does not print if the cartridge is empty 2 Be sure you have broken the tab on th...

Page 171: ...duplex ing Print Quality Problems Print quality problems are those related to the appearance of the pages you print Print quality problems include white lines on the page uneven blacks and other prin...

Page 172: ...possible solu tions Try the solutions in the sequence given If the solutions listed don t solve the problem place a service call to your QMS vendor See the next section in this chapter Placing a Servi...

Page 173: ...y control lever inside the printer to the thin end of the wedge shaped scale 2 Remove the toner cartridge and gently rock it from side to side as you would when installing a new cartridge This redistr...

Page 174: ...the QMS international offices for work outside of the US National and interna tional contacts are listed in appendix A QMS Customer Support Before calling be sure you have the answers to these questi...

Page 175: ...7 Professional Printing In This Chapter n About typefaces and fonts n Typography terms n Typeface classification n Resident fonts n Postscript typeface sampler...

Page 176: ...ht thickness of stroke It does not define a particular size Typeface Family A group of similar typefaces For example the Times typeface family consists of four typefaces Times Roman Times Bold Times I...

Page 177: ...ve serifs Sans Serif Sans serif sans is French for without indicates a typeface without any of these small tails A Helvetica sans serif typeface is decorative by the shape and styling of its letters b...

Page 178: ...and is easier on the eye This manual s text uses the Helvetica font a proportionally spaced typeface Pi or Symbol Pi or symbol typefaces are collections of assorted special purpose characters for exam...

Page 179: ...the letter The following example shows a character in 8 10 12 24 and 36 point sizes A B C D E Bitmapped Font A bitmapped font is a one in which each character is represented by a set of dot patterns...

Page 180: ...t medium bold is the width thickness of the lines strokes that make up a character The example at left shows the medium and bold weights of Palatino Italic and Oblique Forms Times Roman Times Italic I...

Page 181: ...klmnopqrstuvwxyzAbcdefghijklmnopqrs tuvwxyzAbcdefghijklmnopqrstuvwxyzAbcdefghijklmnopqrstuvw AbcdefghijklmnopqrstuvwxyzAbcdefghijklmnop qrstuvwxyzAbcdefghijklmnopqrstuvwxyzAbcde fghijklmnopqrstuvwxyzA...

Page 182: ...n Times Italic Times Bold Times Bold Italic Courier Courier Oblique Courier Bold Courier Bold Oblique ITC Avant Garde Gothic Book ITC Avant Garde Gothic Book Oblique ITC Avant Garde Gothic Demibold IT...

Page 183: ...i or Symbol Font Dingbats ITC Zapf Dingbats Courier 12 pitch 10 point Courier 12 pitch 10 point Italic Courier 12 pitch 10 point Bold Courier 10 pitch 12 point Courier 10 pitch 12 point Italic Courier...

Page 184: ...riable spaced versions and all are scalable v 9825 Character Set ANSI ASCII French German ISO French ISO German ISO IRV International Reference Version ISO Italian ISO Norway Version 1 ISO Norway Vers...

Page 185: ...s Chapter n Envelope feeder n Duplexer assembly n Font and security cards n Downloadable emulations and print system software n Single in line memory SIMMs n Installing optional interfaces n Internal...

Page 186: ...egal and executive size n High capacity feeder 1500 sheet capacity n Automatic envelope feeder 100 sheet capacity n Duplexer assembly n Font and emulation cards n Security card n Memory upgrades RAM e...

Page 187: ...ray lets you print mailing addresses on envelopes pre printed with logos or addresses It even allows you to print your own logo and return address along with the mailing addresses Selecting Envelopes...

Page 188: ...urn the printer power switches off and remove the upper paper cassette 2 Remove the envelope feeder slot cover located above the upper paper cassette slot by pushing it in and then down 3 Replace the...

Page 189: ...Options 4 Reinstall the upper paper cassette in the printer 5 Take the envelope feeder in both hands line up the position ing arms with the openings in the printer and insert the enve lope feeder as f...

Page 190: ...er as far as they will go before meeting resistance 8 Adjust the envelope feed guides located on both sides of the envelopes to match the size of the envelopes Note Arrange the envelopes so that they...

Page 191: ...omatic feed from a paper cassette Additional memory is required for duplexing at 600 dpi resolution on legal size media The following chart represents the minimum amount of memory needed to print vari...

Page 192: ...upper and lower paper cassettes from the printer 3 Loosen the screw on the metal plate in the lower paper cas sette slot with a Phillips screwdriver Be careful not to drop the screw inside the printe...

Page 193: ...e in case y ou remove the duplex er from the printer If y ou do remove the duplex er this plate should be reinstalled to ensure that the printer operates properly 6 Remove the two screws on the duplex...

Page 194: ...ull out the inner cabinet Store the inner cabinet in a safe place in case y ou ever remove the duplex ing unit from the printer If y ou do remove the duplexing unit from the printer you must reinstall...

Page 195: ...The message window should read IDLE Font and Emulation Cards The two slots on the front right side of the printer below the bottom paper tray may be used to expand the font and or emulation capabili t...

Page 196: ...ts and data stored in the printer s memory 2 To insert a font or emulation card slide it into either slot with the label side facing up 3 Put the printer back on line To remove a card 1 If you are usi...

Page 197: ...Key Purpose Message Select Accesses the Administration Disk Operations Install Option menu DISK OPERATIONS INSTALL OPTION Select Accesses the Format Disk Dsk menu INSTALL OPTION DSK x Next Scrolls thr...

Page 198: ...Next key one or more times to advance through the list of selections or options Key Purpose Message Select Accesses the Administration Disk Operations Remove Option menu DISK OPERATIONS REMOVE OPTION...

Page 199: ...elect key Then press the Nex t key until the source of the optional emulation displays in the message window 5 Press the Select key You are prompted to insert the emulation card into the card slot 6 T...

Page 200: ...al emulation displays in the message window 4 Press the Select key Then press the Nex t key until the address of the card containing the emulation displays in the message window 5 Press the Select key...

Page 201: ...storage space Once an emulation is downloaded the only way to remove it is to reformat the hard disk using the Administration Disk Opera tions Format Disk menu or PS Executive Series Utilities Procedu...

Page 202: ...ey to turn the indicator off If you forget to take the printer off line before inserting or removing a card turn the printer power off and back on to regain access to the data stored in the printer s...

Page 203: ...ck on line Once a menu is password protected you cannot enter the menus or make changes in it until you enter a valid password You ll know whether or not the menu is password protected when you press...

Page 204: ...al ground for example the bare metal chassis of equipment as on the back of a computer that is plugged in but turned off Never attach the wrist strap to any piece of equipment with an electrical curre...

Page 205: ...optional network interface cables from the printer 2 Position the printer so that the right side of the printer to the right of the control panel is facing you 3 Remove the two screws on each end of...

Page 206: ...left is released by opening the ejector switches on each side of the connector and then pulling out the connector The connector on the right is released by pressing in the tab on each side with one h...

Page 207: ...tray assembly as you slide it out of the printer After the tray assembly has been lifted over the safety catches allow the tray to return to a level horizontal position Then pull the tray assembly str...

Page 208: ...r attach the wrist strap to any piece of equipment with an electrical current present Turn off all power switches first Plastic rubber wood painted metal surfaces and telephones are not acceptable gro...

Page 209: ...y turning it clockwise 3 Reconnect the two connectors on the tray assembly You should hear them snap into place 4 Replace the metal tray assembly cover using five screws to secure The top of the cover...

Page 210: ...raded through the installation of additional SIMMs to a maximum of 32 MB Note When installing a memory upgrade make sure the memory added is distributed among memory clients See the Memory submenu sec...

Page 211: ...ainted metal surfaces and telephones are not acceptable grounding points The printer isn t an acceptable grounding point either because it must be unplugged before you perform this task If you don t h...

Page 212: ...Guide 8 28 3 Hold the new SIMM at a 45 angle with the notch on the left hand side Slide the new SIMM into the open SIMM connector closest to the previously installed boards 4 Tilt the SIMM up to a 90...

Page 213: ...ious sec tion Installing a SIMM for installation instructions Note SIMM connector 0 DRAM 0 must always have an 8 MB SIMM installed and the printer must have at least 13 MB of RAM installed 1 If you ha...

Page 214: ...rk environment Depending on which optional kit you purchased for your printer your option assembly kit may include some if not all of the following n An interface board with metal plate attached n A d...

Page 215: ...grounding points The printer isn t an acceptable grounding point either because it must be unplugged before you perform this task If you don t have an anti static wrist strap discharge your body s sta...

Page 216: ...illustration 4 Peel the tape from the bottom of the plastic feet 5 With the plastic feet facing down insert the interface card through the connector opening in the metal plate from the outside of the...

Page 217: ...two plastic feet to the tray assembly Note Your optional interface card may look different than the one shown in the illustration 8 Open the two ejector latches on the interface board and the two on...

Page 218: ...lastic ribbon cable and fold it over so that the notches keys face upward on both connectors Slide the ribbon cable connectors onto the interface card connector and the controller board connector Note...

Page 219: ...two mini support posts in the two holes on the controller board 11 Snap the daughterboard on the two mini support posts and the two 48 pin connectors The daughterboard fits only one way Note Your daug...

Page 220: ...from your QMS vendor Make sure you have all the parts necessary for the conversion The Dataproducts conversion kit includes n An anti static wristband n Two 2 pin shunts small plastic pieces lined wit...

Page 221: ...important 3 Use a flat tipped screwdriver to remove the existing 1 K ohm DIP resistor pack from the RP1 socket located behind the parallel port Gently slide the screwdriv er under the DIP resistor pa...

Page 222: ...talling the Tray Assembly earlier in this chapter being careful to follow the directions for eliminating static electricity 6 Use the 50 pin to 36 pin cable included in your kit to connect the Datapro...

Page 223: ...brackets n Phillips screws n A power cable n A plastic ribbon cable A Phillips screwdriver and needle nose pliers are needed for this pro cedure Upgrading the Internal Hard Disk The following procedu...

Page 224: ...discharge your body each time after walking around and before touching the printer tray assembly again Handle the tray assembly and disk drive carefully and try to handle it by the edges only Use the...

Page 225: ...er board ribbon cable and the power cable fitting under the brackets on the hard disk attach the other end of ribbon cable to the controller board connector and the power cable to the 4 pin controller...

Page 226: ...nter control panel and must be used when installing or removing a printer option such as an optional emulation O Caution If you connect to this printer an external hard disk you previously used with a...

Page 227: ...rewritten to in a flash This allows you to update the system software without opening up the printer and installing new PROMs Updated system software allows you to take advantage of future enhancement...

Page 228: ...tware disk 2 b Disk 1 sy stem software disk 1 c Disk 2 sy stem software disk 2 6 Turn on the printer wait for IDLE to appear in the message window and then print an advanced status page The advanced s...

Page 229: ...e Select key to enter the Install to Disk submenu 5 Press the Next key until the following message appears in the message window INSTALL TO DISK PARALLEL 6 Press the Select key to load the software fr...

Page 230: ...ve completed installing the system software you are ready to boot the system Return to your printer and press the Menu key The message window displays the fol lowing message QMS SOFTLOAD X X INSTALL T...

Page 231: ...s point DO NOT TOUCH ANY KEYS until the system has completed loading The system may go through many cycles of rebooting which can take several minutes When the system rebooting is complete the followi...

Page 232: ......

Page 233: ...A QMS Customer Support In This Chapter n Sources of customer support n QMS world wide offices...

Page 234: ...to reach Q FAX In all other countries call 334 633 3850 Have your fax number handy when you call or place the call from your fax machine s handset You can choose to have either a directory a list of...

Page 235: ...tral Standard Time at 334 633 4500 US You can also fax questions to CTA at 334 633 3716 US Please indicate whether you would like a fax or a phone call If you call for assistance have the following in...

Page 236: ...merica Fax 334 639 3347 QMS Asia Pacific Melbourne 61 3 899 5777 Sydney 61 2 901 3235 Tokyo 81 3 3437 4030 Canada QMS Canada Inc 9630 Rte Trans Canadienne Saint Laurent Qu bec H4S 1V9 Telephones 514 3...

Page 237: ...r n Print engine specifications n Controller characteristics n Electrical and environmental requirements n Physical characteristics n Print media specifications n Optional hardware n Printer options a...

Page 238: ...to 17 pages per minute using letter or A4 paper Up to 7 5 double sided pages per minute using letter paper size Note Actual print speed depends on the host application Resolution 300x300 dpi 600x600...

Page 239: ...scalable HP PCL fonts in 35 symbol sets and 1 resident scalable HP PCL font in 5 symbol sets all of which can automatically be rotated to landscape orientation 40 resident HP GL symbol sets Support fo...

Page 240: ...dB A Printing less than 60 dB A Ozone Density The printer emits less than 0 1 ppm maximum with a 100 duty cycle under 8 hours of continuous operation Relative Humidity Printing 20 80 RH non condensing...

Page 241: ...rom upper or lower manual feed slots Sizes See Print Media Sizes below Types Cut sheet paper transparencies labels and envelopes We do not recommend printing on perforated paper including 3 hole punch...

Page 242: ...178 mm 7 2 5 x 10 1 2 188 mm x 267 mm Power feed Requires optional envelope feeder 3 7 8 x 7 1 2 98 4 mm x 190 5 mm 4 1 3 x 9 1 2 110 mm x 241 3 mm Duplexer assembly Optional kit that allows printing...

Page 243: ...e with this printer With an internal SCSI hard disk installed up to 3 external hard disks may be added Without an internal SCSI hard disk installed up to 4 external SCSI hard disks may be added Q FAX...

Page 244: ...cable used to connect your printer to a com puter Signal Pin No Signal Description Direction 1 Strobe In 2 Data 1 InOut 3 Data 2 InOut 4 Data 3 InOut 5 Data 4 InOut 6 Data 5 InOut 7 Data 6 InOut 8 Dat...

Page 245: ...ectively All interface conditions are based on Transistor Transistor Logic TTL level Both the rise and fall times of each signal must be less than 0 2 microseconds Data transfer must be carried out by...

Page 246: ...shown and may require an additional null modem adapter Check with your cable vendor for compatibility Printer end of cable 25 Pin M CPU XT end of cable 25 Pin F Printer end of cable 25 Pin F CPU AT e...

Page 247: ...erial port Note To download printer system software from a Macintosh you must have this type cable Pin Name Pinout view from front of connector 1 2 7 Reserved 3 Transmit Data TXD 4 Signal Ground GND 5...

Page 248: ...800 777 7782 In all other countries check appendix A QMS Cus tomer Support for the QMS office closest to you Electrostatic Discharge and Your Warranty Electrostatic discharge can destroy circuit board...

Page 249: ...ge your body each time after walking around and before touching the printer controller board again Handle the tray carefully and try to handle it by the edges only Incidental and consequential damages...

Page 250: ......

Page 251: ...C Document Option Commands In This Chapter n Supported Document Option Commands DOCs n Updated PLC 5 DOCs n CCITT commands...

Page 252: ...4 and PCL 5 DOCs as well as a listing of CCITT commands Supported DOCs Header Trailer Page Commands Print document creator Creator Print creation date and time CreationDate Print copyright statement C...

Page 253: ...et IncludeFeature symbolset Set carriage return to CR LF IncludeFeature criscrlf Set linefeed to CR LF IncludeFeature lfiscrlf Set number of lines per inch IncludeFeature linesperinch Set number of li...

Page 254: ...eature numcopies Select orientation IncludeFeature orientation Select output bins IncludeFeature output Set printer resolution IncludeFeature resolution Updated DOCs This section provides updated info...

Page 255: ...t resource may be deleted directly by the PCL language Therefore unless they are explicitly removed external fonts are always available to all PCL jobs Font Index Number In addition to its ID a downlo...

Page 256: ...current resource User downloaded PCL objects with the exception of palettes are identified by an ID when they are downloaded The ID is usually set by the file performing the download If not the system...

Page 257: ...Disable scalable fonts to n Print PCL 4 documents which have selected PCL 5 scalable fonts n More closely emulate the PCL 4 font environment Syntax IncludeFeature install resource id object id Purpose...

Page 258: ...object is deleted and replaced by the new object If a IncludeFeature remove command precedes a IncludeFeature install command the install command is ignored these two commands are mutually exclusive N...

Page 259: ...s0b4153This text will be in the downloaded font if it supports the ROMAN 8 symbol set is proportionally spaced 12 points in height or scalable upright medium weight and has type 4153 Example C Job 1 I...

Page 260: ...n the specified resource are removed Notes Unlike the IncludeFeature install command the IncludeFeature remove command does not set any defaults and it is not directly related to the job to which it i...

Page 261: ...ange 0 6 Default N A Format Integer Notes This ID must be specified It indicates the resource from which the desired object is to be removed There is no way to specify all resources If a IncludeFeatur...

Page 262: ...font permanent and Retain Temporary is not set then those objects are removed from the disk when the job completes A downloaded font can only be accessed by its ID if the font is stored in the current...

Page 263: ...sed for default font selection Selecting a bound bitmap font overrides the default settings for symbol set and point size An unbound font uses the specified default symbol set if possible while a scal...

Page 264: ...set name Purpose Specifies the default symbol set for the emulation Notes This command specifies the default symbol set Not all symbol sets are available with certain resident fonts In particular the...

Page 265: ...1 zapf dingbats100 iso 25 zapf dingbats200 iso 57 zapf dingbats300 Default N A Format Character Syntax IncludeFeature criscrlf value Purpose Controls the default line termination mode the ESC k G comm...

Page 266: ...ing table shows the criscrlf lfiscrlf commands and the corresponding PCL Line Termination command parameters LFISCRLF CRISCRLF PCL Code Comments Off Off 0 CR CR LF LF FF FF On Off 2 CR CR LF CR LF FF...

Page 267: ...cintosh listings usually require the third setting lfiscrlf Off criscrlf On Note that the FF becomes a CR FF when the LF is a CR LF Syntax IncludeFeature linesperinch x 100 Purpose Sets the default PC...

Page 268: ...t settings of all available CCITT commands Accessing CCITT Emulation To access CCITT emulation include the following QMS Document Option Commands DOC to the beginning of each data stream IncludeFeatur...

Page 269: ...ge in pixels Default None Notes This command must be used in order to decompress an image This command must be sent before the ImageData command If it is not the image is ignored Function Sets the ima...

Page 270: ...rs about the origin 0 0 Any rotation except 0 about the default image position 0 0 causes the image to be rotated off the page Therefore any rotation other than 0 must coincide with a ImagePosition co...

Page 271: ...ach aligned on a byte boundary Syntax EBAMode true false true Indicates that the data is encoded byte aligned false Indicates that the data is not encoded byte aligned Default false Function Causes th...

Page 272: ...resolution will reduce the image while DPI resolutions below the original scanned resolution will enlarge the image Syntax DPI horizontal vertical horizontal vertical Default Currently selected engine...

Page 273: ...include this command for a page to be printed Syntax PageEnd Default None no options Notes You must include this command for a page to be printed Image data must be included after this command Functio...

Page 274: ......

Page 275: ...D Sessions In This Chapter n Sessions commands...

Page 276: ...inter description languages subjobs can be combined in a single session that maintains global features such as duplex mode copy count document layout and collation A session also gives you the flexibi...

Page 277: ...ork interfaces on QMS Crown printers at this time It is not supported for jobs submitted through any other interface LocalTalk parallel or serial Use of the Session command in print jobs submitted ove...

Page 278: ...n Session Command Since each subjob may use a different end of subjob argument the Session command sequence must be inserted at the begin ning of each subjob to specify the end of subjob argument for...

Page 279: ...s It may not contain ASCII spaces carriage return or line feed A delimiter of null means ignore the delimiter string terminator The maximum value of the delimiter string is 32 bytes or characters Note...

Page 280: ...command is encountered the printer pro cesses all of the data up to the end of that subjob Once the subjob terminates and more data arrives from the host computer the printer checks again to see if t...

Page 281: ...ude all white space and forms control characters inserted by the host system in the byte count End by Delimiter String Example To group the three subjobs in the following example into a document using...

Page 282: ...the following example This is what ignore means in the definition of length described earlier in this appendix Also in the following example at define 2nd subjob boundary the Session 0 7213 is the rea...

Page 283: ...subjobs to use the same layout features A layout may be specified once for an entire document or altered for individual subjobs using the newlayout command Collation Range Collation range is a group...

Page 284: ...point on n Indicate that a new collation range is to take effect from this point on This com mand is intended for use when multiple small documents are combined into a sin gle print job in order to co...

Page 285: ...y the previous subjob See the Collation Range definition earlier in this section collate Create a new collation range but retain the same layout and document formatting options that were in effect wit...

Page 286: ...b will replace the previous values of these settings inherited from the previous subjobs All other settings inherited from the previous subjobs in the document remain unchanged This setting is a combi...

Page 287: ...E Notices In This Chapter n Manual notices n Laser safety n FCC compliance n International notices n Colophon...

Page 288: ...of the equipment when so operated Laser Safety This printer is certified as a Class 1 laser product under the U S Department of Health and Human Services DHHS Radiation Perfor mance Standard according...

Page 289: ...nician for help Note A shielded cable is required to comply with the limits for a Class B digital device pursuant to Part 15 of the FCC rules O Caution Any modifications or changes to this product not...

Page 290: ...Produkt in bereinstimmung mit Postordnung 1046 1984 ist und RFI unterdr ckt ist Die Gesch ftslage und der Verkauf diese Ger te auszuprobieren mit der bereinstimmung und der Regierung zu best tigen wur...

Page 291: ...Tech nology regulation Vfg 1046 1984 Your printer complies with the Electronics Emissions Requirements of the European Economic Council directive 82 499 EEC Colophon This manual was written and format...

Page 292: ......

Page 293: ...F Configuration Menu In This Chapter n Menu Diagrams...

Page 294: ...putbin Chain Inputs Manual Feed Size Def Duplex Tumble Duplex Operator Control Administration Disk Operations Take printer offline then by pressing press Operator Control Install Option Remove Option...

Page 295: ...e Pen Width Pen Color Pen 1 8 HP GL Font Point Sz 100ths Character Map Line Numbering Tab Stops LF is CRLF CR is CRLF FF is CRLF Orientation Autowrap Lines Per Page Left Right Top Bottom Margins LineP...

Page 296: ...Menu Diagrams QMS 1725 SLS Print System User s Guide F 4 v...

Page 297: ...people perform a certain type of work for example word processing page layout programming graphics and spreadsheets Adobe Illustrator Excel and Word are applications ASCII An acronym for American Sta...

Page 298: ...s called a byte which consists of 8 bits See also ASCII byte Bitmap A grid composed of small dots used to define an image line drawing or character See also raster graphics Bitmapped Font A bitmapped...

Page 299: ...erform frequently used operations four LEDs light emitting diodes that identify various printer status information and an LCD liquid crystal display message window that provides status information ad...

Page 300: ...llows the printer to respond to commands intended for a different type of printer For example when the printer is set for HP PCL emulation it responds to the same commands HP PCL that a Hewlett Packar...

Page 301: ...in an application See also default Flash ROM Quick loading reprogrammable memory that holds information such as system code and downloadable emulations evenwhen the printer is turned off The chief ad...

Page 302: ...onts and emulations and for spooled data thus providing virtual memory capabilities You can add an internal hard disk and up to three external hard disks to your QMS 1725 SLS Print System Header Page...

Page 303: ...e and software constraints the amount of memory available for the full page frame buffer Interface The place where two devices are physically connected allowing them to communicate Interface Cable A s...

Page 304: ...for printed output Memory The space within your printer where information is stored while being actively worked on The term applies to internal storage space as opposed to external storage such as di...

Page 305: ...t when the printer loses power Null Modem A cable configuration used for serial communication This cable arranges the communication between two devices NV RAM This protected form of RAM is used to sto...

Page 306: ...r follows in its journey through the printer it begins at the paper cassette or tray pickup point and ends at the output tray Parallel Interface A data transmission technique that sends each bit simul...

Page 307: ...plemented in your printer through a QMS developed PostScript emulation PostScript Level 2 emulation is the native language of your printer s controller It describes text graphics and page images to th...

Page 308: ...m Access Memory the memory your printer uses to perform tasks It can be written to and read from Once a task is complete the memory is free again to be used for another file This memory is volatile so...

Page 309: ...memory also called internal fonts Resolution A measurement of the dots per inch dpi in output material either printed or visual as in a high resolution monitor Your printer features a 300x300 and 600...

Page 310: ...ws up to three external hard disks to be connected to your printer See also IDE Security Card A module the size of a credit card that allows you to set passwords for the Operator Control and Administr...

Page 311: ...hich information can be kept There are three main types of storage ROM RAM and hard disks ROM stores read only data RAM represents temporary storage and hard disks hold information on a more permanent...

Page 312: ...tion film commonly used for presentations Typeface The basic printed design of characters in a font For instance Courier and Times typefaces each print characters of different designs Typeface Family...

Page 313: ...XON XOFF Glossary G 17 XON XOFF Control characters used for flow control in data transmission v...

Page 314: ......

Page 315: ...Alignment ANSI ASCII symbol set HP GL 7 10 Anti static teeth 5 6 AppleTalk G 1 See LocalTalk Application G 1 Configuration printer 2 2 ASCII G 1 Automatic Jam Recovery 1 10 Autowrap menu Lineprinter...

Page 316: ...ort 6 8 Settings 3 21 Testing Macintosh 6 12 Testing parallel port 6 6 Communications submenu 2 16 Compile Ahead Technology 1 8 Compressed Data Formats 1 10 CompuServe A 3 Configuration Application vi...

Page 317: ...s Start menu 2 46 DOC C 4 Document Finishing DOC D 10 Header page commands C 2 HP PCL 5 emulation commands C 3 HP GL emulation commands C 2 Lineprinter emulation commands C 3 PCL 4 emulation commands...

Page 318: ...2 61 Vertical Offset menu 2 59 Enhanced Mode menu HP GL 2 37 Envelope Formatting data 3 10 Printing 3 10 Selection 8 3 Single print 3 10 Specifications 3 10 B 5 B 6 Envelope feeder 8 3 Installing 8 3...

Page 319: ...Device numbers 2 64 8 42 Disk Operations menu 2 64 Error messages 2 65 Expandability 1 12 External B 7 Formatting 2 65 IDE board B 7 Identifying 2 64 8 42 Internal 8 38 B 7 SCSI B 7 Hardware flow con...

Page 320: ...3 Cards 8 18 Duplexer assembly 8 7 Emulation cards 8 11 Envelope feeder 8 3 Font cards 8 11 Internal hard disk 8 39 Network interface 8 30 Options 8 14 RAM expansion 8 26 SIMMs 8 26 Toner cartridge 5...

Page 321: ...Autowrap menu 2 41 Character Map menu 2 40 CR is CRLF menu 2 41 DOC C 3 FF is CRFF menu 2 41 Font menu 2 39 LF is CRLF menu 2 40 Line Numbering menu 2 40 Lines per Page menu 2 42 Margins menu 2 42 Or...

Page 322: ...enu name Menu key 1 17 2 5 Message window 1 15 Language changing 2 11 2 63 Messages 6 2 Service 6 2 Min K Spool menu LocalTalk 2 28 Parallel 2 24 Serial 2 18 mode command DOS 6 8 Mode menu LocalTalk 1...

Page 323: ...communication 6 6 Parity Errors ignore 2 20 Menu 2 20 Serial 2 20 Password Administration 2 67 Invalid 2 68 Using 2 68 PC System software updating 8 43 Testing parallel port 6 6 Updating print system...

Page 324: ...s 4 4 Print quality problems See Printer errors Print resolution 4 5 Gray levels 4 5 Printable area Table of 3 4 Printer All pages don t print 6 24 Blank pages 6 24 Care 5 5 Cleaning 5 6 Electrical re...

Page 325: ...g 2 60 4 2 Resource C 6 Retain Temporary menu PCL5 2 32 Reverse Image menu HP GL 2 37 ROM 2 49 Roman Extensions symbol set HP GL 7 10 S Sans serif typefaces 7 3 Scalable font 7 5 G 14 Scalable Fonts m...

Page 326: ...ailer Inputbin menu 2 45 Trailer Pages menu 2 44 Special Symbols symbol set HP GL 7 10 Specifications Controller B 3 Duty cycle B 2 Emulations B 3 Memory B 3 Ozone density B 4 Print engine B 2 Print M...

Page 327: ...2 17 Job Timeout menu 2 17 PostScript 2 16 Settings 3 21 Spooling 2 19 Toner Cartridge Care 5 3 Installation 5 3 Model EP B B 2 Replacing 5 2 Toner out action 2 61 Toner Out Act menu 2 61 Trailer Inp...

Page 328: ...ndom Access Memory 1 11 Using the EOD commands 3 15 V Vendor Labels B 7 Paper B 7 Transparencies B 7 Vertical Offset menu 2 59 Virtual disk 2 49 W Waiting for idle Status message 6 3 Waiting on input...

Reviews: